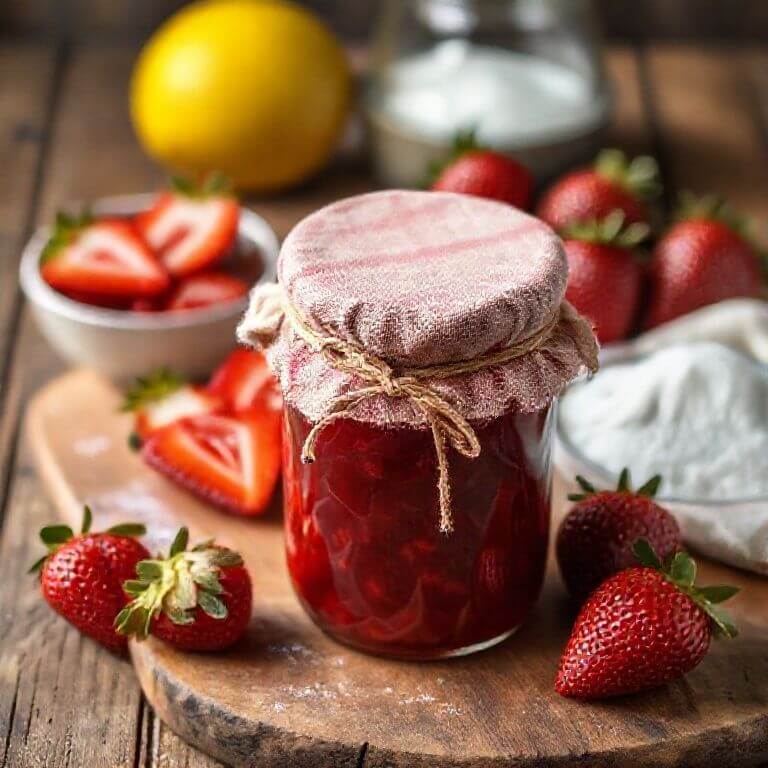
Let’s be honest—there’s nothing quite like the smell of strawberries bubbling gently on your stove. That sweet, tangy aroma can instantly bring back cherished memories of summer days and family kitchens. If you’ve ever thought, “I’d love to try making jam, but isn’t it a huge fuss?” you’re in good company!
The good news is, making a fresh, delicious strawberry jam at home is much easier than you might imagine—no fancy gadgets, no canning, and absolutely no stress. With this small-batch recipe, you can turn a handful of strawberries into pure homemade joy in just a matter of minutes. It’s fun, rewarding, and perfect for sharing with loved ones—or simply savoring yourself, one spoonful at a time.
Making jam at home doesn’t have to be an all-day affair. This simple method is perfect for using up a pint of berries from the market or your garden. It’s a wonderful way to enjoy the classic taste of homemade jam on your morning toast, swirled into yogurt, or even as a thoughtful gift for a friend.
Why Small-Batch Strawberry Jam is a Game Changer
If you’ve ever tried making jam the old-fashioned way—standing over a steamy kitchen, watching a giant pot bubble away, worrying if you’ve used too much sugar or if it’ll set—you know how overwhelming it can feel. I still remember my first attempt years ago; my hands were sticky, I hovered with a thermometer, and the end result? More like strawberry syrup than jam!
Maybe you’ve had a batch that never thickened, or one so sweet you could barely taste the fruit. And the canning process? All those special jars and tongs can seem like a production worthy of its own TV show.
That’s exactly why I fell in love with small-batch jam: you just need a few handfuls of berries, a regular saucepan, and a little patience.
Suddenly, jam-making is relaxed and approachable—something you can do on a quiet afternoon, or even on a whim when you find a basket of ripe strawberries at the store. There’s no pressure and no waste, just a jar or two of the freshest, most flavorful jam, ready in a flash.
This easy version solves all those common problems. You only need three simple ingredients that you likely already have. The jam thickens beautifully on its own, cooks in about 15 minutes, and develops a perfect, glossy consistency without any fuss. It’s a recipe designed for success, giving you all the joy of homemade jam without the headache.
Ingredients and Equipment You’ll Need For Strawberry Jam
Before you start, gather these simple ingredients and tools. Having everything at arm’s reach makes jam-making even more enjoyable!
Ingredients:
1 pound (about 2 heaping cups) fresh strawberries (you can use frozen if fresh aren’t available)
1 cup granulated sugar (adjust to taste)
1–2 tablespoons fresh lemon juice (plus a little zest if you like)
Optional Flavor Add-Ins:
1 teaspoon vanilla extract or seeds from half a vanilla bean
Step-by-Step: Your Guide to Perfect Strawberry Jam
Let’s walk through it together—nothing fancy, promise! Here’s how you can make a batch of jam you’ll be proud to share (or keep for yourself):
Step 1: Prep the Strawberries
Give your strawberries a good rinse and take off the green tops—no need to be fussy; I usually just use a small knife.
Chop them up however you like. If you’re after a smoother jam, go ahead and mash them a bit with a fork or potato masher. Sometimes I leave a few juicy chunks because they look so inviting on toast.
Step 2: Add Sugar and Lemon
Toss your strawberries into a wide pan. Sprinkle over the sugar and drizzle in the lemon juice. Give it all a gentle stir—just enough to combine everything.
Then let it sit for about 10 minutes so the berries start to release all those gorgeous juices. (It’s worth peeking—a little taste at this stage is always tempting!)
Step 3: Cook the Jam
Put your pan on the stove over medium heat. As the mixture warms up, keep stirring every so often; you don’t want anything sticking.
When it starts to simmer, you might see a bit of foamy stuff on top—no stress, you can scoop that off if you want, or skip it altogether.
Step 4: Check for Doneness
After 10 to 15 minutes, your jam should be looking thicker and nice and glossy. Here’s what I do to check if it’s ready:
Take a spoon and see if the back of it is coated in jam. If so, you’re on the right track!
Try dragging your spatula across the bottom of the pan. If the trail holds for a second, you’re almost there.
My favorite test: Pop a small plate in the freezer before you start. Drop a bit of hot jam on it, let it chill for a minute, then give it a gentle nudge with your finger. If it wrinkles a bit, you’ve nailed it!
Step 5: Cool and Store
Remove the pan from the heat and, if you can resist, let it cool for a few minutes. Carefully ladle the jam into a clean jar (the kitchen will smell amazing at this point).
Leave it to cool on the counter, then pop a lid on and get it straight into the fridge.
And that’s all there is to it! No need for thermometers, special jars, or a long afternoon standing by the stove. Just small-batch, homemade strawberry jam—made with love.
Once you’ve nailed the basic recipe, the real fun begins—this is where you can start putting your own spin on things! Over the years, I’ve experimented with lots of different add-ins, and some of them have become family favorites.
These little tweaks can turn your jam into something truly special, perfect for pairing with more than just toast.
Here are a few tasty directions to try—don’t be afraid to play and see what your crowd loves most:
Strawberry Vanilla Jam: Try adding a splash of vanilla extract or scrape in the seeds from a vanilla bean at the end of cooking. My grandkids love this one drizzled over warm pancakes on Sunday mornings.
Strawberry Basil Jam: Add a handful of finely chopped fresh basil leaves right at the end. This is especially wonderful served with soft goat cheese on crackers—perfect for a casual get-together.
Strawberry Balsamic Jam: Stir in a teaspoon of good-quality balsamic vinegar for a grown-up flavor. I keep a jar of this in the fridge for cheese boards or to spoon on grilled chicken—trust me, it’s a conversation starter!
Spicy Strawberry Jam: If you like a hint of heat, toss in a pinch of red pepper flakes with your other ingredients. This one’s great with sharp cheddar or as a surprising twist in a turkey sandwich.
There’s no right or wrong here—some of my best batches have come from trying something new on a whim. If you stumble on a winning combo, jot it down for next time or share it with friends over coffee.
Strawberry Vanilla Jam: Add a splash of vanilla extract or the seeds from a vanilla bean at the end of cooking for a warm, comforting flavor.
Strawberry Basil Jam: For a sophisticated, savory twist, stir in a few finely chopped fresh basil leaves during the last minute of cooking. This is wonderful with cheese.
Strawberry Balsamic Jam: A teaspoon of good-quality balsamic vinegar added with the sugar creates a rich, complex flavor that pairs beautifully with goat cheese.
Spicy Strawberry Jam: Like a little kick? Add a pinch of red pepper flakes with the other ingredients for a delightful sweet-and-spicy combination.
Strawberry Jam: Dietary-Friendly Options
What I really love about this recipe is how easy it is to adapt, whether you’re watching your sugar, avoiding certain ingredients, or cooking for friends and family with special diets. Over the years, I’ve made batches to suit just about everyone who’s come to the table—so don’t be afraid to experiment and make it your own! Maybe you’re looking to cut back on sugar, or you want something that’s vegan or safe for guests with allergies—this jam has you covered.
Low-Sugar Jam: You can reduce the sugar, but keep in mind this may result in a slightly thinner jam. The jam will also not keep as long, so plan to use it within a week.
Sugar-Free Jam with Chia: For a completely sugar-free option, you can skip the sugar and stir in a tablespoon of chia seeds at the end of cooking. The chia seeds will gel and thicken the jam beautifully.
Vegan-Friendly: This recipe is naturally vegan!
Allergy-Friendly: It’s also free of gluten, nuts, and dairy, making it a safe and delicious treat for almost anyone.
Strawberry Jam: Storing Your Homemade Treasure
Since this jam skips the hassle of traditional canning, it’s happiest and freshest when kept in the fridge. I always make sure to use a clean jar and a tight-fitting lid—little steps that really help keep your jam tasting bright for longer. I
f you’re not planning to eat it all right away (though in my house, a jar rarely lasts more than a week or two!), I suggest splitting it into a couple of smaller jars. That way, you only open what you need, keeping the rest undisturbed and fresh.
And here’s a trick I love: when strawberry season is in full swing, I make an extra batch (or two) and freeze it in small containers. Just remember to leave a little space at the top for expansion. On a chilly winter morning, pulling out that homemade jam is like getting a taste of sunshine—my grandchildren always say it’s just as good as the day we made it!
Refrigerator: It will last for up to two weeks in a clean, airtight jar.
Freezer: You can also freeze it! Let the jam cool completely, then store it in a freezer-safe jar or container, leaving a little space at the top for expansion. It will keep well for up to three months. Simply thaw it in the refrigerator when you’re ready to use it.
Delicious Ways to Enjoy Your Strawberry Jam
Honestly, dipping into your homemade jam is pure joy! Sure, it’s unbeatable on buttered toast, but over the years, I’ve found all sorts of delightful ways to enjoy it. On Saturday mornings, I love spooning it over a stack of pancakes fresh off the griddle—my family always asks for seconds.
Sometimes, I swirl a dollop into my Greek yogurt or warm oatmeal for a burst of berry brightness. If you like to bake, try using it as a filling between cake layers or even tucked inside cupcakes; it adds a nostalgic, homemade touch that everyone raves about. For special gatherings, I’ll layer it in parfaits with granola and a bit of whipped cream—so easy, yet it looks beautiful in a glass.
And don’t forget the cheese board—a little jar of strawberry jam alongside sharp cheddar or goat cheese is a conversation starter at any get-together. My personal guilty pleasure? A scoop of vanilla ice cream topped with jam—simple, sweet, and full of summer memories, any time of year.
Spoon it over pancakes, waffles, or French toast.
Swirl it into a bowl of plain yogurt or oatmeal.
Use it as a filling for cakes and cupcakes.
Layer it in a parfait with granola and cream.
Serve it on a cheeseboard with crackers.
Top a bowl of vanilla ice cream for a simple dessert.
Frequently Asked Questions About Strawberry Jam
Q: Why didn’t my jam thicken? No worries—this is probably the most common jam question I get from friends! If your jam is still a little too runny, chances are it just needs a few more minutes on the stove. Pop it back in the pan and let it bubble gently for a bit longer, stirring as you go. And remember, it thickens up quite a lot as it cools, so don’t panic if it looks thin when it’s hot. You’ve got this!
Q: Can I use frozen strawberries? A: Absolutely. You don’t need to thaw them first. Just put them in the pan and know that it might take a few extra minutes for the mixture to come to a simmer.
Q: Can I double the recipe? A: It’s best to stick to a small batch. Doubling the recipe changes the cooking time and can make it harder for the jam to thicken properly. It’s quick enough to make two separate small batches if you need more.
Q: How do I know when the jam is done? A: The jam will become glossy and visibly thicker. The test on a cold plate is the most reliable method—if a drop of jam wrinkles when pushed, it’s ready.
The Freshest Strawberry Jam You Can Make at Home
Making jam at home is more than just a recipe—it’s a little act of joy, a way to slow down, savor the simple things, and make something special with your own hands. I hope this strawberry jam fills your kitchen with sweet memories and gives you the confidence to keep exploring new flavors.
If you decide to give it a try, I’d truly love to hear how it goes for you! Did you try a fun twist? Was it your first time making jam? Share your stories, tips, or even a photo in the comments below. Most of all, enjoy every spoonful—you’ve earned it!
Want just the essential recipe details without scrolling through the article? Get our printable recipe card with just the ingredients and instructions.
Disclosure: This post may contain affiliate links.
If you make a purchase through these links, I may earn
a small commission at no extra cost to you.
prab chahal
Hi, I’m Prabjot Chahal – the heart (and taste buds) behind this blog!
Food has always been my love language – from experimenting with family recipes to discovering unique flavors from around the world. I believe that cooking isn’t just about following a recipe, it’s about creating moments, sharing stories, and connecting with others over something delicious. Through this blog, I want to build a vibrant food community where we share more than just recipes – we share inspiration, tips, and the joy of making and enjoying good food together. Whether you’re here for quick weekday dinners, festive treats, or creative seasonal ideas, you’re part of this table. So grab a fork (or a whisk!) and let’s cook, bake, and share our love for food – one recipe at a time.