You want a cookie that tastes like childhood, takes less time than scrolling TikTok, and dirties exactly one bowl? Meet 3-ingredient peanut butter cookies. They’re ridiculously simple, gloriously peanut-buttery, and totally unfussy. No chill time, no mixer drama, no “cream until light and fluffy” instructions. Just mix, scoop, bake, brag.
You only need three pantry staples, and you probably already have them. The dough comes together in under 2 minutes, and the cookies bake in about 10. That’s faster than setting an out-of-office email, FYI. These cookies hit that chewy-soft center with crisp edges—like a peanut butter hug with a tiny crunch. Plus they’re naturally gluten-free (no flour!), which feels like a life hack you didn’t know you needed.
The Big Three: What You Need
Ingredients:
1 cup peanut butter (creamy or crunchy both work)
3/4 to 1 cup granulated sugar (sweetness to taste)
1 large egg
Tools:
Mixing bowl + spoon
Baking sheet + parchment
Fork (for the classic crisscross)
Choosing the Right Peanut Butter
Not all jars behave the same. Conventional peanut butter (think Jif/Skippy) gives you the most consistent texture. Natural peanut butter (the stir kind) works too, but the dough runs softer. If you go natural, stir it really well and consider adding 1-2 tablespoons more sugar to help it set.
How to Make Them (Like, Right Now)
Heat your oven to 350°F (175°C). Line a baking sheet.
Stir together peanut butter, sugar, and egg until smooth and glossy.
Scoop 1-tablespoon mounds. Roll into balls if you want prettier edges.
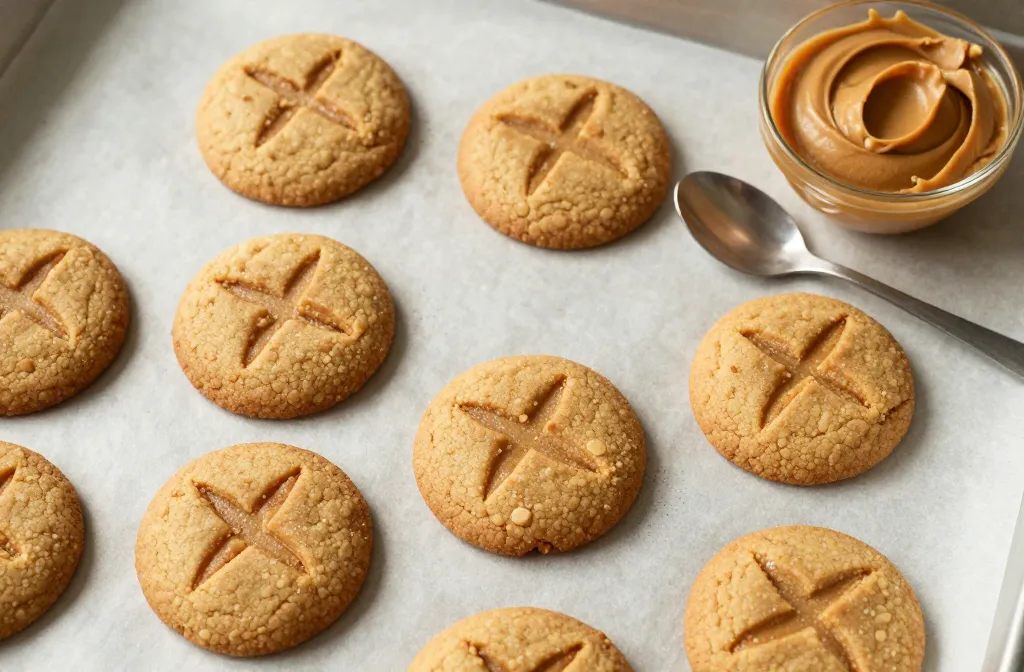
Press each ball with a fork in a crisscross pattern to flatten to about 1/2 inch thick.
Bake 8–10 minutes until edges set and centers look slightly soft. They’ll firm up as they cool.
Cool on the sheet 5 minutes, then transfer to a rack. Try to wait at least 3 minutes before “taste-testing.”
Visual Cues You Can Trust
Edges look matte, not shiny.
Centers puff slightly and deflate as they cool.
If the bottoms turn deep brown, you went too far. Aim for light golden.
Make Them Your Own (Without Ruining the 3-Ingredient Flex)
Yes, the beauty is in the simplicity, but we love a little flair. Choose one of these and keep it chill:
Ingredient Swaps
Peanut butter: Swap for almond or cashew butter. It changes the flavor (duh), but the texture still works.
Sugar: Use light brown sugar for a caramel vibe and extra chew. Coconut sugar works too, slightly sandier but delish.
Egg-free: Replace the egg with 3 tablespoons aquafaba (the liquid from a can of chickpeas). Beat lightly until foamy first.
Flavor Boosts (Optional, but Worth It)
Vanilla: 1 teaspoon makes them taste like a bakery cookie.
Salt: A pinch in the dough + flaky salt on top = chef’s kiss.
Chocolate: Press a chocolate chunk into each cookie right after baking.
Cinnamon + sugar: Roll the dough balls in it before crisscrossing for a PB snickerdoodle situation.
Tips for Best Results
Don’t overbake. Pull them when they look a tad underdone in the middle. Overbaking = dry and crumbly. We want tender.
Chill if sticky. If your dough feels oily or loose (hi, natural PB), chill it for 15 minutes.
Size matters. Tablespoon scoops bake evenly. Bigger cookies need 1–2 extra minutes and a longer cool-down.
Fork pattern. The crisscross isn’t just cute—it flattens the cookie for even baking. Press gently.
Warm sheet = spread city. Use a cool sheet for the second batch to avoid puddle-cookies.
Troubleshooting: What Went Wrong?
Cookies spread too much? Your peanut butter had extra oil. Stir thoroughly and chill the dough a bit. You can also sprinkle in a tablespoon of cornstarch for insurance. Crumbling when you pick them up? You baked a smidge too long or measured sugar heavy. Let them cool longer on the sheet and try 1–2 teaspoons water in the next batch to add moisture. Not sweet enough or too sweet? Adjust sugar from 3/4 to 1 cup next time. IMO, 7/8 cup hits the sweet spot if you’re picky.
Texture Tweaks
Softer/chewier: Use brown sugar, underbake by 30 seconds, and cool on the sheet longer.
Crispier: Flatten thinner and bake to 10 minutes, watching closely.
Serving, Storing, and Freezing
Eat them warm because you’re human. But also plan ahead.
Room temp: Store in an airtight container for 3–4 days. Slip in a slice of bread to keep them soft (old-school trick that works).
Freeze dough: Scoop and crisscross, then freeze on a sheet. Once solid, bag them. Bake from frozen at 350°F for 10–12 minutes.
Freeze baked: Cool completely, freeze in layers with parchment. Thaw at room temp or microwave 10–15 seconds.
Fun Serving Ideas
Make PB&J cookie sandwiches with a smear of jam.
Dip half in melted chocolate and sprinkle with crushed peanuts.
Top warm cookies with vanilla ice cream. No notes.
FAQ
Can I use natural peanut butter?
Yes, and they’ll still be great. Stir the jar very well to reincorporate the oil, and consider chilling the dough if it feels loose. A tablespoon more sugar helps structure too.
Nope. The egg binds, the sugar sweetens and tenderizes, and the peanut butter brings fat and protein. The chemistry works without leaveners. Magic? Kind of.
How do I make them less sweet?
Drop the sugar to 3/4 cup and add a pinch of salt. You can also roll them in chopped peanuts instead of sugar for texture without extra sweetness.
Can I make them vegan?
Use 3 tablespoons aquafaba (chickpea liquid) instead of the egg. Whisk it until slightly foamy before mixing. Bake times stay about the same.
Why did my cookies crack?
A little cracking is normal and cute. Excessive cracking can mean slightly dry dough or overbaking. Try pulling them earlier and letting them finish on the sheet.
Can I double the recipe?
Absolutely. Mix gently and rotate your baking sheets halfway through for even browning. Also, hide half the batch if you live with other humans. FYI.
Final Thoughts
These 3-ingredient peanut butter cookies deliver maximum payoff with minimal effort—like the sweatpants of desserts, but make it chic. You mix, you crisscross, you bake, you feel like a wizard. Keep a jar of PB on deck, and you’ll never be more than 15 minutes away from warm, chewy cookie bliss. IMO, that’s what we call a life skill.
Printable Recipe Card
Want just the essential recipe details without scrolling through the article? Get our printable recipe card with just the ingredients and instructions.
Disclosure: This post may contain affiliate links.
If you make a purchase through these links, I may earn
a small commission at no extra cost to you.
prab chahal
Hi, I’m Prabjot Chahal – the heart (and taste buds) behind this blog!
Food has always been my love language – from experimenting with family recipes to discovering unique flavors from around the world. I believe that cooking isn’t just about following a recipe, it’s about creating moments, sharing stories, and connecting with others over something delicious. Through this blog, I want to build a vibrant food community where we share more than just recipes – we share inspiration, tips, and the joy of making and enjoying good food together. Whether you’re here for quick weekday dinners, festive treats, or creative seasonal ideas, you’re part of this table. So grab a fork (or a whisk!) and let’s cook, bake, and share our love for food – one recipe at a time.


")
")


")