Nothing beats the simple joy of baking these mini red velvet bundt cakes on a lazy Sunday afternoon. The first time I made them, I couldn’t help but marvel at how inviting my kitchen smelled—a mix of rich cocoa, sweet vanilla, and that signature touch of cream cheese glaze.
These cakes aren’t just a feast for the eyes; they bring people together, too. There’s something special about setting out a tray of these vibrant little cakes and watching friends and family instantly light up, each choosing their favorite drizzle or topping. Whether you’re celebrating something big or just making an ordinary day a little sweeter, these mini bundts make every moment feel a bit more memorable.
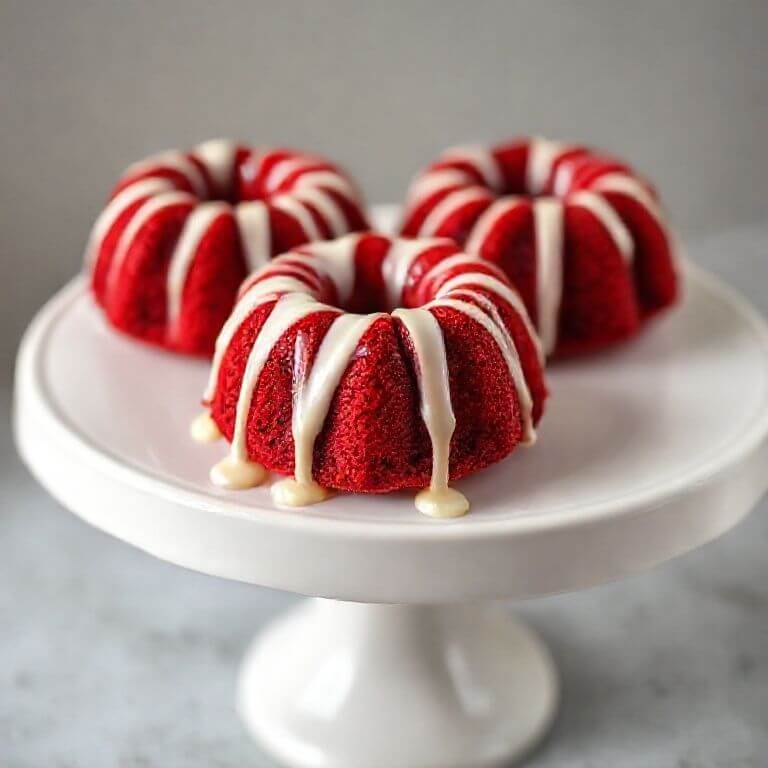
This easy red velvet recipe uses the same batter as a classic cake but transforms it into faster, cuter mini bundts. They are perfect for Valentine’s Day, birthdays, bridal showers, or simply elevating your dessert table. Get ready to impress everyone with these gorgeous little cakes.
Why Red Velvet Bundt Cakes are Better
Making a full-sized red velvet cake can sometimes lead to disappointment. Common issues include a dry crumb, an overpowering cocoa taste, or a bitter, artificial red color. Plus, decorating a large cake can feel intimidating. This recipe is designed to solve all those problems.
Our mini red velvet bundt cakes deliver a perfectly balanced cocoa and vanilla flavor with a vibrant red hue that isn’t bitter.
The smaller size ensures a faster, more even baking time, preventing dryness. Best of all, their elegant shape requires no complex decorating skills—a simple drizzle of glaze is all you need for a stunning finish.
Related Post: Red Velvet Cake: The Classic Dessert Everyone Loves
Red Velvet Bundt Cakes: Ingredient Breakdown
Understanding the role of each ingredient is the key to a flawless bake. Here’s a look at the science behind what makes these mini bundt cakes so special.
Flour: All-purpose flour provides the ideal structure for a tender yet stable crumb. Be careful not to overmix the batter to keep the cakes soft.
Cocoa Powder: Just a hint of cocoa powder gives these cakes their classic red velvet flavor without being overwhelming. Dutch-processed cocoa is a great choice for a smoother, deeper flavor.
Sugar: Beyond sweetness, sugar is crucial for keeping the cakes moist by locking in water. It also contributes to a lovely, subtle caramelization during baking.
Oil & Butter: This recipe uses a combination of oil for unparalleled moisture and butter for that rich, classic flavor. It’s the best of both worlds.
Buttermilk: This is the signature ingredient in any great red velvet recipe. Its acidity reacts with the cocoa powder and baking soda, creating an incredibly tender crumb and helping the red color develop.
Vinegar: A small amount of white vinegar reacts with the baking soda to create extra lift, resulting in an airy, light texture. It’s classic red velvet chemistry.
Eggs: Eggs provide essential structure, richness, and stability to the batter.
Red Food Coloring: Gel food coloring offers the most vibrant red color without adding excess liquid or a bitter taste. You can also explore natural alternatives like beet powder.
Cream Cheese Glaze: A simple, drizzly cream cheese glaze provides the perfect tangy and creamy finish, beautifully balancing the cake’s sweetness.
Related Post: Discover the ultimate red velvet cookies recipe
Red Velvet Bundt Cakes: Equipment You’ll Need
Before you start baking, gather these essentials to make the process smooth and enjoyable:
Step-by-Step: How to Make Mini Red Velvet Bundt Cakes
Follow these simple steps for perfect mini cakes every time.
Step 1: Prep Your Pans
Thoroughly grease your mini bundt molds with butter or non-stick spray. A light dusting of flour or cocoa powder will provide extra insurance against sticking.
Step 2: Mix the Dry Ingredients
In a medium bowl, whisk together the all-purpose flour, cocoa powder, baking soda, and salt.
Step 3: Mix the Wet Ingredients
In a separate large bowl, cream the sugar, oil, and softened butter together until light and fluffy. Beat in the eggs one at a time. In a small bowl, whisk together the buttermilk, vinegar, vanilla extract, and red food coloring.
Step 4: Combine Wet and Dry
Alternatively, add the dry ingredient mixture and the wet buttermilk mixture to the butter and sugar base, starting and ending with the dry ingredients. Fold gently until just combined—do not overmix.
Step 5: Fill the Mini Bundt Pans
Spoon or pipe the batter into your prepared pans, filling each mold about two-thirds full. This leaves enough room for the cakes to rise into their perfect shape.
Step 6: Bake
Bake at 350°F (175°C) for 15–20 minutes. The cakes are done when a toothpick inserted into the center comes out clean or with a few moist crumbs attached.
Step 7: Cool Completely
Let the cakes cool in the pan for about 10 minutes before carefully flipping them onto a wire rack to cool completely. Mini bundts are delicate, so handle them with care.
Step 8: Glaze and Decorate
Once the cakes are completely cool, drizzle them with the cream cheese glaze or melted white chocolate.
What Makes This Red Velvet Bundt Cakes Recipe So Moist & Velvety?
The secret to truly moist red velvet cakes lies in the ingredients and baking method. The combination of buttermilk and vinegar tenderizes the gluten, creating a soft, velvety crumb. Using oil ensures long-lasting moisture that butter alone can’t provide. Finally, the mini bundt shape allows for quick and even baking, which prevents the edges from drying out before the center is cooked.
How to achieve the perfect red color without bitterness: Use a high-quality gel food coloring. Gels are highly concentrated, so you need less of them, which avoids the bitter aftertaste that some liquid colorings can impart.
Red Velvet Bundt Cakes: Flavor Variations to Try
One of the best things about this recipe is its versatility. Use it as a base to explore fun and delicious variations.
Chocolate-Filled Bundts: Before baking, drop a small spoonful of chocolate ganache into the center of the batter in each mold.
Cream Cheese-Stuffed Bundts: Pipe a small amount of sweetened cream cheese filling into the center of the batter for a cheesecake-like surprise.
Red Velvet Oreo Bundts: Gently fold crushed Oreo cookies into the finished batter before baking.
Red Velvet Valentine Heart Bundts: Use heart-shaped mini molds for a festive treat perfect for Valentine’s Day.
Expert Tips for Perfect Red Velvet Bundt Cakes
Grease Your Molds Well: This is the most important step for clean removal. Use a pastry brush to get into every crevice of the mini bundt pan.
Tap to Remove Air Bubbles: After filling the pans, gently tap them on the counter a few times to release any trapped air bubbles for a smoother cake.
Don’t Overfill: Filling molds only two-thirds full prevents the batter from overflowing and ensures the classic bundt shape.
Cool Before Glazing: Always wait until the cakes are completely cool. A warm cake will cause the glaze to melt and run right off.
Red Velvet Bundt Cakes: Storage and Make-Ahead Guide
These cakes store wonderfully, making them a great make-ahead option.
Room Temperature: Store undecorated cakes in an airtight container for up to 3 days.
Refrigerator: Once glazed, store the cakes in an airtight container in the refrigerator for up to 5 days.
Freezer: Freeze undecorated cakes for up to 2 months. Wrap them tightly in plastic wrap and place them in a freezer-safe container. Thaw at room temperature before glazing and serving.
Red Velvet Bundt Cakes: Frequently Asked Questions
Q: Why did my mini bundt cakes stick to the pan? A: Sticking is usually caused by not greasing the pan thoroughly enough. Use softened butter or a baking spray and get into every nook of the mold. A light dusting of flour or cocoa powder also helps.
Q: Can I bake this batter as cupcakes? A: Absolutely! This batter makes excellent cupcakes. Line a muffin tin with paper liners and bake for 18-22 minutes, or until a toothpick comes out clean.
Q: Why is my red color dull? A: A dull color can result from using too little food coloring or an old product. Gel food colorings provide the most vibrant results. The acidity of the buttermilk also helps brighten the color.
Q: Can I use beetroot instead of food coloring? A: Yes, you can use beet puree or beet powder for a natural red color. Be aware that it may impart a subtle, earthy flavor and the color will be more of a deep magenta than a bright red.
Q: How do I keep the cakes moist for days? A: The key is the oil in the recipe and proper storage. Keep them in a well-sealed, airtight container to prevent them from drying out.
An Elegant Treat for Any Celebration
These mini red velvet bundt cakes are proof that show-stopping desserts don’t have to be complicated. They are moist, flavorful, and perfectly portioned for any occasion. Whether you’re celebrating a holiday or just satisfying a craving, this easy red velvet recipe is sure to become a favorite.
We’d love to see your creations! If you try this recipe, share a photo and tag us, or leave a comment below with your favorite variations.
Related Post: Red Velvet Mug Cake: Your 5-Minute Valentine (Because You Deserve It)
Printable Recipe Card
Want just the essential recipe details without scrolling through the article? Get our printable recipe card with just the ingredients and instructions.
Disclosure: This post may contain affiliate links.
If you make a purchase through these links, I may earn
a small commission at no extra cost to you.
prab chahal
Hi, I’m Prabjot Chahal – the heart (and taste buds) behind this blog!
Food has always been my love language – from experimenting with family recipes to discovering unique flavors from around the world. I believe that cooking isn’t just about following a recipe, it’s about creating moments, sharing stories, and connecting with others over something delicious. Through this blog, I want to build a vibrant food community where we share more than just recipes – we share inspiration, tips, and the joy of making and enjoying good food together. Whether you’re here for quick weekday dinners, festive treats, or creative seasonal ideas, you’re part of this table. So grab a fork (or a whisk!) and let’s cook, bake, and share our love for food – one recipe at a time.


")