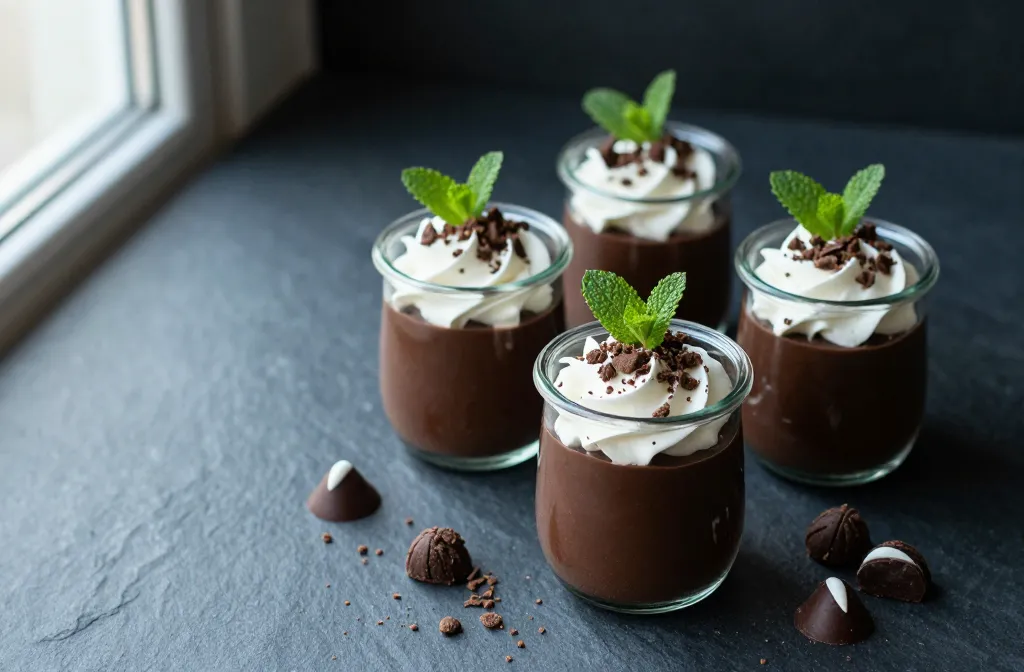
Mint chocolate pudding cups are the dessert equivalent of a wink. They look cute, taste decadent, and come together without making you cry over a sink full of dishes. If you love Thin Mints, Andes mints, or anything that smells like a candy cane factory crashed into a chocolate shop, you’re home. Let’s build a silky, minty, spoonable treat that feels fancy but takes almost no effort.
Why Mint + Chocolate Just Works
Mint wakes up chocolate the way espresso wakes up Monday. It cuts through richness, brightens every bite, and makes chilled desserts feel extra refreshing. The combo hits that sweet spot between indulgent and clean, so you get layers of flavor without cloying sweetness. Also, mint makes you feel like your dessert just brushed its teeth. Win-win.
The Silky Blueprint: What You’ll Need
You only need a handful of pantry staples to nail these pudding cups. Keep it simple or dress them up—your call.
Milk or cream: Whole milk gives body. Half-and-half or a 50/50 milk-cream blend brings extra decadence.
Cornstarch: Our thickener. It sets the pudding smooth, not gloopy.
Sugar: Just enough to sweeten without drowning the chocolate.
Salt: A pinch sharpens everything. Don’t skip it.
Egg yolks (optional but lovely): They add richness and a custard-like vibe.
Chocolate: Use chopped semisweet or dark (60–70% cocoa). The better the chocolate, the smoother the finish.
Butter: A little pat for shine and mouthfeel.
Peppermint extract: Start small. A few drops go a long way.
Vanilla: Rounds it out so the mint doesn’t taste like toothpaste.
Whipped cream + crushed chocolate mints: For topping and flexing.
Ingredient Swaps That Still Slap
Dairy-free: Use full-fat coconut milk or a creamy oat milk. Swap butter for coconut oil or vegan butter.
Refined sugar-free: Use maple syrup (reduce milk slightly) or coconut sugar. FYI, the color may darken.
No yolks: Increase cornstarch slightly or add a small knob of cream cheese at the end for body.
Mint intensity: Prefer subtle? Use a mint simple syrup instead of extract. Stronger? Add a few drops of crème de menthe.
Step-by-Step: From Pan to Cup
This isn’t a culinary obstacle course. You’ll whisk, simmer, and boom—pudding.
Whisk dry and wet: In a saucepan, whisk 1/3 cup sugar, 3 tablespoons cornstarch, and a pinch of salt. Add 2 cups milk (or 1 cup milk + 1 cup half-and-half) gradually, whisking until smooth.
Heat gently: Set over medium heat. Whisk constantly until it thickens and bubbles—about 5–7 minutes. Keep it moving to avoid lumps. If using yolks, temper them now (see below).
Temper yolks (optional but IMO worth it): Whisk 2 egg yolks in a bowl. Slowly stream in 1/2 cup of hot mixture while whisking. Return that to the pot and cook 1–2 minutes more.
Chocolate time: Remove from heat. Add 4–6 ounces chopped chocolate, 1 tablespoon butter, and 1 teaspoon vanilla. Stir until glossy and fully melted.
Mint moment: Add 1/4 to 1/2 teaspoon peppermint extract. Taste after a few drops. Adjust cautiously—mint gets loud fast.
Strain (pro move): Push pudding through a fine mesh sieve into a bowl. This makes it extra silky and removes any sneaky bits.
Chill properly: Divide into cups. Press plastic wrap directly onto the surface so no skin forms (unless you like the skin—no judgment). Chill 2–3 hours.
Tips for Best Results
Keep whisking: Constant motion prevents lumps and scorching.
Mind the mint: Add a little, taste, then add more. This is not the time for “measure with your heart.”
Use good chocolate: Bargain-bin chips contain stabilizers. Real chopped bars melt smoother.
Don’t boil forever: After thickening, give it a short bubble to activate cornstarch, then move on.
Serve chilled: The flavor settles and deepens in the fridge.
Flavor Upgrades and Fun Twists
We’re not here to be boring. Dress these cups up for parties, Netflix nights, or just because your Tuesday deserves it.
Mint-Triple-Chocolate Layers
Alternate layers of mint chocolate pudding with a quick chocolate cookie crumble. Repeat for dramatic effect. Top with whipped cream and a shard of chocolate. It looks bakery-level but takes 5 extra minutes.
Mocha Mint Vibes
Add 1–2 teaspoons instant espresso powder to the milk mixture. Coffee deepens the chocolate and makes the mint feel sophisticated. Like your pudding just put on a blazer.
Grasshopper Cheesecake Cups
Stir in 2–3 tablespoons of softened cream cheese to the hot pudding right after the chocolate melts. It tangles creamy tang with the mint, and yes, it slaps.
Holiday Glow-Up
Tint a small portion of the pudding pale green with gel food coloring. Swirl it into the dark pudding as you portion it. People will think you tried. You didn’t. That’s the magic.
Texture: How to Nail Luxuriously Smooth
Cornstarch thickens fast, which can lead to lumps if you blink. Keep your whisk going in lazy figure-eights and scrape the sides and corners of the pot. If you see a few streaks, don’t panic. Straining fixes nearly everything. Prefer firmer, almost-pot-de-crème vibes? Add an extra teaspoon of cornstarch or chill overnight. Want looser, silkier spoons? Use an extra splash of milk and stop cooking the second it thickens. You control the spoon drip. Power move.
Crushed peppermint: Sprinkle on top for crunch and color.
Andes mint shavings: Classic move, always applauded.
Fresh mint leaves: A leaf or two screams “I know what I’m doing.”
Chocolate curls: Drag a peeler along a chocolate bar. Instant drama.
Mini cups for parties: Shot-glass portions keep it cute and low-commitment.
Make-Ahead, Store, and Serve
You can make mint chocolate pudding cups up to 3 days ahead. Keep them covered in the fridge, especially if your fridge smells like last night’s garlic shrimp. Add toppings right before serving to keep the crunch lively. Serving for a crowd? Portion in small jars with lids. Stack them in the fridge like a dessert army. When it’s time, top, garnish, and bask in the praise.
Batching Tips
Double carefully: Use a wide pot so you can whisk evenly. Thicker volume = easier to scorch.
Chill faster: Spread pudding in a shallow pan first, then portion into cups once cool. FYI, this reduces condensation.
Transporting: Pop cups in a 9×13 pan, cover with foil, and go. Add toppings on site.
FAQ
Can I use cocoa powder instead of chocolate?
You can, but it changes the texture. Cocoa yields a lighter, less velvety pudding. If you go this route, sift 3–4 tablespoons cocoa with the cornstarch and add a touch more sugar and fat (a tablespoon of butter or a splash of cream) to compensate.
My pudding tastes like toothpaste. How do I fix it?
Too much extract happens to the best of us. Balance it with a little more vanilla and a pinch of extra salt. If you can, whisk in some warm plain chocolate ganache or a bit more base pudding without mint. Next time: add mint drop by drop and taste.
Can I skip the egg yolks?
Absolutely. The pudding still sets and tastes great. Without yolks, lean on an extra teaspoon of cornstarch or finish with a tablespoon of butter to keep it silky. IMO, yolks add that “pastry shop” feel, but you do you.
How do I prevent a skin from forming?
Press plastic wrap directly onto the pudding’s surface before chilling. If you forget, whisk a splash of milk into the top layer before serving. Or embrace the skin if you’re one of those chaotic-neutral dessert people.
Is peppermint the same as mint extract?
Not quite. Peppermint extract tastes sharper and more candy-cane classic. “Mint extract” can blend spearmint and peppermint, which reads softer. Use whichever you like, but start low and taste.
Can I make these gluten-free?
Yes. The pudding is naturally gluten-free as written. Just check your chocolate brand and toppings. If you add cookie crumbles, pick a gluten-free cookie.
Final Spoonful
Mint chocolate pudding cups bring big dessert energy with little effort. They’re cool, creamy, and customizable, and they make people weirdly excited about a humble spoon. Keep the mint measured, the chocolate quality high, and your whisk moving. Then enjoy that first silky scoop and try not to smile—if you can.
Disclosure: This post may contain affiliate links.
If you make a purchase through these links, I may earn
a small commission at no extra cost to you.
prab chahal
Hi, I’m Prabjot Chahal – the heart (and taste buds) behind this blog!
Food has always been my love language – from experimenting with family recipes to discovering unique flavors from around the world. I believe that cooking isn’t just about following a recipe, it’s about creating moments, sharing stories, and connecting with others over something delicious. Through this blog, I want to build a vibrant food community where we share more than just recipes – we share inspiration, tips, and the joy of making and enjoying good food together. Whether you’re here for quick weekday dinners, festive treats, or creative seasonal ideas, you’re part of this table. So grab a fork (or a whisk!) and let’s cook, bake, and share our love for food – one recipe at a time.


")
")