Let’s be honest for a second. Is there anything more comforting than the smell of garlic and butter sizzling in a pan? If potatoes are your love language, then prepare to fall head over heels for this recipe.
We aren’t talking about just any potatoes here. We are talking about golden nuggets of joy—crispy and savory on the outside, tender and creamy on the inside, and completely coated in a rich, garlicky glaze. The best part?
You don’t need a pile of mixing bowls or a degree in culinary arts to pull this off. This is the kind of recipe that saves weeknight dinners and steals the show at holiday feasts. It’s low effort, high reward, and basically a hug in food form.
Whether you’ve had a long day at work or you’re hosting friends and want to impress them without stressing out, these one-pan wonders are your answer. Let’s get cooking.
Why You’ll Love These Garlic Butter Potatoes
I know the internet is full of potato recipes. You can roast them, mash them, fry them, or boil them. But this stovetop method holds a special place in my heart (and soon, yours). Here is exactly why this recipe is about to become a staple in your weekly rotation:
One Pan, Minimal Cleanup: We all love cooking, but nobody loves the dishes that come after. By cooking everything in a single skillet, you save time on cleanup. You go from stove to table in the same vessel.
Crispy Outside, Fluffy Inside: To get that perfect contrast in texture, you usually have to parboil or deep fry the food. This method uses a smart steam-then-sear method to get the best of both worlds without any trouble.
Garlic Butter = Flavor Heaven: Is there a more famous pair? The garlic gives it that smell we all love, and the butter makes it richer. It’s easy to do, but it always works.
Budget-Friendly & Beginner-Friendly: You don’t need to buy expensive things. Potatoes are one of the cheapest things you can buy. The method is also forgiving enough for people who are just starting out.
Perfect for Every Occasion: These work just as well for a random Tuesday night as they do for Christmas dinner or Thanksgiving. They are elegant enough for guests but humble enough for a solo meal.
Ready in Under 25 Minutes: Oven roasting can take 45 minutes or more. This stovetop version cuts that time in half, making it perfect for when “hangry” strikes.
Works With Any Potato Variety: While baby potatoes are my favorite, you can adapt this for Yukon Golds, fingerlings, or even chopped Russets.
Naturally Gluten-Free: Serving guests with dietary restrictions? This side dish is naturally safe for gluten-free friends, making it a crowd-pleaser you don’t have to worry about.
Ingredients You Need For Garlic Butter Potatoes
The beauty of this dish lies in its simplicity. You don’t need a long grocery list, just a few high-quality staples. However, choosing the right type of ingredient can make a subtle but noticeable difference in the final result.
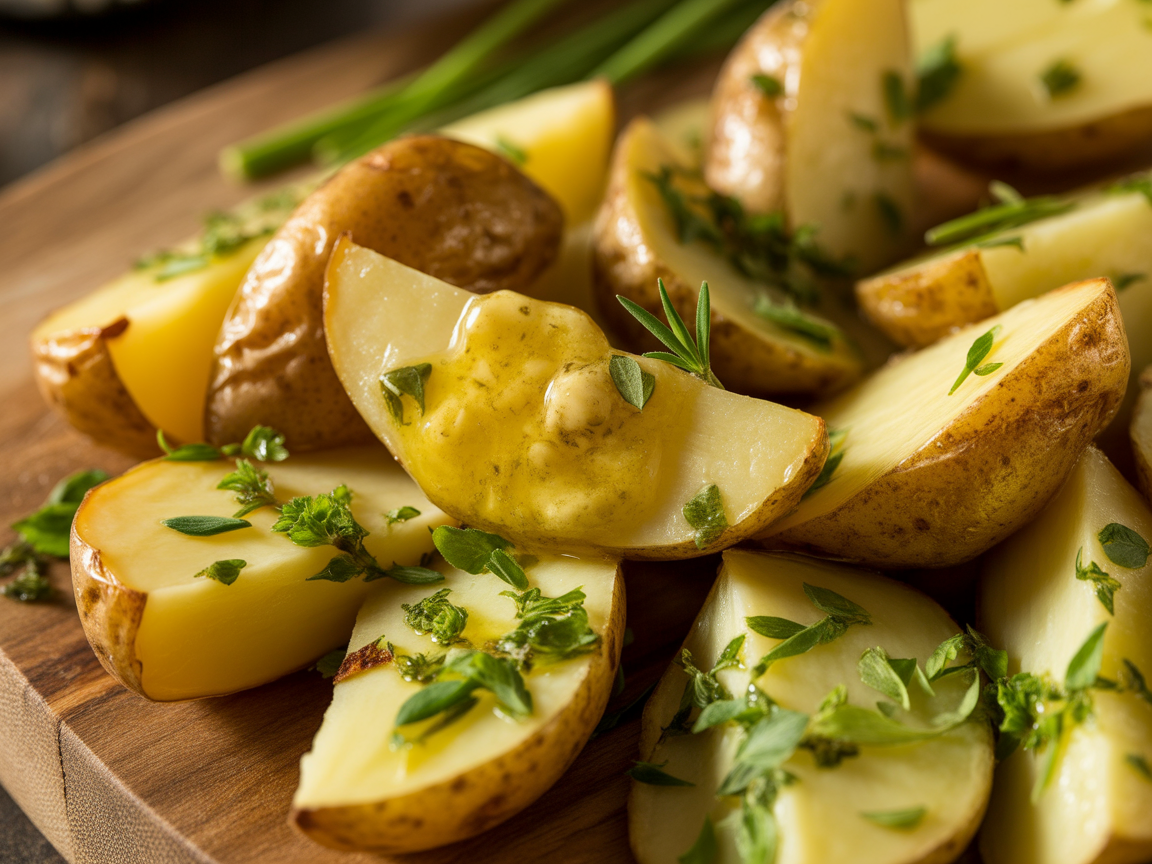
Baby Potatoes (1.5 lbs): I highly recommend yellow or red baby potatoes (sometimes called new potatoes). They have thin skins, which means no peeling—hooray for saving time! Their waxy texture holds up beautifully in the pan, staying creamy rather than turning mealy.
Unsalted Butter (3-4 tbsp): Using unsalted butter gives you total control over the seasoning. You need enough to cover the potatoes and make that golden crust.
Fresh Garlic (4-5 cloves): If you can, please use fresh garlic for the sake of flavor. Minced jarred garlic is okay in a pinch, but fresh garlic minced just before cooking has a strong flavor and sweetness that can’t be beat.
Olive Oil (1-2 tbsp): 1–2 tablespoons of olive oil: This is very important. Butter can easily catch fire because it has a low smoke point. Mixing it with olive oil raises the smoke point, allowing us to get that crispy sear without the bitter taste of burnt milk solids.
Salt & Black Pepper: Kosher salt or sea salt is best for cooking because it sticks to the potatoes well. Freshly ground black pepper gives a nice warmth to the background.
Flavor Boosters (Optional but Recommended)
Fresh Herbs: At the end, parsley is a classic way to add color and freshness. Rosemary and thyme are stronger herbs that can be added to the butter while it cooks to give it flavor.
Paprika: A sprinkle of sweet or smoked paprika gives the dish a nice reddish color and a depth of flavor that goes well with garlic.
Lemon Juice: A small squeeze of fresh lemon juice at the end cuts through the richness of the butter and wakes up the whole dish.
Parmesan Cheese: Want to go all out with Parmesan cheese? When you put grated Parmesan on hot potatoes, it’s a whole new level.
Ingredient Notes for this Garlic Butter Potatoes
Why waxy potatoes? Potatoes generally fall into two categories: starchy (like Russets) and waxy (like Red or Yukon Gold). Starchy potatoes are great for fluffy mash, but they can fall apart when pan-frying.
Waxy potatoes have more moisture and less starch, helping them hold their shape while getting creamy inside.
The Garlic Dilemma: If you only have garlic powder, you can use it, but add it at the very end. Garlic powder burns almost instantly in hot oil. Fresh cloves give you a bit more wiggle room.
How to Make One-Pan Garlic Butter Potatoes (Step-by-Step)
Ready to cook? Grab your largest skillet (cast iron is fantastic here, but non-stick works too) and let’s get started.
Step 1: Prep the Potatoes
Wash your potatoes thoroughly. Since we are keeping the skins on for that rustic texture and extra nutrition, you want them clean.
Mini-Tip: Cut the potatoes into uniform sizes. Halve the small ones, and quarter the larger ones. Uniformity is the secret to even cooking—you don’t want some pieces raw while others are burnt.
Step 2: Melt the Garlic Butter Base
Place your pan over medium heat. Add the olive oil and butter. Once the butter is melted and frothy, it’s time to start building flavor.
Visual Cue: Wait for the butter to stop foaming slightly. This means the water content has evaporated, and it’s ready for frying.
Step 3: The Pan-Sear (Crucial Step!)
Place your potatoes into the pan. Here is the secret: place them cut-side down. Do not dump them in a pile. Arrange them so the flat, cut surface is touching the hot pan. This maximizes contact and creates that irresistible golden-brown crust.
Heat Trick: Keep the heat on medium-high for the first 3-4 minutes. Do not touch them! Let them sear undisturbed. Peek at one after 3 minutes; if it’s golden brown, you are on the right track.
Step 4: Cover & Steam
Once the bottoms are beautifully seared, reduce the heat to low-medium. Now, add your minced garlic (if you add it too early, it burns) and toss the potatoes gently. Add a splash of water (about 1 tablespoon) to the pan and immediately cover it with a tight-fitting lid.
The Science: This traps steam inside the pan, cooking the center of the potato until it is soft and fluffy, while the residual oil keeps the outside from getting soggy. Cook covered for about 8-10 minutes.
Step 5: Uncover & Crisp Up
Remove the lid. The water should be gone, and the potatoes should be fork-tender. (Test one with a fork; it should slide in easily). Increase the heat back to medium. Toss the potatoes in the remaining garlic butter to re-crisp the skin that might have softened during steaming.
Finishing Touch: This is when you add your chopped herbs, paprika, and salt/pepper. The heat will release the oils in the herbs, making your kitchen smell incredible.
Step 6: Plate & Serve Hot
Put it right away in a serving bowl. Add the Parmesan or lemon juice now, while they are still hot.
Visual Cue: Look for crispy, deep golden edges, a shiny buttery sheen, and the smell of toasted garlic filling the air.
Chef Tips to Make Perfect Garlic Butter Potatoes
I want you to succeed with this recipe on the first try. Here are the pro tips that professional cooks use to ensure potato perfection.
Don’t Overcrowd the Pan: This is the number one mistake. If the potatoes are piled on top of each other, they will steam instead of fry. They will still taste good, but they won’t be crispy. Use a large pan or cook in batches if necessary.
Start Cut-Side Down: Always start with the flat side down. This creates the “presentation side” crust that looks amazing and adds crunch.
The Butter/Oil Ratio: Don’t skip the olive oil. Using 100% butter usually results in burnt milk solids before the potatoes are fully cooked. The oil protects the butter.
Patience is Key: When searing, resist the urge to shake the pan constantly. Food releases from the pan naturally once it’s seared. If you try to flip it and it sticks, it needs another minute.
Garlic Timing: If you love intense garlic flavor, add half the garlic at the beginning and the other half in the last 2 minutes of cooking. The garlic added early creates a mellow, roasted flavor, while the late addition gives a fresh, pungent kick.
Fork-Tender Test: Don’t guess if they are done. Pierce the largest potato piece with a fork or a skewer. If there is resistance, keep the lid on for another 2-3 minutes.
Dry Your Potatoes: After washing, pat the potatoes completely dry with a kitchen towel. Water is the enemy of crispiness. If you put wet potatoes in hot oil, they will splatter and steam immediately.
Size Matters: Keep the pieces roughly 1 to 1.5 inches in size. Anything larger takes too long to cook through on the stovetop and might burn on the outside before the inside is done.
Variations to Spice Up Garlic Butter Potatoes
Once you master the basic garlic butter recipe, the sky is the limit. Here are a few of my favorite twists to keep things interesting.
A. Spicy Garlic Potatoes
If you like a little heat, add 1/2 teaspoon of red chili flakes or cayenne pepper when you add the garlic. Smoked paprika also works wonders here for a BBQ-style flavor.
B. Lemon-Herb Potatoes
This version is perfect for spring. Use plenty of fresh dill and parsley, and grate the zest of one lemon over the potatoes right before serving. The brightness of the lemon cuts the fat beautifully.
C. Parmesan Crusted Potatoes
In the final 2 minutes of cooking, sprinkle a generous layer of grated Parmesan cheese over the potatoes. Let it melt and form a lacy, crispy crust on the bottom of the pan. Scrape it up with the potatoes for a cheesy crunch.
D. Indian-Style Garlic Potatoes (Bombay Potatoes Lite)
Add 1/2 teaspoon of turmeric, 1/2 teaspoon of cumin seeds, and a pinch of coriander powder to the oil before adding the potatoes. The spices will bloom in the hot fat and turn the potatoes a vibrant yellow.
E. Butter-Free / Vegan Version
To make this dairy-free, simply swap the butter for a high-quality vegan butter block, or just use extra olive oil. If using only oil, be generous with the salt to make up for the lack of salted butter flavor.
What to Serve Them With Garlic Butter Potatoes
These potatoes are the “little black dress” of side dishes—they go with everything. Here are some pairing ideas to help you build a complete meal.
Steak Night: A juicy ribeye or sirloin steak pairs perfectly with garlic butter. You can even cook the steak in the same pan after removing the potatoes to soak up the leftover garlic flavor.
Roasted Chicken: Whether it’s a whole Sunday roast or simple pan-seared chicken thighs, the herbs in the potatoes will complement the poultry.
Baked Salmon: The richness of salmon needs a solid side. Try the Lemon-Herb variation of these potatoes to match the fish.
Breakfast Hash: Leftovers? Throw them in a pan with a couple of fried eggs and some bacon. It’s better than any diner breakfast.
Holiday Mains: These are a lifesaver for Thanksgiving or Christmas. They free up oven space (which is always at a premium for the turkey or ham) since they cook entirely on the stove.
Vegetarian Bowl: Serve these over a bed of quinoa or greens with some roasted chickpeas and a tahini dressing for a hearty plant-based meal.
Storage, Reheating & Meal Prep Tips For Garlic Butter Potatoes
We rarely have leftovers of these, but if you do, here is how to handle them.
Storage
Store cooled potatoes in an airtight container in the fridge for 3–4 days.
Note on Freezing: I do not recommend freezing these. Cooked potatoes tend to become grainy and watery when thawed. They lose that lovely texture we worked so hard to achieve.
Reheating
Do not—I repeat, do not—microwave these if you want them crispy. The microwave will turn them into a soft, soggy mess.
Air Fryer (Best Method): Pop them in the air fryer at 350°F (175°C) for 3-4 minutes. They will come out almost as good as fresh.
Stovetop (Second Best): add a tiny bit of butter to a pan and reheat them over medium heat, tossing frequently until hot.
Oven: Spread them on a baking sheet and warm at 350°F for 10 minutes.
Meal Prep Tips: If you are prepping for a big dinner party, you can cut the potatoes ahead of time. Store the raw cut potatoes in a bowl of cold water in the fridge to prevent them from turning brown (oxidizing). When you are ready to cook, drain them and pat them very dry before putting them in the pan.
Troubleshooting: What Went Wrong?
Even with simple recipes, things can go sideways. Let’s fix it.
Problem: My potatoes are soggy.
Solution: You probably put too many things in the pan or didn’t let the water evaporate after steaming. Make sure they are all in one layer. If they are still soggy after that, turn up the heat a little and cook them for another 2 to 3 minutes without a lid to get rid of the moisture.
Problem: The garlic burned.
Solution: You put the garlic in too soon. When heated, minced garlic burns in a matter of seconds. Add it only after you’ve turned down the heat or while it’s steaming. Use whole crushed cloves to add flavor, but take them out before serving.
Problem: The potatoes are burnt outside but raw inside.
Solution: The outside of the potatoes is burnt, but the inside is still raw. The problem was that it was too hot. It takes a while for potatoes to heat up in the middle. Use the “cover and steam” method (Step 4) to cook the inside slowly without burning the crust.
Problem: They stuck to the pan.
Solution: This usually happens if you add the potatoes too soon or if the pan wasn’t hot enough. Let the crust form; it will come off on its own. Also, make sure you use enough fat (butter or oil).
Problem: They are too greasy.
Solution: Use a slotted spoon to take them out of the pan without taking the extra butter with them. You can also put them on a paper towel for 30 seconds before putting them on a plate to soak up extra oil.
Frequently Asked Questions for Garlic Butter Potatoes
Can I use large potatoes instead of baby potatoes? Yes, absolutely. Just cut them into 1-inch cubes. Try to keep the skin on if it’s thin (like Yukon Gold); if using Russets, you might want to peel them as the skin can be tough.
Can I use ghee instead of butter? Yes! Ghee (clarified butter) has a lovely nutty flavor and a much higher smoke point than regular butter, so it’s actually less likely to burn. It’s a great swap.
Do I have to parboil the potatoes first? Nope! That’s the beauty of this recipe. The “steam” step with the lid on essentially parboils them right in the pan. It saves you a pot to wash.
Can I use dried garlic instead of fresh? You can, but it lacks the sticky, savory texture of fresh garlic. If using garlic powder, mix it with your salt and pepper and sprinkle it on at the very end so it doesn’t scorch.
How do I keep the garlic from burning? The best trick is to add the garlic after the initial high-heat sear is done. Or, push the potatoes to the side of the pan, add a little butter in the empty spot, sauté the garlic for 30 seconds until fragrant, and then toss everything together.
Can this be made in a cast-iron pan? Yes, cast iron is actually the best tool for this job. It holds heat incredibly well and creates a superior crust. just make sure your pan is well-seasoned so the potatoes don’t stick.
If I double the recipe, do I need two pans? Unless you have a massive skillet, yes. If you crowd too many potatoes into one pan, they will steam and won’t get crispy. It’s better to use two pans or cook in two batches.
Can I add other vegetables? Sure! Bell peppers, onions, or green beans go well. Just be mindful of cooking times. Onions can go in with the potatoes, but softer veggies like zucchini or bell peppers should be added halfway through so they don’t turn to mush.
How do I make it dairy-free? Use a plant-based butter alternative or stick strictly to olive oil. Avocado oil is another great option with a high smoke point.
Can I make this in the oven instead? You can, but the texture will be different (more “roasted” than “pan-fried”). If baking, toss potatoes in the butter/oil mixture and bake at 400°F for 30-40 minutes, flipping halfway.
Final Notes On Garlic Butter Potatoes
There is something incredibly grounding about cooking a simple meal from scratch. These One-Pan Garlic Butter Potatoes are my go-to when I want something easy, crispy, and comforting. They never fail to put a smile on faces around the table.
Whether you are serving them alongside a fancy steak or eating them straight out of the pan with a fork (no judgment here, we’ve all been there), I hope this recipe brings a little bit of warmth and joy to your kitchen.
Give it a try, and don’t forget to make it your own with your favorite herbs or spices. Happy cooking
Disclosure: This post may contain affiliate links.
If you make a purchase through these links, I may earn
a small commission at no extra cost to you.
prab chahal
Hi, I’m Prabjot Chahal – the heart (and taste buds) behind this blog!
Food has always been my love language – from experimenting with family recipes to discovering unique flavors from around the world. I believe that cooking isn’t just about following a recipe, it’s about creating moments, sharing stories, and connecting with others over something delicious. Through this blog, I want to build a vibrant food community where we share more than just recipes – we share inspiration, tips, and the joy of making and enjoying good food together. Whether you’re here for quick weekday dinners, festive treats, or creative seasonal ideas, you’re part of this table. So grab a fork (or a whisk!) and let’s cook, bake, and share our love for food – one recipe at a time.