Table of Contents
Want chocolate but don’t want to make a mess or go to the store? You are in the right place! These chocolate recipes with three ingredients are great for days when you’re busy, when you have guests at the last minute, or when you just need something sweet quickly.
All of the recipes are quick, easy, and adaptable, so you can use whatever you have on hand. There is a chocolate treat here for every mood, occasion, and craving, from fudgy bites to crispy clusters. Put on your apron (or not), grab your favorite chocolate, and let’s get started on these easy, delicious treats that anyone can make.
10 Irresistible 3-Ingredient Chocolate Treats Anyone Can Make
1. 3-Ingredient Chocolate Treats Classic Chocolate Peanut Butter Fudge

- Ingredients:
1 cup semi-sweet chocolate chips
1/2 cup creamy peanut butter
1 cup powdered sugar
(Optional: 1/2 tsp vanilla extract, pinch of sea salt)
- Melt the Chocolate: Put the chocolate chips in a bowl that is completely dry and safe for the microwave. Even a little water can make chocolate seize. Put it in the microwave for 20 to 30 seconds at a time, stirring well each time. It will stay in shape until you stir it. Stop heating it and stir it until it’s mostly melted to finish smoothing it out.
- Blend Smoothly: While the chocolate is still warm, quickly stir in the peanut butter and vanilla extract (if using). Stir until the mixture is smooth and shiny. Add the powdered sugar slowly, stirring after each addition to keep lumps from forming. If it seems too hard to mix, add another spoonful of peanut butter.
- Flavor Boost: Add a pinch of sea salt to the mixture or sprinkle it on top before putting it in the fridge to make it taste better.
- Shape & Set: Pour the mixture into a pan lined with parchment paper and use a spatula to smooth the top. (Leave a little parchment hanging over the edge to make it easier to take off.) Chill for at least an hour, then take it out and cut it into squares that are easy to eat. Have fun!
Bonus: Try pressing a few peanuts or mini chocolate chips on top before chilling for crunch and flair!
Recipe 2: 3-Ingredient Chocolate Treats Almond Joy Bites

- Ingredients:
1 cup milk chocolate chips
1 cup sweetened shredded coconut
1/2 cup whole almonds
(Optional: 1/2 tsp coconut extract for extra flavor)
- Melt the Chocolate: Put the chocolate chips in a bowl that can go in the microwave. Heat in the microwave for 20 to 30 seconds at a time, stirring in between, until the mixture is melted and smooth. Don’t overheat; just stir until everything is melted.
- Combine & Coat: Stir the shredded coconut into the melted chocolate until it is all covered. If you want the coconut flavor to be stronger, add a little coconut extract here.
- Shape Bites: Put big spoonfuls of the mixture on a tray lined with parchment paper. Push a whole almond down hard on top of each mound.
- Chill & Serve: Place the tray in the refrigerator and let the bites firm up for at least 30 minutes. Once set, peel them off the parchment and enjoy!
Tip: Store these in an airtight container in the fridge—perfect for a grab-and-go chocolate fix!
Recipe 3: 3-Ingredient Chocolate Treats Vegan Chocolate Coconut Clusters

- Ingredients:
1 cup dairy-free chocolate chips
1 cup unsweetened shredded coconut
2 tbsp coconut oil
- Melt the Chocolate: To melt the chocolate, put the dairy-free chocolate chips and coconut oil in a bowl that is completely dry and safe for the microwave. Microwave for 20 to 30 seconds at a time, stirring well after each time, until the chocolate is smooth and melted. Don’t let it get too hot; stop when it’s mostly melted and stir to finish.
- Combine & Mix: Mix and combine: Stir the shredded coconut into the melted chocolate. Stir the mixture until it is thick, and all the coconut is covered.
- Shape the Clusters: Use a spoon to drop mounds of the mixture onto a baking sheet lined with parchment paper. Use the back of the spoon to spread or shape the mounds into nice, round clusters.
- Chill & Enjoy: Transfer the baking sheet to the refrigerator and let the clusters set for at least 30 minutes, or until firm to the touch. Once set, peel the clusters off the parchment and enjoy right away!
Tip: These clusters stay freshest in an airtight container in the fridge, where they’ll be ready for a quick snack any time you need a chocolate boost!
Recipe 4: 3-Ingredient Chocolate Treats Salty Pretzel Chocolate Crunch

- Ingredients:
1 cup dark chocolate chips
1 cup mini pretzels (crushed)
1/4 cup salted peanuts
- Melt the Chocolate: Put the chocolate chips in a bowl that is safe for the microwave and dry. Put the chocolate in the microwave for 20 to 30 seconds at a time, stirring well each time, until it is completely smooth and shiny. If you want, you can use a double boiler.
- Stir in Crunchy Goodness: Put the crushed pretzels and salted peanuts right into the melted chocolate and mix them in. Stir well to make sure that each piece is evenly coated. The mixture should look chunky, and every bite should have chocolate on it.
- Spread & Shape: Put parchment paper on a baking sheet and shape it. Use a spatula to scrape the chocolate-pretzel mix onto the tray and spread it out into a thin, even layer. Don’t worry about making it perfect; the rustic look is part of the fun!
- Chill Until Crisp: Pop the tray into your fridge for at least 30 minutes, or until the chocolate is fully set and breakable.
- Break & Snack: Once set, use your hands to break the slab into crunchy, snack-sized pieces.
Tip: Store these in a sealed container in the fridge so they stay crisp and cool. They’re perfect for movie night or a pick-me-up snack!
Related Posts:


Recipe 5: 3-Ingredient Chocolate Treats Chewy Chocolate Date Truffles

- Ingredients:
1 cup pitted dates
1/2 cup chocolate chips
1/2 cup walnuts
(Optional: 1/2 tsp vanilla extract, pinch of sea salt, cocoa powder for rolling)
- Prepare the Date-Walnut Base: Put the dates and walnuts in a food processor to make the Date-Walnut Base. Pulse the mixture until it is finely chopped and starts to stick together. If your dates are a little dry, soak them in warm water for 5 minutes and then pat them dry before blending them.
- Melt the Chocolate: Put the chocolate chips in a bowl that is clean, dry, and safe to put in the microwave. Put the mixture in the microwave for 20 seconds at a time, stirring after each time, until it is smooth and completely melted.
- Combine & Flavor: Quickly stir in the melted chocolate and, if you’re using it, vanilla extract or a pinch of salt. Mix again until everything is well combined and the paste is thick and fudgy.
- Shape the Truffles: Make the truffles by rolling small pieces (about 1 tablespoon each) into balls that are easy to eat with your hands. Lightly wet your hands or chill the mixture for 5 minutes first to make it easier to roll out and less sticky.
- Chill & Finish: Chill and finish: Put the truffles on a tray with parchment paper on it. You can roll them in cocoa powder to make them look nice if you want. Put in the fridge for at least 30 minutes, or until firm.
Tip: Store these truffles in a sealed container in the fridge for up to two weeks. They’re energy-packed, naturally sweet, and make a perfect lunchbox or coffee break treat!
Recipe 6: 3-Ingredient Chocolate Treats Banana Chocolate Freezer Bites

- Ingredients:
2 bananas (sliced)
3/4 cup chocolate chips
1/2 cup peanut butter
- Prep the Bananas: Peel them and cut them into thick rounds. It will be easy to make “sandwiches” if the pairs are about the same size.
- Spread the Peanut Butter: To spread it, put some peanut butter on a piece of banana. Gently press a second slice of banana on top of the first to make a small sandwich. Keep going until you have pairs of all of your banana slices.
- Melt the Chocolate: Put the chips in a bowl that is dry and safe for the microwave to melt the chocolate. Put the mixture in the microwave for 20 to 30 seconds at a time, stirring it each time, until it is completely smooth. Don’t let it get too hot; just keep stirring until it shines!
- Dip the Banana Sandwiches: Use a fork or skewer to hold each banana sandwich and dip it in the melted chocolate. You can cover as much of it as you want. Let any extra chocolate fall off.
- Freeze to Set: Put each dipped sandwich on a tray lined with parchment paper and put them in the freezer. After covering all the pieces, put the tray in the freezer for at least an hour, or until the chocolate is hard..
- Enjoy or Store: You can eat it straight from the freezer for a cold, creamy treat.
Trick: If your chocolate gets too thick, add a tiny bit (about 1/2 tsp) of coconut oil or vegetable oil to thin it out and make dipping easier.
Recipe 7: 3-Ingredient Chocolate Treats, Chocolate Rice Cereal Clusters

- Ingredients:
1 cup milk chocolate chips
1 1/2 cups puffed rice cereal
1/4 cup honey
(Optional: pinch of salt or mini chocolate chips for topping)
- Melt the Chocolate: Place the milk chocolate chips in a dry, microwave-safe bowl. Microwave in 20–30 second bursts, stirring well after each round, until the chocolate is smooth and fully melted.
Tip: Don’t overheat—stop when there are just a few chips left and stir to finish melting! - Sweeten and Stir: Add the honey to the warm, melted chocolate and stir until well blended.
- Fold in the Cereal: Gradually add the puffed rice cereal, gently folding with a spatula until all pieces are evenly coated in chocolate. Work carefully to keep the cereal crispy and avoid crushing it.
- Shape the Clusters: Line a baking sheet with parchment paper. Using two spoons or a cookie scoop, drop small mounds of the mixture onto the parchment, leaving space between each.
- Top & Set: For extra flair, sprinkle a little salt or add a few mini chocolate chips on top before chilling, if you’d like.
- Chill to Crunch: Transfer the pan to the fridge for at least 30 minutes, or until the clusters are firm and crunchy to the touch.
- Serve & Store: Enjoy right away or store in an airtight container in the refrigerator for up to a week.
Trick: For extra crunch, let the clusters chill a little longer, and use the back of a spoon to press them together before they fully set!
Recipe 8: 3-Ingredient Chocolate Treats, Hazelnut Chocolate Cups

- Ingredients:
1 cup dark chocolate chips
1/2 cup hazelnut spread (like Nutella)
1/2 cup chopped toasted hazelnuts
(Optional: a pinch of flaky salt for topping)
- Melt the Chocolate: Put the dark chocolate chips in a bowl that can go in the microwave and dry. In the microwave for 20 seconds at a time, stirring well each time, until the mixture is smooth and melted.
- Combine & Blend: Stir the hazelnut spread into the warm melted chocolate until it is completely mixed and shiny.
- Add Nuts: Gently mix in most of the chopped hazelnuts, but save a spoonful to sprinkle on top later.
- Fill the Cups: Fill the cups in a mini muffin tray with paper liners. Fill each cup about three-quarters full with the chocolate mixture. Use the back of a spoon to smooth out the tops.
- Top & Chill: If you want, you can add a little salt to each cup and then put the reserved hazelnuts on top. Put the tray in the fridge for at least 45 minutes, or until the cups are completely hard.
- Enjoy & Store: Take the liners off the cups of chocolate and throw them away. They can stay in the fridge for up to a week if they are in a container that doesn’t let air in.
Trick: Add a whole hazelnut in the center for a crunchy surprise!
Recipe 9: 3-Ingredient Chocolate Treats, Easy Rocky Road Bars

- Ingredients:
1 cup semi-sweet chocolate chips
1 cup mini marshmallows
1/2 cup chopped salted peanuts
- Melt the Chocolate: To melt the chocolate, put the chocolate chips in a dry bowl that can go in the microwave. Microwave for 20 to 30 seconds at a time, stirring each time, until the chocolate is smooth and shiny. If you want, you can use a double boiler on the burner.
- Mix in The Goodies: While the chocolate is still warm, quickly fold in the mini marshmallows and shredded salted peanuts. Just stir until everything is evenly coated. Don’t mix too much; this keeps the marshmallows fluffy!
- Shape Your Bars: Shape your bars by lining a small loaf pan (or square pan) with parchment paper and letting some hang over the edges. Put the mixture in and use a spatula to push it down evenly into all the corners. For a fun finish, add a few more peanuts or marshmallows on top.
- Chill and Slice: Put the pan in the fridge for at least an hour to let it set. When the slab is hard, use the parchment to lift it out and cut it into bars with a sharp knife.
- Serve & Store: You can serve the bars right away or keep them in an airtight container in the fridge for up to a week.
Tip: For extra crunch, add a handful of chopped graham crackers or your favorite cookies to the mix before pressing into the pan!
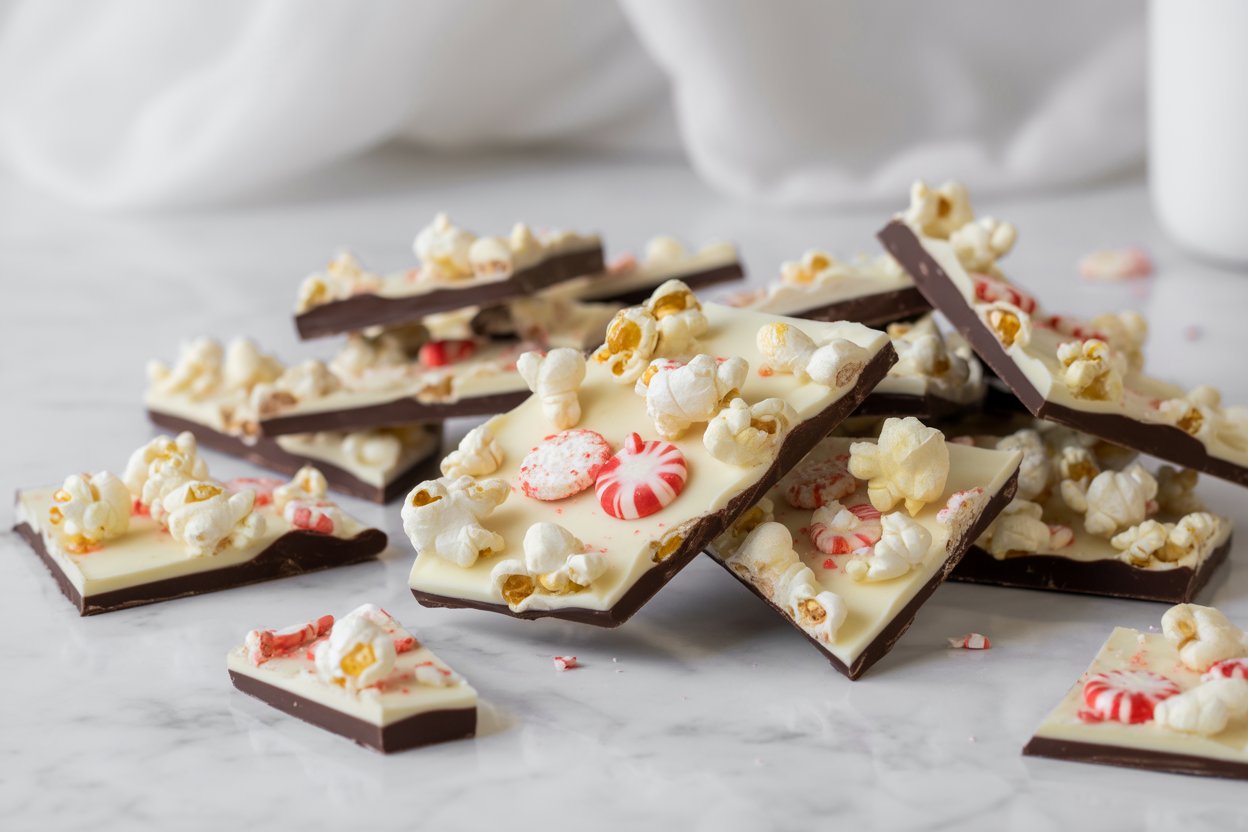
Recipe 10: 3-Ingredient Chocolate Treats, White Chocolate Berry Bark

- Ingredients:
1 1/2 cups white chocolate chips
1 cup freeze-dried mixed berries
1/2 cup chopped pecans
(Optional: a pinch of sea salt, extra berries or nuts for topping)
- Melt the White Chocolate: Put the white chocolate chips in a bowl that is dry and safe for the microwave. Put it into the microwave and cook it on medium power for 20 to 30 seconds at a time, stirring well after each time, until it is creamy and smooth. White chocolate can burn quickly, so be careful with it.
- Mix in the Goodies: To make the chocolate taste better, mix in the chopped pecans and freeze-dried berries. Mix everything thoroughly until everything is covered and the mix is thick and bright.
- Spread & Top: Put parchment paper on a baking sheet and spread it out. Use a spatula to spread the white chocolate mixture out on the sheet until it is the thickness you want (about 1/4 inch is good). For the best look, while the bark is still melting, add a few more berries, pecans, and a pinch of sea salt to the top.
- Chill & Break: Put the tray in the fridge for about 45 minutes, or until the bark is hard. Use the parchment to pull it out when the bark is hard. You can use your hands or a sharp knife to break it up.
- Serve & Store: You can eat the bark right away or put it in an airtight container in the fridge for up to a week. You can also make this present at home.
Tip: Try using different freeze-dried fruits or switching the pecans for pistachios, cashews, or almonds for unique flavors every time!
Quick Tips for Best Results: 3-Ingredient Chocolate Treats
- Always use dry bowls and spoons so your chocolate doesn’t seize!
- Store treats in an airtight container; most will keep in the fridge for about a week.
- Feeling creative? Swap in your favorite nuts, nut butters, or dried fruit!
With just three simple ingredients and a few minutes, you can have homemade chocolate treats any day. Which one will you try first? Share your favorite combos in the comments!
Frequently Asked Questions About 3-Ingredient Chocolate Treats
1. How should I store these 3-ingredient chocolate treats?
The best way to store most of these treats is in the fridge in a container that doesn’t let air in. They will stay good for about a week. Some things, like barks or clusters, can be frozen for up to a month.
2. Can I use different nut butters or make these nut-free?
Of course! If you don’t want nuts, you can use almond, cashew, or sunflower seed butter instead of peanut butter. Each one changes the taste a little, so pick the one you like best.
3. What if I don’t have a microwave?
Not a problem! You can melt chocolate on the stovetop with a double boiler. Put a bowl of chocolate on top of a pot of water and heat it up. Stir until the chocolate melts.
4. Do these work with sugar-free or dairy-free chocolate chips?
Yes! Use your favorite chocolate chips that don’t have sugar or dairy in them for a snack that fits your diet. Most recipes also work with powdered sugar substitutes.
5. Can I make these ahead for parties?
Of course. Most recipes get firmer after a day or two in the fridge. Keep them cold until it’s time to serve them.
6. How do I keep the chocolate from getting too hard or soft?
Let the treats sit out at room temperature for 10 to 15 minutes before eating them if you want them to be softer. Keep the treats cold if you want them to be firmer. Always keep food in the fridge if your house is warm.
7. Can I add extra ingredients or flavors?
Yes, of course! A pinch of sea salt, some dried fruit, or a sprinkle of crushed candy canes on top—there’s no wrong answer.
8. Are these safe for kids to help make?
Yes! With a little adult help melting chocolate, most steps are perfect for little hands—mixing, scooping, and decorating.
9. My treats aren’t setting—what went wrong?
Usually, the chocolate just needs more time in the fridge. If you added something with a lot of moisture (like fresh fruit), that can affect the firming up. Stick to drier mix-ins for best results.
10. What’s the best way to serve these?
Pile them on a platter for parties, add to lunchboxes, or wrap them up as gifts. They’re a hit anytime you want an easy, homemade chocolate fix!
Conclusion & Extra Tips
Whipping up chocolate treats with only three ingredients proves that you don’t need much to spoil yourself. The biggest secret? Don’t be afraid to swap in your favorite mix-ins—try dried fruit, mini marshmallows, or crushed pretzels for more flavor and crunch. A sprinkle of flaky salt on top adds gourmet vibes with almost no effort.
Keep your sweets fresh by storing them in an airtight container in the fridge. Most stay good for up to two weeks (if you have any left that long!). For extra creamy texture, let your treats sit out for five minutes before eating.
Serving tip: These look cute on a platter for parties, work great as lunchbox surprises, and make sweet last-minute gifts when packed in a tin with a simple ribbon.
Most importantly—have fun and make the recipes your own! Chocolate is all about joy, and with these easy treats, you can share that happiness any time.
Check out my Power-Packed Energy Bites You Can Make in 10 Minutes!!