Okay, let me tell you about my secret weapon for chocolate cravings—Greek yogurt chocolate mousse. I know what you’re thinking: “Healthy chocolate mousse? No way.” But trust me, this stuff is so rich and silky, you’ll totally forget it’s good for you.
Even better, it takes just five minutes to whip up! Whether you’re always rushing, trying to eat better, or just obsessed with dessert (like me), this mousse has your back. Busy parents, gym lovers, sweet-toothed kids, you name it—everyone at my house goes crazy for it.
What makes this recipe so special? It uses Greek yogurt as its secret weapon, creating a luxuriously creamy texture while packing a serious protein punch. Forget complicated steps and long ingredient lists. You only need a few basic items to create a dessert that satisfies your deepest chocolate cravings without any of the guilt.
What Is Greek Yogurt Chocolate Mousse?
So what exactly is Greek yogurt chocolate mousse? Think of it as your favorite chocolate mousse—only way healthier and honestly, so much easier to make. Instead of piling in heavy cream and egg yolks, you just use a few basic, feel-good ingredients.
The cool part? You still get all that dreamy, chocolatey richness, just with a lot more nutrition packed in.
You can expect a thick, creamy, and smooth texture, almost like a cross between a classic mousse and a rich chocolate pudding. It has quickly become a favorite online, celebrated for being a protein-rich snack and a quick, guilt-free sweet.
Okay, let me tell you why I keep coming back to this little bowl of chocolatey happiness—and why you will too:
It’s loaded with protein, so it’s basically snack fuel (or dessert, or breakfast…no judgment).
Kids love it—I mean, who says no to chocolate mousse?
You get to play chef: toss in your favorite flavors or toppings to make it totally your own.
It’s meal-prep friendly, so you can whip up a batch and have treats all week.
And best of all, it’s so rich and chocolaty that you’ll forget it’s actually good for you.
High-Protein Dessert: Perfect for a post-workout refuel or just adding more protein to your diet.
No Refined Sugar: Sweetened naturally, it skips the processed stuff.
Ready in Minutes: From craving to consumption in under 5 minutes.
Kid-Friendly: A healthy treat your kids will actually ask for.
Highly Customizable: Easily adapt it to your taste and dietary needs.
Great for Meal Prep: Make a batch on Sunday for delicious desserts all week.
Satisfies Cravings: Delivers that rich chocolate flavor you want, guilt-free.
Ingredients Breakdown For Yogurt Chocolate Mousse
Let’s talk about what you’ll need—honestly, it’s super simple! You just grab three basic ingredients from your fridge and pantry, and you’re set.
If you’re feeling fancy, there are some extra add-ins that can make your mousse even more irresistible. Consider these like fun bonus levels for your dessert.
Base Ingredients
Greek Yogurt: This is the star. For the creamiest mousse, choose a full-fat (5%) plain Greek yogurt. A 2% version also works well. A 0% fat yogurt will work, but the texture might be slightly less rich and a bit more tangy.
Cocoa Powder: For a deep, intense chocolate flavor, use Dutch-processed cocoa powder. It’s less acidic and darker than natural cocoa powder. However, any unsweetened cocoa powder will do the trick.
Sweetener: You have options! Maple syrup and honey are fantastic liquid sweeteners that blend in easily. For a sugar-free alternative, powdered monk fruit or erythritol works best to avoid a gritty texture.
Vanilla Extract: A small splash enhances the other flavors and adds a layer of aromatic warmth.
Optional Add-Ins
Melted Dark Chocolate: For an ultra-rich, decadent mousse.
Protein Powder: Add a scoop of chocolate or vanilla protein powder for an extra protein boost.
Peanut Butter: A tablespoon creates a delicious Reese ‘s-like flavor.
Espresso Powder: A tiny pinch will intensify the chocolate flavor without making it taste like coffee.
Pinch of Sea Salt: Balances the sweetness and makes the chocolate taste richer.
Related Post: “From Plain to Pizzazz: Transforming Your Yogurt into unicorn yogurt bark.”
Equipment Needed For Yogurt Chocolate Mousse
You don’t need any fancy tools to make this mousse.
Fine-mesh sieve (optional, but recommended for lump-free cocoa)
For an incredibly smooth, blender-like texture, you can also mix all the ingredients in a high-speed blender.
Step-by-Step Instructions For Yogurt Chocolate Mousse
Let’s walk through this together—it’s super easy, I promise. Here’s how I make it:
Step 1: Prep the Yogurt
Grab your Greek yogurt and pop it into a mixing bowl. Take your whisk (or a fork if that’s what you have) and give it a good whisk for about 30 seconds.
You want it smooth, light, and a little fluffy—think “yogurt clouds.” This makes the mousse extra creamy and helps tame any tangy flavor.
Step 2: Add Sweetener and Vanilla
Next up, pour in your sweetener (maple syrup or honey—whatever you love) and a splash of vanilla extract.
Whisk again, making sure all that sweetness gets mixed in nicely. Go ahead and dip in a spoon if you want to taste and adjust!
Step 3: Add Cocoa Powder
Here’s a little trick: sift your cocoa powder right into the bowl, especially if it tends to get lumpy.
If you skip the sifter, just sprinkle slowly and whisk well.
Fold it in gently at first with a spatula, then switch to your whisk. It’s super satisfying to watch it all come together into a deep chocolatey mousse.
Step 4: Optional Rich Chocolate Add-In
Feeling fancy? If you want to go all-out, melt a bit of dark chocolate and let it cool for a minute so it doesn’t curdle your yogurt.
Drizzle it in slowly, whisking as you go. This step is totally optional, but wow, does it make the mousse even more decadent.
Step 5: Chill Before Serving
I know, waiting is tough—but chilling your mousse makes it set up beautifully, and the flavors get even better.
Just cover it and pop it in the fridge for at least 30 minutes (or longer if you want an extra thick mousse). If you sneak a bite early, I won’t judge!
Step 6: Garnish and Serve
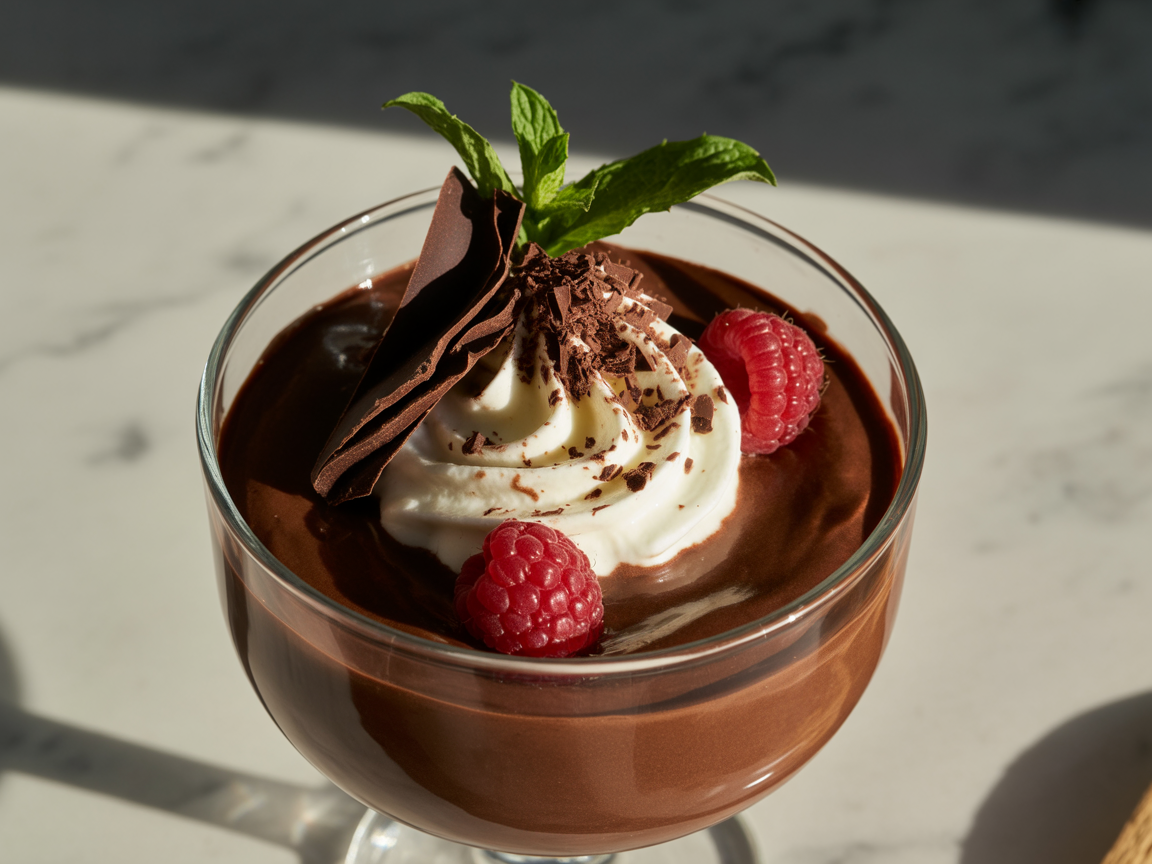
Now for the best part: toppings! Spoon your mousse into little cups or jars and pile on whatever sounds good—fresh berries, a sprinkle of chocolate, maybe some crushed nuts. Then grab a spoon and dig in!
Related Post: Sprinkle-Covered Cake Pop Bites: Fun, Kid-Friendly Treat!
Tips for the PERFECT Greek Yogurt Chocolate Mousse
Here are my top tips for nailing the perfect Greek yogurt chocolate mousse—honestly, these are the things I tell all my friends:
If your mousse tastes a little bitter, don’t worry! Try using a good Dutch-processed cocoa powder, and don’t be shy about adding a bit more sweetener if you like.
Want that creamy, dreamy texture? Go for full-fat (5%) Greek yogurt. It’s so much richer and doesn’t have that overly tangy vibe.
When it comes to sweetness, start small and taste as you go. The chocolate flavor actually gets stronger as the mousse chills, so give it a chance to set before tweaking too much.
Is your mousse a bit runny? No biggie! Sometimes yogurt brands are just wetter than others. Just add another spoonful of cocoa powder or a little chia seed, then let it sit for 15 minutes.
On the flip side, if your mousse is way too thick, just stir in a splash of milk or almond milk—easy fix!
Not a fan of that yogurt tang? Trust me, a little vanilla extract and a tiny pinch of salt work wonders to mellow it out and boost the chocolatey goodness.
Last tip: If you want your mousse super light and fluffy, use an electric mixer instead of a whisk. It really makes a difference—think chocolate mousse clouds!
Try a few of these, and you’ll be a mousse master in no time!
Let’s have a little fun with this recipe! The base is awesome on its own, but you can totally get creative. Here are some of my favorite ways to change it up—honestly, it’s like a choose-your-own-adventure dessert.
Want to keep it ultra-healthy? Try swapping in monk fruit sweetener or making it dairy-free with coconut yogurt.
How about going dessert-crazy? Swirl in peanut butter for those Reese’s vibes, sprinkle in espresso powder for a bold mocha kick, or get fancy with a caramel drizzle and a pinch of sea salt.
Feeling playful? Peppermint extract + mini chocolate chips turns it into mint chocolate chip mousse, and you can even layer in fresh berries or banana slices for an extra treat.
Seriously, the options are endless, so mix and match until you find your perfect flavor combo!
Yogurt Chocolate Mousse: Healthy Versions
Sugar-Free Mousse: Use a powdered monk fruit or stevia blend as your sweetener.
Vegan Mousse: Swap the Greek yogurt for a thick, plain coconut or almond milk-based yogurt.
Low-Calorie, High-Protein Mousse: Use 0% fat Greek yogurt and a sugar-free sweetener.
Peanut Butter Chocolate Mousse: Mix in 1-2 tablespoons of creamy peanut butter.
Mocha Espresso Mousse: Add 1/2 teaspoon of instant espresso powder.
Salted Caramel Mousse: Drizzle with a sugar-free caramel sauce and a sprinkle of flaky sea salt before serving.
Mint Chocolate Chip Mousse: Add 1/4 teaspoon of peppermint extract and stir in some mini chocolate chips.
Yogurt Chocolate Mousse: Toppings & Serving Ideas
Honestly, this is where you can have a little fun! Here are some of my absolute favorite ways to top off your mousse and turn it into something extra special:
Pile on fresh berries—raspberries and strawberries are my go-to for a pop of color and natural sweetness.
Grab a bar of dark chocolate and shave some right on top—trust me, it makes everything feel a bit fancier.
Sprinkle on some granola or chopped nuts for the perfect bit of crunch.
Toasted coconut flakes bring a tropical vibe (especially good in the summer).
Want to go extra? Add a swirl of whipped cream or a dollop of coconut cream.
Layer it up: make a parfait with fruit and granola for brunch-worthy flair.
Or turn it into breakfast—yes, really! Spoon your mousse into a bowl, toss on oats and seeds, and you’ve got a breakfast that tastes like dessert.
Get creative and use whatever you have on hand—there’s no wrong way to enjoy this mousse!
Fresh berries (raspberries, strawberries)
Shaved dark chocolate
Granola or chopped nuts for crunch
Toasted coconut flakes
A dollop of whipped cream or coconut cream
Layer it into a parfait with fruit and granola
Serve it as a healthy breakfast bowl with oats and seeds
Storage and Meal Prep Guide For Yogurt Chocolate Mousse
If you’re into meal prep (or just want to make your week a little sweeter), this mousse totally has you covered. I like to scoop it into little jars or containers right after making it—that way, you’ve got grab-and-go snacks or desserts ready whenever you need a treat. Just pop them in the fridge, and they’ll stay fresh for 3 to 4 days.
Honestly, I think the flavor gets even better after a night in the fridge. It’s like the chocolate and yogurt have a little party together and come out even more delicious!
Freezing is not recommended, as Greek yogurt can separate when thawed, resulting in a grainy texture.
Yogurt Chocolate Mousse: Common Mistakes & How to Fix Them
Let’s be real—even with a simple recipe like this, little hiccups can happen! Here’s how I help friends troubleshoot when things don’t go perfectly the first time:
Mousse turned out too thin? No worries, it happens! Sometimes yogurts are just runnier. Just add a bit more Greek yogurt or an extra spoonful of cocoa powder, give it a good stir, and let it chill a little longer. It’ll thicken up.
Too bitter for your taste buds? That’s just the cocoa flexing its muscles! Start by mixing in a bit more sweetener—maple syrup, honey, whatever you prefer. Taste as you go until it’s perfect for you.
Chalky texture? Ugh, that’s the worst, but it’s fixable! This usually means the cocoa powder didn’t blend in fully (sometimes it clumps if it’s a lower quality). Next time, try sifting your cocoa powder first and fold it in gently before whisking.
Grainy mousse after adding chocolate? I’ve been there! It probably means the chocolate was a bit too hot when it hit the cold yogurt. Let your melted chocolate cool down for a minute or two before mixing it in, and you’ll get that dreamy, smooth finish.
Taste too sour? That’s just the yogurt saying hello a little too loudly. Stir in a little extra vanilla extract and a small pinch of salt—it really tones down the tang. Also, a splash more sweetener never hurts!
With a few tweaks, you’ll have chocolate mousse perfection in no time.
Frequently Asked Questions For Yogurt Chocolate Mousse
Is Greek yogurt chocolate mousse healthy? Totally! Greek yogurt is full of protein and probiotics, and since you’re skipping the refined sugar, you’re getting a treat that’s actually good for you. It seriously beats most desserts when it comes to nutrition, but you’d never guess because it tastes so indulgent.
Can I use regular yogurt instead of Greek yogurt? You can, but the mousse will be much thinner. Greek yogurt is strained, which makes it thick and creamy. If you only have regular yogurt, you can strain it through a cheesecloth for a few hours to thicken it.
Can I make this without any sweetener? You can, but it will be quite bitter and tangy. For a naturally sweet option, you can blend in a ripe banana.
How do I make it more chocolatey? For a more intense flavor, use both cocoa powder and melted dark chocolate. A pinch of espresso powder also deepens the chocolate taste.
Can I make this dairy-free? Absolutely. Use a thick, unsweetened dairy-free yogurt like coconut, soy, or almond-based yogurt as a 1:1 substitute.
What is the best yogurt for this mousse? A plain, full-fat (5% or more) Greek yogurt will give you the richest and creamiest results with the least amount of tang.
How long does Greek yogurt mousse last in the fridge? It stays fresh in an airtight container in the refrigerator for 3 to 4 days.
Related post: Stop Making Regular Oats — This Chocolate Strawberry Version Changes Everything
Printable Recipe Card
Want just the essential recipe details without scrolling through the article? Get our printable recipe card with just the ingredients and instructions.
Disclosure: This post may contain affiliate links.
If you make a purchase through these links, I may earn
a small commission at no extra cost to you.
prab chahal
Hi, I’m Prabjot Chahal – the heart (and taste buds) behind this blog!
Food has always been my love language – from experimenting with family recipes to discovering unique flavors from around the world. I believe that cooking isn’t just about following a recipe, it’s about creating moments, sharing stories, and connecting with others over something delicious. Through this blog, I want to build a vibrant food community where we share more than just recipes – we share inspiration, tips, and the joy of making and enjoying good food together. Whether you’re here for quick weekday dinners, festive treats, or creative seasonal ideas, you’re part of this table. So grab a fork (or a whisk!) and let’s cook, bake, and share our love for food – one recipe at a time.

")
")


")