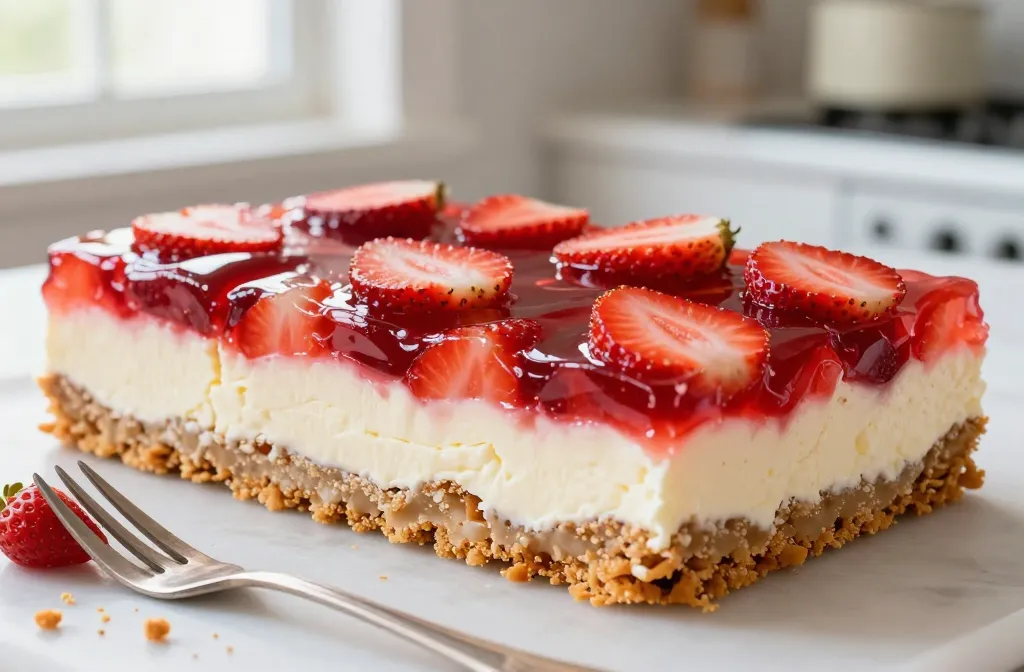
Strawberry Pretzel Dessert Bars don’t ask for much—just a crunchy-salty base, creamy middle, and glossy strawberry crown. They show up to every potluck dressed like a retro queen and still steal the spotlight. Ready to make the crowd-pleaser that vanishes first? Grab a 9×13 pan and let’s build some layers of joy.
Why These Bars Slap (And Why You’ll Crave Them)
This dessert hits all the notes: sweet, salty, creamy, fruity, chilled. It’s basically the dessert version of a perfectly curated playlist. You get the savory snap of pretzels, a lush cream cheese filling, and a ruby-red strawberry topping that looks like it belongs on a magazine cover. FYI: these bars chill beautifully and slice like a dream. Pro vibe: They’re unfussy, make-ahead friendly, and wildly forgiving. It’s hard to mess these up unless you try to rush the chilling. Don’t rush the chilling.
The Three-Layer Blueprint
Think of this as edible architecture. Each layer does a job, and together they’re unstoppable.
The Pretzel Crust: Crushed pretzels + melted butter + sugar. Bake briefly to lock it in.
The Cream Cheese Cloud: Cream cheese + sugar + whipped topping (or homemade whipped cream). Spread it edge-to-edge to create a seal.
The Strawberry Top: Strawberry gelatin + sliced strawberries (fresh or frozen, thawed and drained). Chill until it quivers like a Jell-O commercial.
Tips for Best Results
Seal the edges: Press the cream layer tight against the pan sides so the gelatin can’t sneak to the crust. Soggy crust = sadness.
Cool everything: Let the crust cool fully. Let the gelatin hit a thick, syrupy stage before pouring. Patience pays off.
Slice smart: Use a sharp knife, wipe between cuts, and slice straight down. You’ll get those bakery-worthy squares.
Ingredient Lineup (and Good Swaps)
Here’s your classic baseline. After that, go wild.
Pretzels: About 2 1/2 cups crushed. Sticks or twists. Salted works best. Pulse, don’t powder.
Butter: 3/4 cup melted. Butter equals flavor; margarine doesn’t hit the same.
Sugar for crust: 1/4 cup granulated.
Cream cheese: 16 oz, softened.
Sugar for filling: 3/4 cup powdered sugar for a silkier texture (granulated works, but IMO powdered wins).
Whipped topping: 8–12 oz, thawed. Or use 2 cups freshly whipped cream, lightly sweetened.
Strawberry gelatin: Two 3-oz boxes (or one 6-oz) strawberry Jell-O.
Strawberries: 3–4 cups sliced. Fresh tastes brighter, but well-drained frozen strawberries still slay.
No whipped topping? Whip 1 cup cold heavy cream with 2 tbsp powdered sugar to soft peaks, fold into the cream cheese mix.
Fruit twist: Swap in raspberries + raspberry gelatin, or mixed berries + strawberry gelatin for a mixed-berry vibe.
Step-by-Step: You’ve Got This
Let’s keep it clean and painless.
Preheat: Oven to 350°F (175°C). Grease a 9×13-inch pan lightly.
Make the crust: Crush pretzels to small bits (not dust). Stir with melted butter and sugar. Press firmly into the pan. Bake 8–10 minutes until set. Cool completely.
Mix the filling: Beat cream cheese and powdered sugar until smooth and fluffy. Fold in whipped topping. Spread over the cooled crust, sealing edges. Chill 20–30 minutes.
Prep the strawberry layer: Dissolve gelatin in boiling water. Stir in cold water. Let it cool until it thickens slightly—think maple syrup consistency. Stir in strawberries.
Finish the magic: Gently pour or spoon the strawberry mixture over the cream layer. Smooth it out. Chill 4–6 hours until fully set.
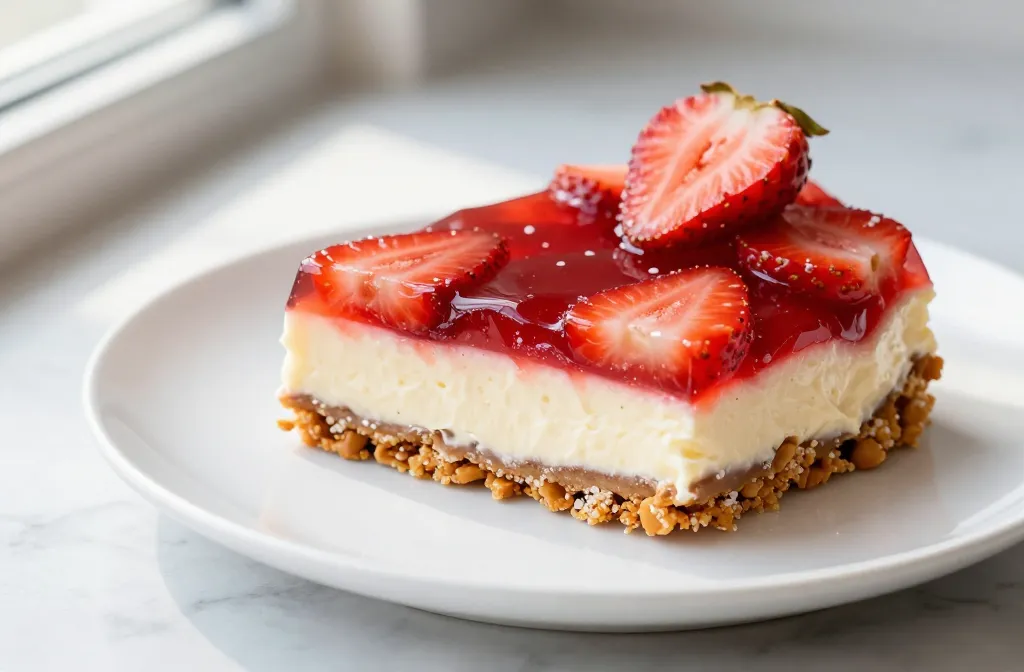
Serve: Slice into bars. Add extra whipped cream if you feel fancy. You earned it.
Small But Mighty Techniques
Crust pressure: Use a flat-bottomed measuring cup to press firmly and evenly. No thin spots.
Temperature control: Cold cream layer + slightly thickened gelatin = tidy layers. Liquid gelatin on warm filling equals chaos.
Strawberry placement: Scatter berries evenly before you pour the rest of the gelatin so you don’t get clumps.
Make-Ahead, Storage, and Party Strategy
You can build these bars the night before. They quietly chill while you pretend you “forgot dessert” and then reveal you’re a genius.
Make-ahead: Assemble fully and chill up to 24 hours. The crust stays crunchy if you sealed that cream layer well.
Storage: Cover and keep refrigerated for 3–4 days. The top may release a little gel by day 3, but flavor stays great.
Transport: Keep the pan cold and level. If it’s hot out, park it in a cooler. These bars don’t love road trips without AC.
Scaling: For a thicker bar, use a 9×9 pan and reduce heat slightly; extend baking and chilling times a bit.
Entertaining Tips
Pre-slice: Cut into neat squares at home, then reassemble in the pan for drama-free serving.
Garnish glow-up: A light drizzle of melted white chocolate or a sprinkle of crushed pretzels on top looks pro.
Portion control (lol): Mini bars work for buffets. Use a 10×15 jelly roll pan, slightly thinner layers, smaller squares.
Troubleshooting: What Went Sideways?
Everyone has a kitchen oops moment. Here’s how to dodge the usual suspects.
Soggy crust: The cream layer didn’t fully cover the pretzels or the gelatin was too runny. Next time, seal the edges and wait for that syrupy stage.
Runny top: Gelatin didn’t set because the ratio was off or it never chilled long enough. Follow the package water amounts and chill a full 4–6 hours.
Gritty filling: Sugar didn’t dissolve well. Use powdered sugar and fully soften the cream cheese.
Crust shatters: You overbaked or didn’t press firmly. Aim for light golden and compact it well.
Flavor Upgrades (If You’re Feeling Extra)
Lemon pop: Add 1–2 tsp lemon zest to the cream layer. Brightens everything, IMO.
Vanilla hug: 1 tsp vanilla extract in the filling adds warmth and depth.
Salty sprinkle: Finish with a pinch of flaky salt on top before serving. Sweet-salty harmony.
FAQ
Can I use fresh whipped cream instead of whipped topping?
Absolutely. Whip 1 cup cold heavy cream with 2 tbsp powdered sugar to soft peaks and fold into the cream cheese mixture. It tastes richer and cleaner, but the bars won’t hold quite as long as with stabilized topping. Serve within 24–36 hours for best texture.
Do I need to sweeten the pretzel crust more?
Nope. The strawberry layer and cream filling bring plenty of sweetness. The crust should stay slightly salty to balance everything. If your pretzels taste very salty, you can cut the added sugar to 2 tbsp and still get magic.
Why did my gelatin seep into the crust?
Two likely culprits: you poured the gelatin while it was still very liquid, or you didn’t spread the cream layer to the pan’s edges. Let the gelatin thicken first and use a spatula to press the cream against all sides.
Yes, with some caveats. Use dairy-free cream cheese and a non-dairy whipped topping, both well-chilled. The texture stays great. Also swap butter for a plant-based butter with at least 80% fat. Flavor shifts a bit, but it still slaps.
What if I only have whole strawberries?
Slice them thin so the top layer sits level. Big chunks make messy slices and uneven coverage. If they’re super juicy, pat them dry before stirring into the gelatin.
Can I freeze these bars?
I wouldn’t. Gelatin and cream layers can weep and separate when thawed. If you must, freeze individual slices tightly wrapped and thaw in the fridge, but expect some texture changes.
Final Bite
Strawberry Pretzel Dessert Bars prove you don’t need a culinary degree to make something iconic. Keep the layers tidy, chill like you mean it, and embrace the salty-sweet crunch. You’ll serve them once, and then your friends will “volunteer” you to bring them forever. FYI: that’s the price of greatness.
Disclosure: This post may contain affiliate links.
If you make a purchase through these links, I may earn
a small commission at no extra cost to you.
prab chahal
Hi, I’m Prabjot Chahal – the heart (and taste buds) behind this blog!
Food has always been my love language – from experimenting with family recipes to discovering unique flavors from around the world. I believe that cooking isn’t just about following a recipe, it’s about creating moments, sharing stories, and connecting with others over something delicious. Through this blog, I want to build a vibrant food community where we share more than just recipes – we share inspiration, tips, and the joy of making and enjoying good food together. Whether you’re here for quick weekday dinners, festive treats, or creative seasonal ideas, you’re part of this table. So grab a fork (or a whisk!) and let’s cook, bake, and share our love for food – one recipe at a time.