You want gooey, toasty, chocolatey s’mores… without hunting for sticks or smelling like campfire smoke? Enter s’mores cookie bars. They pack all the messy, melty joy of the classic treat into tidy squares you can bake any time. Zero tents required. Maximum nostalgia guaranteed.
Why S’mores Cookie Bars Beat a Campfire (Most Days)
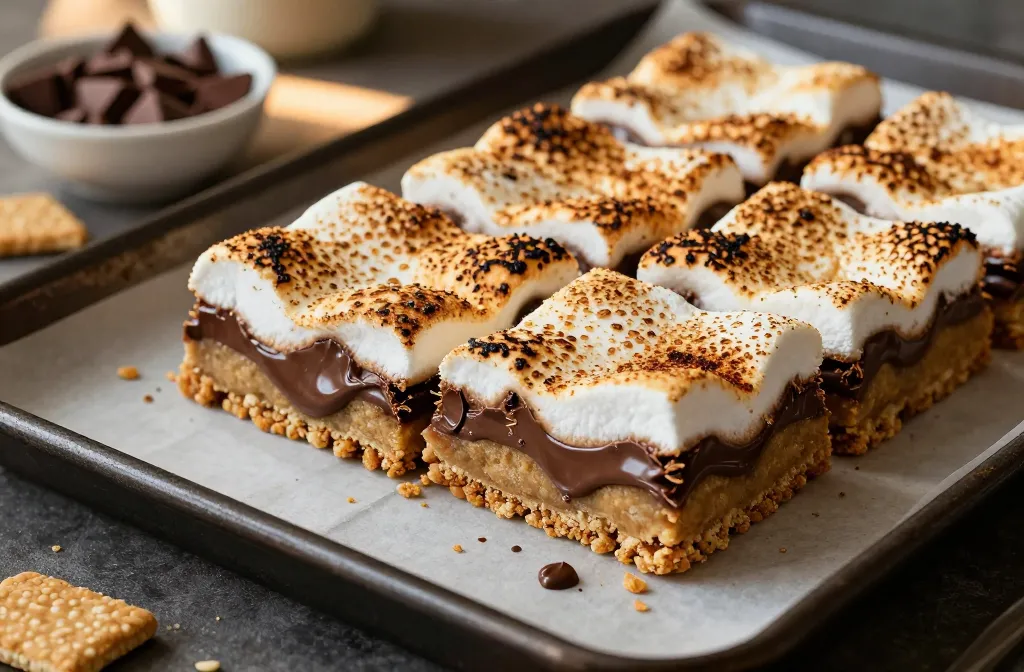
S’mores cookie bars give you everything you love—crunch, goo, and chocolate—minus the sticky fingers that glue you to your napkin. They slice cleanly, travel well, and taste even better the next day. Plus, you can scale a pan for a crowd without juggling skewers. That’s a win, FYI. Key idea: Build layers—graham base, cookie dough, chocolate, marshmallow—then bake until the top blisters and the edges caramelize. It’s that simple, and wildly satisfying.
The Classic Layered Bar (Your Starter Recipe)
This version nails the flavor you crave with minimal fuss. Make it once, memorize it forever, flex it at every potluck. You’ll need:
1 1/2 cups crushed graham crackers (fine crumbs)
6 tbsp unsalted butter, melted
2 tbsp granulated sugar
1/2 tsp kosher salt, divided
1/2 cup unsalted butter, room temp
1/2 cup brown sugar, packed
1/4 cup granulated sugar
1 large egg
1 tsp vanilla extract
1 1/4 cups all-purpose flour
1/2 tsp baking soda
1 cup chocolate chips or chunks (milk or semi-sweet)
2 XL milk chocolate bars (Hershey-style), snapped into pieces
2 cups mini marshmallows (or marshmallow creme—see notes)
Steps:
Heat oven to 350°F (175°C). Line an 8×8-inch pan with parchment, overhang on two sides for easy lifting.
Mix graham crumbs, melted butter, 2 tbsp sugar, and a pinch of salt. Press firmly into the pan. Bake 8 minutes, then cool 5 minutes.
Cream 1/2 cup butter with brown sugar and 1/4 cup sugar until fluffy. Beat in egg and vanilla.
Whisk flour, 1/2 tsp baking soda, and remaining salt. Stir into the butter mix. Fold in chocolate chips.
Spread half the dough over the crust. Layer chocolate bar pieces evenly. Scatter marshmallows on top.
Dollop remaining dough in flattened pieces to mostly cover the marshmallows. Don’t stress about gaps—melty marshmallow drama looks great.
Bake 22–27 minutes, until top turns golden and edges look set. Cool at least 45 minutes before lifting and slicing. (Yes, waiting is torture. Worth it.)
Tips for best results
Chill for tidy slices: Pop the pan in the fridge for 30 minutes after cooling. Clean cuts, less mess.
Broil for toastiness: Want extra char? Broil 30–60 seconds at the end. Watch like a hawk.
Line the pan: Parchment prevents sugar-glued corners. Your dish will thank you.
Ingredient swaps
Graham crackers: Sub digestive biscuits, Biscoff, or gluten-free grahams 1:1.
Chocolate: Use dark for less sweet, or swirl Nutella on the chocolate layer.
Marshmallows: Mini melt evenly. Marshmallow creme works—spread thin to avoid overflow.
Dairy-free: Plant butter and dairy-free chocolate make these friendly for more folks.
Brown Butter S’mores Bars for Grown-Ups
Want a deeper, nutty vibe? Brown the butter for the cookie dough and add a whisper of espresso powder. It punches the chocolate without tasting like coffee. How to brown butter fast:
Melt 1/2 cup butter over medium heat. Stir until it foams and the milk solids turn amber and smell toasty (3–5 minutes).
Cool 10 minutes, then continue the cookie dough as above. Add 1/2 tsp espresso powder if you like.
Pro move
Salt flakes on top: A pinch of flaky sea salt at the finish makes flavors pop. Don’t skip if you’ve got it.
Skillet S’mores Cookie (Shareable and Dramatic)
No parchment. No squares. Just grab spoons and go. This one bakes in a 10-inch oven-safe skillet and screams movie night. Method:
Make the same cookie dough, but stir in 1/2 cup crushed graham crackers with the flour.
Press dough into a buttered skillet. Bake at 350°F for 12–15 minutes until edges set but center looks soft.
Top with chocolate pieces and marshmallows. Broil until toasted. Serve warm with scoops of vanilla ice cream. Chaos, but the good kind.
Chewy vs. Crunchy: Dialing in Texture
You control the vibe. Want a softer bite or a crisper base? Easy tweaks.
Softer, chewier bars: Use more brown sugar than white in the dough and pull the pan on the early side.
Crispier base: Add 1 extra tablespoon melted butter to the graham mix and pre-bake 10–12 minutes.
Extra goo factor: Add a swirl of marshmallow creme on top of mini marshmallows before the final dough layer.
IMO, the perfect balance
Crisp edges, soft center, toasted top. Aim for golden brown all over with a slight jiggle in the middle. The carryover heat finishes the job.
Fun Flavor Twists (When You’re Feeling Extra)
You love the classic, but sometimes you need a little razzle-dazzle. Try these:
Peanut butter cup s’mores bars: Swap half the chocolate with chopped PB cups. Add 2 tbsp peanut butter to the dough.
Salted caramel swirl: Drizzle 1/3 cup warm caramel over the chocolate layer. Add flaky salt after baking.
Mocha crunch: Mix 1 tbsp cocoa powder and 1 tsp espresso powder into the dough. Use dark chocolate chunks.
Toasted coconut: Sprinkle 1/2 cup toasted coconut with the marshmallows for a Mounds-adjacent moment.
Raspberry s’mores: Dot 1/3 cup seedless raspberry jam between the chocolate and marshmallow layers. Tart + sweet = chef’s kiss.
Make it party-friendly
9×13 pan: Double the recipe and bake 25–35 minutes. Rotate halfway for even browning.
Bar topping bar: Serve plain bars with bowls of crushed pretzels, chopped nuts, and extra chocolate for DIY flair.
Storage, Make-Ahead, and Freezer Tips
Bake today, feast tomorrow. Or next month. I don’t judge.
Room temp: Store in an airtight container up to 3 days. The crust softens slightly but stays great.
Fridge: Keeps 5 days. Let bars come to room temp for best texture—or microwave 10–15 seconds.
Freeze: Wrap individual squares and freeze up to 2 months. Thaw at room temp 1–2 hours.
Make-ahead dough: Chill cookie dough up to 48 hours. Press into pan cold and add 2–3 minutes to bake time.
FAQ
Can I use marshmallow fluff instead of mini marshmallows?
Yes, spread a thin, even layer over the chocolate. Use a greased offset spatula to prevent sticking. Fluff melts more aggressively, so leave some edges uncovered and watch for bubbling near the end.
Why did my bars turn out greasy?
Most likely the crust had too much butter or the crumbs were too coarse. Measure crumbs after crushing, and press them tightly. Also, cool the pre-baked crust briefly so the cookie dough doesn’t melt into it immediately.
How do I keep the top from over-browning?
Tent loosely with foil during the last 5–10 minutes if the top darkens too fast. You can also move the pan to a lower rack. If you plan to broil at the end, bake slightly lighter so you don’t overshoot.
Can I make these gluten-free?
Totally. Use gluten-free graham crackers and a 1:1 gluten-free flour blend for the dough. Check your chocolate and marshmallows for GF labeling. Texture stays impressively close to the original.
What chocolate works best?
Classic milk chocolate brings that campfire nostalgia, but semi-sweet or dark balances the sweetness better, IMO. A mix of chips for melt and bar chunks for ooze gives the best of both worlds.
Do I need a mixer?
Nope. A sturdy spatula and a bowl get the job done. Cream the butter and sugars well by hand to avoid dense dough, and you’re golden.
Wrap-Up: Your New Crowd-Pleaser
S’mores cookie bars deliver all the gooey charm of a campfire without leaving your kitchen. Start with the classic, then riff with brown butter, caramel, or raspberry when you feel extra. Slice, share, and brace for compliments—because you just made everyone’s inner kid very, very happy.
Disclosure: This post may contain affiliate links.
If you make a purchase through these links, I may earn
a small commission at no extra cost to you.
prab chahal
Hi, I’m Prabjot Chahal – the heart (and taste buds) behind this blog!
Food has always been my love language – from experimenting with family recipes to discovering unique flavors from around the world. I believe that cooking isn’t just about following a recipe, it’s about creating moments, sharing stories, and connecting with others over something delicious. Through this blog, I want to build a vibrant food community where we share more than just recipes – we share inspiration, tips, and the joy of making and enjoying good food together. Whether you’re here for quick weekday dinners, festive treats, or creative seasonal ideas, you’re part of this table. So grab a fork (or a whisk!) and let’s cook, bake, and share our love for food – one recipe at a time.


")
")