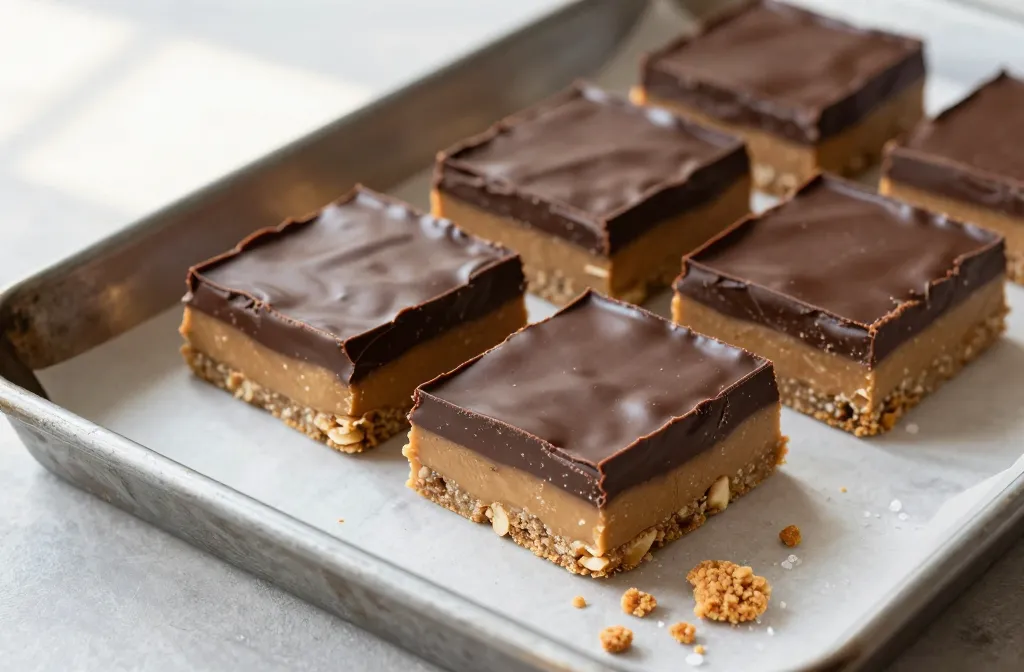
Peanut butter bars with chocolate on top hit that sweet spot where nostalgia meets zero-fuss baking. They taste like a candy bar but slice like brownies. You don’t need an oven, a degree in pastry, or even a stand mixer. Just a bowl, a pan, and a dangerous amount of willpower.
Why These Bars Absolutely Slap
These bars deliver a perfect bite: buttery, salty-sweet peanut base, and a smooth chocolate cap that snaps just enough. They’re fast, foolproof, and party-proof. Also, they store like champs, which means you can make them on a random Tuesday and still have a treat on Friday. If they last that long. (They won’t.)
The Core Formula (No Oven, No Drama)
Think of these as a no-bake cousin of fudge, but lighter and a little salty in the best way. You press a peanut butter mixture into a pan, melt chocolate on top, chill, slice, flex. That’s it. You’ll need:
Peanut butter (creamy works best)
Butter
Powdered sugar
Graham cracker crumbs (or a similar crunchy binder)
Chocolate chips or chopped chocolate
Vanilla and a pinch of salt
Classic Ratio That Never Fails
1 cup unsalted butter, melted
2 cups graham cracker crumbs
2 cups powdered sugar
1 1/2 cups creamy peanut butter (plus 2–3 tablespoons for the chocolate layer)
2 cups chocolate chips (semi-sweet or milk chocolate)
1 teaspoon vanilla extract
1/2 teaspoon fine sea salt
Step-by-Step (10 Minutes of Effort, Tops)
Line a 9×13-inch pan with parchment, leaving overhang for easy lifting.
Stir melted butter, peanut butter, vanilla, and salt until smooth.
Mix in powdered sugar and graham crumbs. Stir until it looks like soft cookie dough.
Press the mixture into the pan in an even layer. Compact it well—use a flat measuring cup.
Melt chocolate chips with 2–3 tablespoons peanut butter (microwave in bursts or use a double boiler). Stir until glossy.
Pour chocolate over the base and smooth it out. Tap the pan to release bubbles.
Chill 60–90 minutes until set. Slice into bars with a warm knife. Try not to eat five. Fail gloriously.
Texture Talk: Get the Snap and the Soft Right
You want a firm base that holds, not a crumbly mess. The graham crumbs and powdered sugar bind moisture and give structure. If it feels too loose, add more crumbs a tablespoon at a time. Too stiff? A spoonful of peanut butter fixes it. On top, the chocolate should set with a soft bite, not a tooth-cracking slab. A little peanut butter melted into the chocolate keeps it tender. If you live somewhere warm, chill the bars slightly longer, then let them rest at room temp 10 minutes before cutting.
Tips for Best Results
Use creamy peanut butter for a silky base. Natural PB can work, but stabilize it (see swaps).
Press the base firmly so the layers don’t separate when slicing.
Warm your knife under hot water, wipe dry, slice. Clean between cuts for sharp edges.
Don’t over-melt the chocolate. Heat gently, stir a lot. Chocolate throws tantrums when scorched.
Salt helps. A pinch in the base + flaky salt on top for that sweet-salty pop.
Ingredient Swaps That Still Taste Like Childhood
Not everyone keeps graham crumbs or standard PB around. No stress.
Peanut Butter Options
Natural peanut butter: Stir until fully emulsified. Add 1–2 extra tablespoons powdered sugar to offset the looseness.
Crunchy peanut butter: Totally fine for texture lovers. Reduce graham crumbs by a couple tablespoons if it feels dry.
Peanut allergy? Use almond butter, cashew butter, or sunflower seed butter. FYI, sunflower seed butter tastes slightly earthy but plays great with chocolate.
Crumb Alternatives
Shortbread cookie crumbs for a richer base
Digestive biscuits for a not-too-sweet vibe
Gluten-free graham-style crackers or crispy rice cereal for a GF-friendly version
Biscoff cookies if you want a caramel-spice slay (IMO, excellent.)
Chocolate Choices
Semi-sweet: Balanced and classic.
Milk chocolate: Sweeter and kid-approved.
Dark (60–70%): Fancy-feeling, cuts the sweetness.
Mix it up: Half milk, half dark = win.
Make-Ahead, Store, Share (or Hide)
These bars love the fridge. They set faster, slice cleaner, and taste amazing cold. You can also freeze them if you want an emergency stash.
Storage Basics
Fridge: Airtight container, 1–2 weeks. Separate layers with parchment to avoid sticking.
Freezer: Up to 2 months. Thaw in the fridge for an hour before serving.
Room temp: Short-term only (a few hours), especially if your kitchen runs warm.
Gifting and Transport
Cut into small squares, nestle into mini cupcake liners, and stash in a tin. They travel well if you keep them cool. If it’s hot out, toss in an ice pack and pretend you’re a pro chocolatier on tour.
Flavor Upgrades That Take 2 Extra Minutes
Let’s zhuzh it a bit. The base tastes great as-is, but a few tweaks turn these from “yum” to “whoa, who made these?”
Vanilla + espresso: Add 1/2 teaspoon instant espresso to the chocolate layer for mocha vibes.
Salted crunch: Sprinkle flaky sea salt or crushed pretzels on top before the chocolate sets.
Peanut swirl: Dollop warm peanut butter on the chocolate, swirl with a toothpick. Artsy and delicious.
Peanut butter cup energy: Add a thin layer of chopped roasted peanuts between base and chocolate.
Coconut moment: Mix 1/2 cup toasted coconut into the base. Tropical meets candy bar.
Party-Size Variations
Thick bars: Use an 8×8 pan for chunky squares. Increase chill time.
Bite-size: Press into a lined quarter sheet pan for thinner bars—easier to feed a crowd.
Holiday version: Sprinkle crushed candy canes on top in December for minty crunch.
Common Pitfalls (And Easy Fixes)
Crumbly base: Add another spoon of peanut butter, mix again, and press firmly.
Greasy layer separation: Use the peanut butter-in-chocolate trick and chill fully before slicing.
Chocolate blooms (white streaks): Cosmetic only. Keep bars in the fridge to prevent it. Still tastes perfect.
Too sweet: Use dark chocolate and add a pinch more salt. Balance restored.
FAQ
Can I make these without graham crackers?
Absolutely. Use digestive biscuits, shortbread, Biscoff, or gluten-free grahams. Even finely crushed cornflakes or crispy rice cereal can work if you like a lighter, crispier bite.
Do I need a mixer?
Nope. A sturdy spatula and a bowl will do the job. Melt the butter first so everything blends easily by hand.
Stir a spoonful or two of peanut butter into the melted chocolate. It softens the set. Also, don’t cut the bars straight from the fridge; let them sit 10 minutes so the chocolate yields instead of shatters.
Can I reduce the sugar?
Yes. Swap some powdered sugar for extra graham crumbs to maintain structure, and use darker chocolate. The texture stays solid, and the sweetness drops to a more grown-up level, IMO.
What if I only have natural peanut butter?
Use it, but stir it thoroughly to reincorporate the oil. Add a tablespoon or two extra powdered sugar and an extra pinch of salt to compensate. Chill well to help it set firm.
How long do they last?
In the fridge, 1–2 weeks. In the freezer, about 2 months. Wrap tightly, and they’ll taste fresh every time you sneak one at 11 p.m. FYI, they disappear faster than that in real life.
Conclusion
Peanut butter bars with chocolate on top bring maximum payoff for minimal effort. They’re nostalgic, adaptable, and wildly snackable. Whip up a pan, add a sprinkle of flaky salt, and prepare for instant hero status. And if you stash a secret corner piece for later? I fully support your life choices.
Disclosure: This post may contain affiliate links.
If you make a purchase through these links, I may earn
a small commission at no extra cost to you.
prab chahal
Hi, I’m Prabjot Chahal – the heart (and taste buds) behind this blog!
Food has always been my love language – from experimenting with family recipes to discovering unique flavors from around the world. I believe that cooking isn’t just about following a recipe, it’s about creating moments, sharing stories, and connecting with others over something delicious. Through this blog, I want to build a vibrant food community where we share more than just recipes – we share inspiration, tips, and the joy of making and enjoying good food together. Whether you’re here for quick weekday dinners, festive treats, or creative seasonal ideas, you’re part of this table. So grab a fork (or a whisk!) and let’s cook, bake, and share our love for food – one recipe at a time.


")
")