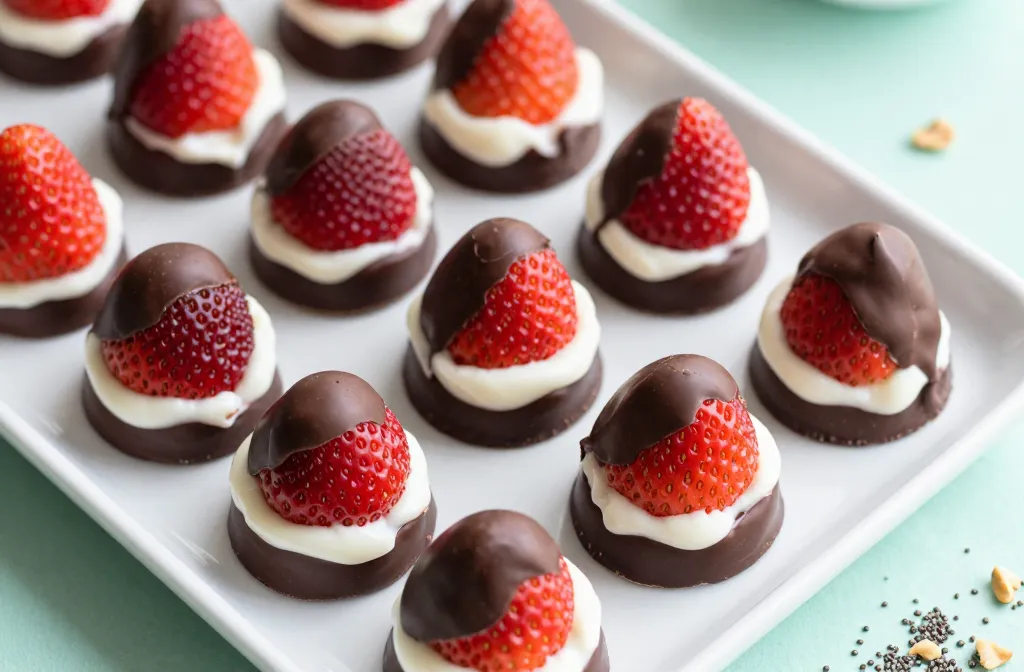
It takes just a handful of ingredients and a quick freeze to turn ordinary yogurt into something dangerously addictive. Frozen Strawberry Yogurt Chocolate Bites are basically summer in bite-sized form—cool, fruity, and a little bit fancy. You’ll be popping these like candy, but with the healthy-leaning vibe of yogurt and fruit. FYI, you’re about to become the snack MVP among friends.
What makes these bites so irresistibly shareable
They’re not just cute. They’re easy to whip up, customize, and stash in the freezer for a rainy day (or a hot afternoon when motivation is hiding somewhere between the couch cushions). You get bright strawberry tartness, creamy yogurt, and a crisp chocolate shell all in one little package. Who said snacking had to be complicated?
Ingredients and why they work
Frozen strawberries provide that punchy flavor and natural sweetness without needing a ton of sugar.
Plain or Greek yogurt brings creaminess and protein—ditch the fat myth, this is a vibe.
Dark or milk chocolate for dipping. The chocolate adds a glossy shell and a satisfying snap.
Honey, maple syrup, or a pinch of vanilla to balance the tang. Use sparingly—nobody needs sticky sweetness.
Optional add-ins like chia seeds, mini chocolate chips, or crushed nuts for texture and flair.
How to make them without drama
Blend frozen strawberries with yogurt until smooth. If you want extra strawberry punch, add a splash of strawberry jam.
Scoop onto a parchment-lined tray and freeze until firm. This sets up the base so the chocolate coat sticks nicely.
Melt chocolate gently and dip the frozen Centers. Return to the tray and freeze again until the chocolate hardens.
Techniques for glossy, breaky chocolate coating
Getting a shiny, crackly shell is easier than it looks. Here’s how to nail it without a mess:
Use tempering (if you’re feeling fancy) or simply melt and temper by adding a hint of coconut oil or shortening for shine.
Keep the chocolate at a pleasantly warm, not hot, temperature while dipping so it coats evenly.
Dry surfaces = better shell. Pat the berries dry before dipping to avoid watery chocolate that won’t set.
Little hacks to customize (and save you time)
Make-ahead magic: Freeze the filling in small silicone molds for perfectly uniform bites.
Flavor upgrades: Add a quarter teaspoon of orange zest or a pinch of cinnamon for a surprising twist.
Texture play: Roll the frozen centers in crushed nuts or coconut before the chocolate sets for extra crunch.
Pro tips
Label your tray with a date. Frozen yogurt bases taste best within a couple of weeks, but you’ll likely finish them sooner, right?
Work quickly but calmly. If the centers melt too much, pop the tray back in the freezer for 10 minutes and try again.
Use a fork or dipping tool to lower the bites into chocolate—keeps your fingers clean and the coating even.
Common mistakes
Too-warm filling: It can cause the chocolate to seize or the center to sag when dipped.
Clumpy chocolate: Not enough melting or overheating can make the coating dull or spotty.
Skipping docking time: If you don’t let the centers freeze solid before dipping, the coating won’t cling.
Variations
Raspberry twist: Swap strawberries for raspberries for a tarter edge.
Minty finish: Add a drop of peppermint extract to the chocolate for a refreshing bite.
Caramel surprise: Drizzle a thin line of caramel before the final freeze for a plug‑and‑play filled bite.
Comparison blocks
Here’s how different approaches stack up so you can pick your vibe:
<strongClassic: Strawberry yogurt center with dark chocolate shell. Best balance of flavor and texture.
<strongDark chocolate-forward: Use only bitter chocolate for a grown-up finish; pairs beautifully with tangy yogurt.
<strongCreamy and mild: Use sweeter milk chocolate and a touch more honey for a dessert-like bite.
FAQ: quick answers to your burning questions
Can I make these dairy-free? Yes. Use coconut yogurt or almond yogurt as the base and a dairy-free chocolate coating. The texture will be a touch lighter, but still fabulous.
How long do they last in the freezer? About 2–3 weeks for best texture. They’ll still be good after that, but the yogurt can develop a frosty freezer taste if left too long.
Do I have to use strawberries? Not at all. Any berry works, or mix a few berries for a mosaic of flavors.
Are they kid-friendly? Absolutely. They’re basically frozen fruit pops in bite-size form. Just mind the chocolate shell as it can be a bit melty on warm days.
Storage and freezing do’s and don’ts
Do freeze on a parchment-lined tray so they don’t freeze into one big block.
Don’t stack them when freezing. Leave space for air to circulate around each bite.
Do keep them in an airtight container to prevent ice crystals and flavor transfer from other frozen foods.
Don’t forget to label with date. It saves you from playing freezer detective later.
Flavor boosters to try next time
Orange zest and a splash of vanilla for a bright, sunny profile.
Chili dust or pink peppercorn for a surprising heat and aroma contrast.
Almond butter drizzle inside for a nutty center that bites back with a crunch.
Conclusion
Frozen Strawberry Yogurt Chocolate Bites are the kind of treat that makes you feel like a kitchen wizard without the big effort. They’re easy, flexible, and absolutely crave-worthy. IMO, the best part is how endlessly customizable they are—you can tailor them to your mood, the season, or whatever you’ve got lounging in the fruit bowl. So grab some berries, melt some chocolate, and start dipping. Your future self will thank you—and your friends will demand these at the next gathering.
Disclosure: This post may contain affiliate links.
If you make a purchase through these links, I may earn
a small commission at no extra cost to you.
prab chahal
Hi, I’m Prabjot Chahal – the heart (and taste buds) behind this blog!
Food has always been my love language – from experimenting with family recipes to discovering unique flavors from around the world. I believe that cooking isn’t just about following a recipe, it’s about creating moments, sharing stories, and connecting with others over something delicious. Through this blog, I want to build a vibrant food community where we share more than just recipes – we share inspiration, tips, and the joy of making and enjoying good food together. Whether you’re here for quick weekday dinners, festive treats, or creative seasonal ideas, you’re part of this table. So grab a fork (or a whisk!) and let’s cook, bake, and share our love for food – one recipe at a time.


")