I’ve been on a constant mission to find that one perfect snack. You know the one—it has to please the kids, be sophisticated enough for adults, and ideally, be something I can whip up without turning my kitchen upside down. For the longest time, my afternoon tea time felt like a compromise.
The kids wanted something sweet and fun, and I just wanted a moment of peace with a warm, comforting bite. Then, I discovered this easy churro bites recipe, and everything changed.
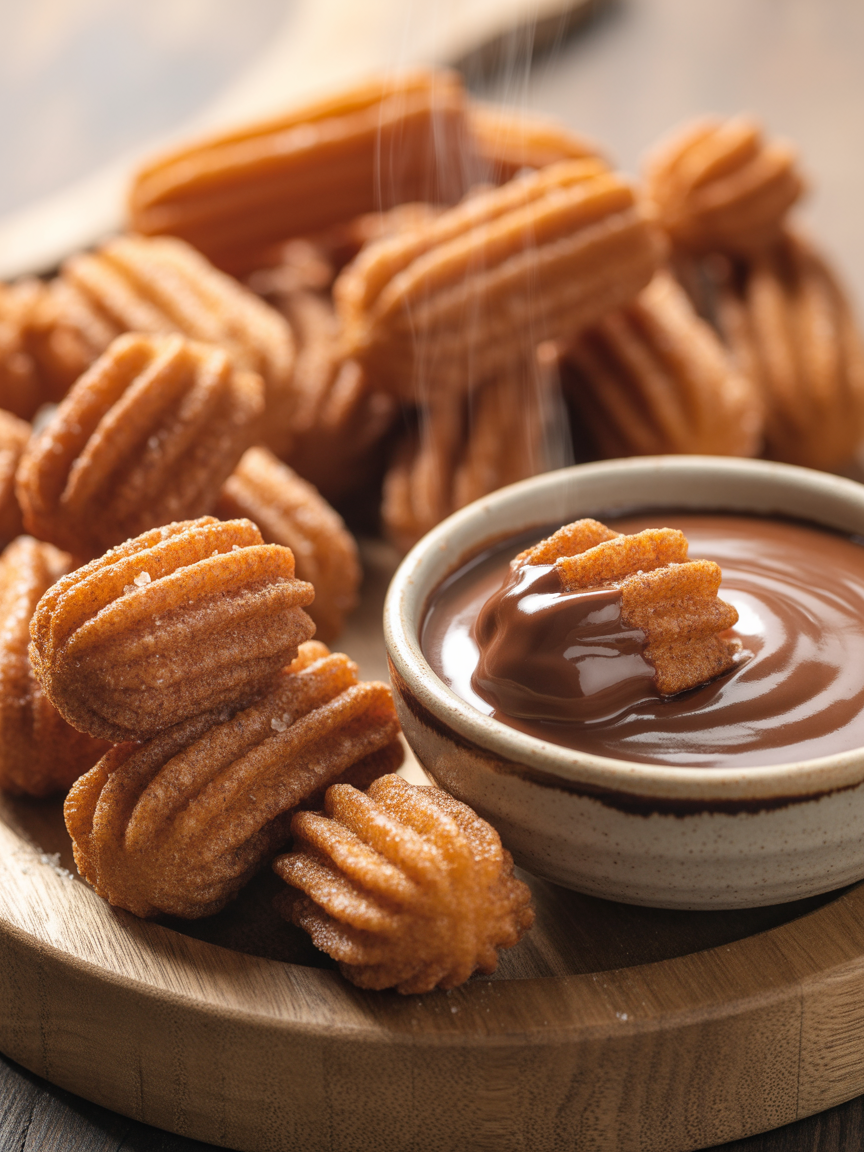
These little morsels of joy are everything you could want in a treat. They have a wonderfully soft and tender inside, protected by a perfectly crisp, golden-brown exterior. The best part? They are rolled in a blanket of warm cinnamon sugar.
Parents, you’ll love this recipe because it’s surprisingly quick, and you can choose to either bake or fry them. Whether you need a special lunchbox surprise, a crowd-pleasing party dessert, or a perfect tea-time treat, these mini bites are the answer. And you don’t need any fancy equipment to make them happen.
Why Kids (And You!) Will Absolutely Love These Churro Bites
It’s one thing for me to love a recipe, but getting the kids on board is the real test. These churro bites passed with flying colors. Their bite-sized shape makes them incredibly easy for little hands to hold and dip. While they are sweet, they aren’t overwhelmingly sugary, so you can feel good about serving them.
The real fun begins with the dipping sauces. We set up little bowls of melted chocolate, caramel, and even strawberry sauce, turning snack time into a fun, interactive activity.
The dough itself is simple and not messy, which means it’s a great opportunity for kids to help in the kitchen. From birthday parties and sleepovers to a simple after-school snack, these churro bites have become our go-to for making any moment a little more special.
Ingredients You’ll Need for This Easy Churro Bites Recipe
Let’s keep it real—one of my favorite things about these churro bites is that everything you need is probably already sitting in your pantry or fridge. No running to three different stores. Here’s what I grab before tying on my apron:
For the Churro Dough:
1 cup water (just from the tap, nothing fancy)
1/2 cup unsalted butter (I always reach for the real deal, but margarine will work in a pinch)
1/4 cup granulated sugar (just your everyday white sugar)
1/4 teaspoon salt
1 cup all-purpose flour (honestly, the cheapest bag does the job)
3 large eggs (the fresher, the better)
1 teaspoon vanilla extract (the secret to making your kitchen smell heavenly)
For the Cinnamon Sugar Coating:
1 cup granulated sugar
2 teaspoons ground cinnamon (I sometimes eyeball this—if you love cinnamon, add a little extra!)
A pinch of nutmeg (totally optional, but it makes the coating feel a little ‘bakery special’)
Additional (Optional):
2 tablespoons melted butter (especially nice for baked churros)
Chocolate or caramel sauce for dipping—always a win with kids, or honestly, with me!
Rainbow sprinkles for that fun, celebratory touch (I keep these in a jar for snack emergencies)
It’s seriously as simple as that—nothing tricky or intimidating, just the fixings for pure, cinnamon-scented happiness.
The magic of this recipe lies in its simple, pantry-staple ingredients. For the best results, using good-quality ingredients will make a noticeable difference in the final texture and flavor.
For the Churro Dough:
1 cup water
1/2 cup unsalted butter
1/4 cup granulated sugar
1/4 teaspoon salt
1 cup all-purpose flour
3 large eggs
1 teaspoon vanilla extract
For the Cinnamon Sugar Coating:
1 cup granulated sugar
2 teaspoons ground cinnamon
A pinch of nutmeg (optional, but adds a lovely warmth)
Additional (Optional):
2 tablespoons melted butter (for the baked version)
Chocolate or caramel sauce for dipping
Rainbow sprinkles for a kid-friendly touch
Equipment Needed for Churro Bites
Before you dive into making these churro bites, let’s chat about the handful of tools you’ll want by your side. The beauty of this recipe is that it doesn’t require anything special—just the things you probably already have in your kitchen drawer!
Heavy-Bottom Pot & Slotted Spoon: For the fried version.
Mixing Bowl & Spatula: For preparing the dough.
Small Bowls: For the cinnamon-sugar coating and dipping sauces.
Step-by-Step Instructions to Make Perfect Churro Bites
Let’s roll up our sleeves together and make some churro magic! I promise, this process is way easier (and way more fun) than you might think. I make these with my kids and, honestly, we all look forward to the mess and giggles as much as the final bites.
Step 1: Make the Dough
Grab your favorite saucepan—you know, the one you always trust not to burn the butter! Pour in the water, toss in the butter, sugar, and salt.
I let the kids measure the sugar, which always makes them feel like “real bakers.” Bring everything to a good boil over medium-high heat—once the butter’s completely melted and everything’s simmering, drop the heat to low and dump all the flour in at once.
Now, stir like you mean it! This is a two-handed job for me—one to hold the pot and one to work that dough until it clumps up and pulls away from the sides.
It should all come together quickly, just a minute or two, and suddenly you have a big, soft dough ball.
Take it off the heat and let it cool a bit—about 5 to 10 minutes—otherwise the eggs will scramble, and trust me, nobody wants that.
Step 2: Add the Eggs & Vanilla
Once the dough is no longer piping hot (if you can touch it without flinching, you’re good), scoop it into a mixing bowl.
Now the eggs go in, one at a time. My youngest likes to “crack and drop”—sometimes I’m fishing out a bit of shell, but that’s part of the charm.
Mix well after each egg, and don’t panic if it looks weird and slippery for a minute. Keep stirring or blending, and it will turn glossy and hold together.
Last, splash in the vanilla. Take a second to breathe in that amazing smell—I swear it’s the smell of happiness.
Step 3: Shape the Churro Bites
Transfer the dough to a piping bag or a zip-lock bag with a corner cut off (we’ve improvised with both).
Fit your star nozzle if you have one—it’s not required, but the kids get such a kick out of those ridges. Pipe or squeeze out bite-sized pieces (about an inch or two long) onto a baking sheet lined with parchment.
When my kids help, we end up with all sorts of shapes—squiggles, odd balls, the letter “M.” It all tastes the same, and honestly, the wobbly ones are my favorites.
Step 4A: The Baked Version
If you prefer to bake (it’s my go-to for less mess), heat your oven to 400°F (200°C). Space the churro bites out on the tray and brush them with a bit of melted butter for an extra golden, decadent finish.
Bake for 20 to 25 minutes, or until they’re beautifully golden and crisp on the outside.
Pro tip: Turn the oven off, crack the door, and let the churros sit for 10 minutes—this keeps them perfectly crisp.
Step 4B: The Fried Version
If you’re feeling a little adventurous, it’s fry time! Pour about 2 inches of vegetable or canola oil into a heavy pot and heat it to 360°F (180°C). (A candy thermometer is helpful, but I’ve also just flicked in a tiny bit of dough and looked for sizzle.)
Fry the bites in batches for 2 to 3 minutes per side, turning them until puffed and deep gold. My kitchen smells like a festival when I do this! Scoop them out with a slotted spoon and drain them on paper towels or a wire rack.
Step 5: The Cinnamon Sugar Coating
Here’s where the magic really happens. Mix your sugar and cinnamon (plus nutmeg if you’re feeling fancy) in a shallow bowl.
While the churro bites are still warm—don’t wait—toss them in the cinnamon sugar until they’re coated like little treasures. If my kids are around, I have to guard this bowl or half the bites disappear before we’re done!
And that’s it—you’ll be left with a batch of golden, cinnamony, irresistible churro bites. They’re less “perfect bakery,” more “made with love,” and that’s exactly how we like them.
Easy Churro Bites: The Perfect Tea-Time Treat for All Ages
Keep Them Crisp: Store churros in a single layer at room temperature. Piling them up can create steam and make them soggy.
Prevent a Soggy Mess: Ensure your fried churros are drained well and that baked churros are fully cooked through.
Avoid Splitting Dough: Let the dough cool sufficiently before adding the eggs. Adding eggs to hot dough can cause it to become greasy and split.
Perfect Piping: If the dough is too stiff to pipe, add a teaspoon of warm water. If it’s too runny, add a tablespoon of flour.
Softer for Toddlers: For younger kids, you can slightly under-bake the churros so they remain softer on the inside.
Fun, Kid-Friendly Variations
Fun Shapes: Use the piping bag to create hearts, stars, or even the first letter of your child’s name.
Flavored Coatings: Mix cocoa powder with sugar for a chocolatey coating, or blend freeze-dried strawberries with sugar for a fruity twist.
Fun Toppings: After dipping in chocolate, let the kids go wild with rainbow sprinkles or mini chocolate chips.
Delicious Dipping Sauces: Go beyond chocolate and try caramel sauce, strawberry syrup, or even marshmallow fluff.
Healthier & Allergy-Friendly Alternatives
This recipe is wonderfully adaptable for different dietary needs.
Baked or Air Fryer: Baking is a great way to reduce the fat content. For an air fryer version, cook at 375°F (190°C) for 8-10 minutes, shaking the basket halfway through.
Flour Alternatives: You can experiment with whole wheat or oat flour for added fiber, though the texture will be slightly denser.
Refined Sugar-Free: Swap granulated sugar for coconut sugar in both the dough and the coating.
Egg-Free Option: Use 1/4 cup of unsweetened applesauce per egg as a substitute. The texture will be a bit different but still delicious.
Serving Ideas for Any Occasion
Party Platter: Arrange them on a large platter with various dipping sauces in the center.
Lunchbox Treat: Pack a few in a small container for a delightful school snack.
Winter Warmer: Serve alongside a mug of rich hot chocolate for dunking.
Movie Night Snack: Forget popcorn! A bowl of warm churro bites is the ultimate movie night indulgence.
Dessert Bowl: Top a scoop of vanilla ice cream with churro bites and a drizzle of caramel sauce.
Storage and Reheating Guide
Storage: Churro bites are best eaten the day they are made. If you have leftovers, store them in an airtight container at room temperature for up to 2 days. Avoid the fridge, as it can make them soggy.
Reheating: To bring back their signature crispiness, reheat them in an oven or air fryer at 350°F (175°C) for 5-7 minutes.
Freezing: You can freeze the uncooked, piped dough on a baking sheet. Once frozen, transfer the bites to a freezer bag. You can also freeze cooked churros, though they may lose some texture upon reheating.
Troubleshooting Common Mistakes
Dough is too runny: You may have added the eggs too quickly or used extra-large eggs. Add a tablespoon of flour at a time until it thickens.
Dough is too stiff: The flour may have been overcooked. Try adding a teaspoon of warm water to loosen it.
Churros are soggy: Your oil might not have been hot enough, causing them to absorb too much grease. Use a thermometer to maintain the correct temperature.
Sugar won’t stick: You waited too long to coat them. Roll the churros in the cinnamon-sugar mixture while they are still warm.
Baked churros are pale: They may need a few more minutes in the oven or a more generous brushing of melted butter before baking.
Frequently Asked Questions About Churro Bites
Can I bake churro bites instead of frying? Absolutely! The baked version is a fantastic, healthier alternative. Just follow the instructions in Step 4A for perfectly golden, crisp churro bites.
How do I make churro bites crispy in the air fryer? Arrange the bites in a single layer in the air fryer basket. Cook at 375°F (190°C) for 8-10 minutes, shaking the basket halfway through until golden and crisp.
Can I make the churro dough ahead of time? Yes, you can prepare the dough and store it in an airtight container in the refrigerator for up to 2 days. Let it come to room temperature before piping.
What’s the difference between churros and doughnuts? Churros are made from a choux pastry dough (like éclairs), which is piped directly into hot oil. Doughnuts are typically made from a yeast-leavened or cake-style batter that is cut into shapes before frying.
If You Like Healthy & Tasty Breakfast Options, Then Stop Making Regular Oats — This Chocolate Strawberry Version Changes Everything
Printable Recipe Card
Want just the essential recipe details without scrolling through the article? Get our printable recipe card with just the ingredients and instructions.
Disclosure: This post may contain affiliate links.
If you make a purchase through these links, I may earn
a small commission at no extra cost to you.
prab chahal
Hi, I’m Prabjot Chahal – the heart (and taste buds) behind this blog!
Food has always been my love language – from experimenting with family recipes to discovering unique flavors from around the world. I believe that cooking isn’t just about following a recipe, it’s about creating moments, sharing stories, and connecting with others over something delicious. Through this blog, I want to build a vibrant food community where we share more than just recipes – we share inspiration, tips, and the joy of making and enjoying good food together. Whether you’re here for quick weekday dinners, festive treats, or creative seasonal ideas, you’re part of this table. So grab a fork (or a whisk!) and let’s cook, bake, and share our love for food – one recipe at a time.