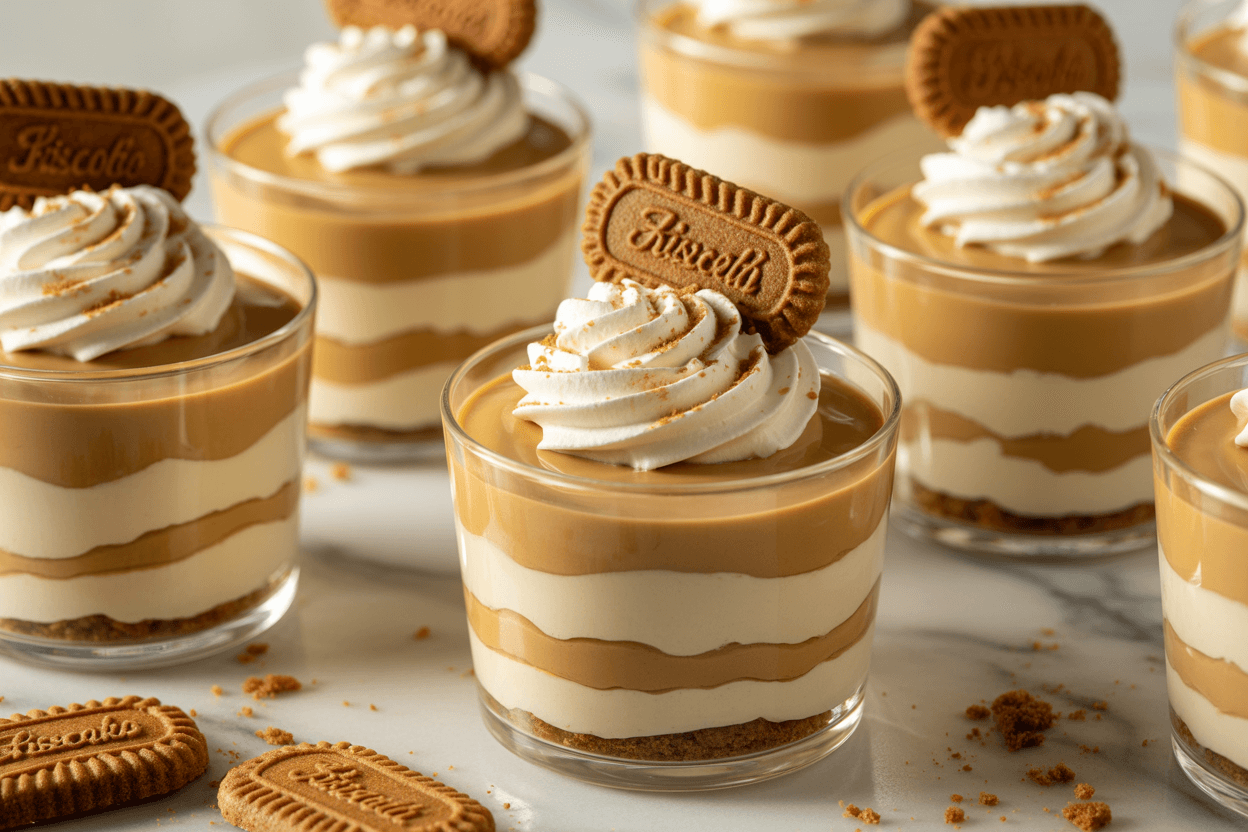
Let’s be real—sometimes you just crave something sweet, creamy, and a little bit special, but you don’t want to spend hours in the kitchen. Picture this: layers of silky Biscoff cream, crunchy Lotus biscuit crumbles, and fluffy whipped mousse, all cozied up together in a cute dessert cup.
Sounds dreamy, right? And the best part is, you don’t need to be a pastry chef (or even turn on your oven) to make it happen. Whether you’re pulling together a last-minute treat for guests, looking for a no-fuss party dessert, or simply need a pick-me-up after a long day, these Biscoff cream cups check every box.
Fast, easy, minimal ingredients—maximum wow-factor and comfort in every spoonful.
Why Biscoff Cream Cups Are So Popular
Let’s be honest—we’ve all had those moments where we see an amazing dessert online, get excited to try it, and then realize it’s a mile-long recipe or you need cake-decorating superpowers just to get past step one.
Or maybe you start, and by the end, the kitchen’s a disaster, and what you made looks nothing like the photo. It’s almost enough to make you give up on homemade treats altogether!
This Biscoff cream cup recipe solves all those problems. It’s incredibly beginner-friendly, with no baking or complex cooking involved. You only need a handful of ingredients to create a dessert that looks like it came straight from a Pinterest board. The beautiful layered look and the rich, café-style mousse taste make it an instant favorite.
Biscoff Cream Cups: Ingredients & Equipment
Let’s break down what you’ll need, and why each little piece makes this dessert so darn good. I’ll walk you through the tools and ingredients—not just so you know what to grab, but so you can see how every part brings something magical to the finished cup. Think of it as dessert-building with purpose!
Equipment List:
Mixing bowls
Electric mixer or stand mixer (a whisk works too, with some effort)
Spatula
Small dessert cups or glasses
Piping bag with a round or star tip (optional, for neat layers)
Rolling pin or food processor (for crushing biscuits)
Ingredients Breakdown:
Biscoff Spread (1 cup, warmed slightly): This is the star of the show. It infuses the cream with its signature caramelized, spiced cookie flavor. Its smooth consistency helps create a light, mousse-like texture while providing most of the dessert’s sweetness.
Heavy Cream or Whipping Cream (1 ½ cups, cold): When whipped to soft peaks, heavy cream provides the structure and airy volume that defines a mousse. Its fat content also balances the intense richness of the Biscoff spread.
Cream Cheese (4 oz, softened, optional): For a tangier, cheesecake-like flavor, add cream cheese. It also thickens the cream layer and adds stability to the dessert cups, helping them hold their shape.
Biscoff Biscuits (8-10 biscuits, crushed): These provide a necessary textural contrast. The crunchy base layer and crumbled topping prevent the dessert from being one-note and soft, adding more of that classic caramel flavor.
Powdered Sugar (2 tbsp, optional): Biscoff spread is quite sweet on its own, so this is often unnecessary. Add it only if you have a serious sweet tooth or are using cream cheese, which can mute the sweetness.
Related Post: Easy No-Oven Masala Chai Biscuit Cake Recipe (Perfect for Tea Time)
Step-by-Step: How to Make Biscoff Cream Cups
Let’s walk through this together—don’t worry, it’s foolproof, and you don’t need any fancy skills. Just follow along, and you’ll have creamy, dreamy Biscoff cups before you know it!
Step 1: Prepare the Biscuit Base
Crush the Biscoff biscuits into a coarse crumb. You can do this by placing them in a zip-top bag and crushing them with a rolling pin or by pulsing them a few times in a food processor.
Spoon an even layer of the crumbs into the bottom of each dessert cup.
Step 2: Make the Biscoff Cream
In a large mixing bowl, use an electric mixer to whip the cold heavy cream until it forms soft peaks. Be careful not to over-whip.
In a separate bowl, stir the slightly warmed Biscoff spread until smooth. If you’re using cream cheese, beat it with the Biscoff spread until fully combined.
Gently fold the Biscoff mixture into the whipped cream with a spatula until just combined and no streaks remain.
Step 3: Layer the Dessert
Now it’s time to assemble. For neat layers, transfer the Biscoff cream into a piping bag.
Pipe a layer of cream over the biscuit base in each cup.
Add another thin layer of crushed biscuits, followed by another layer of cream. Continue until you reach the top of the cup, finishing with a layer of cream.
Step 4: Drizzle & Decorate
For a final touch, you can melt a tablespoon of Biscoff spread in the microwave for a few seconds and drizzle it over the top.
Garnish with more crushed biscuits, a whole Biscoff cookie, or even some chocolate shavings.
Step 5: Chill
For the best texture, refrigerate the dessert cups for at least one to two hours. This allows the cream to set into a firm, scoopable mousse and lets the flavors meld together.
Related Post: “Only 3 Ingredients: The 5-Minute Oreo Mug Cake You’ll Want Every Night.”
The Creamiest, Dreamiest Biscoff Cream Cups Dessert in Minutes
Biscoff Cream Cups: The Science Behind the Flavor & Texture
So what is it about these Biscoff cream cups that makes them so insanely addictive? Honestly, it’s all about that magical balance of flavor and texture. Think about it: the Biscoff spread has this deep, caramelized, almost spiced-cookie taste that comes from how the biscuits are made in the first place.
Swirl that into rich, whipped cream, and the two just click—the cream carries all that Biscoff goodness, making every bite taste super smooth and satisfying.
The layers are key to the experience. Your spoon first cuts through a silky cream, then meets the satisfying crunch of the biscuit layer, providing a delightful contrast that keeps you coming back for another bite. Chilling is the final step that transforms the mixture from a simple cream into a stable, set mousse.
Biscoff Cream Cups: Flavor Variations
Here’s the fun part: these dessert cups are total chameleons. You can switch things up to suit your mood, what you have in the pantry, or who you’re serving. Try one (or all!) of these delicious twists:
Biscoff Cheesecake Cups: Add the optional cream cheese for that classic tangy cheesecake flavor.
Biscoff Chocolate Cream Cups: Fold a few tablespoons of melted dark or milk chocolate into the Biscoff cream.
Biscoff Banana Cream Cups: Layer thin slices of fresh banana between the cream and biscuit layers for a fruity twist.
Coffee Biscoff Cream Cups: Dissolve a teaspoon of instant espresso powder in the heavy cream before whipping for a mocha-inspired treat.
Biscoff Strawberry Cups: Add a layer of diced fresh strawberries for a pop of freshness and color.
Biscoff Cream Cups: Dietary-Friendly Adaptations
No one should miss out on dessert—especially not something this good! If you or someone you love has dietary needs, don’t worry. There are super easy ways to make these Biscoff cream cups work for you:
Vegan: Use full-fat, chilled coconut cream instead of heavy cream. Biscoff spread and biscuits are naturally vegan in many regions (always check the label).
Gluten-Free: Biscoff spread contains gluten. Use a gluten-free cookie butter alternative and a base made from your favorite gluten-free cookies.
Dairy-Free: Use a dairy-free whipping cream alternative or chilled coconut cream.
Sugar-Free: Use a no-added-sugar cookie butter and skip the optional powdered sugar.
Biscoff Cream Cups: Expert Tips for Perfect Dessert Cups
Use Cold Cream: Trust me, this one’s huge—pop your heavy cream (and even your mixing bowl) in the fridge for a bit before you get started. The colder, the better. It’ll whip up fast and get super fluffy.
Warm the Biscoff: Give your Biscoff spread a quick 10-15 second zap in the microwave. It gets way easier to mix in, and you won’t lose any of that beautiful airiness in your whipped cream.
Pipe for Perfection: Want those bakery-style layers? Grab a piping bag—even a zip-top bag with the corner snipped works! It keeps things neat and gives you pretty swirls.
Don’t Overmix: As tempting as it is to keep mixing “just a little more,” stop as soon as everything’s combined. You want light and airy, not dense or gloopy.
Chill Adequately: I know waiting is hard, but chilling really works its magic. Give your cups at least an hour to set in the fridge so you get that mousse-like, dreamy texture.
Refrigerator: These little cups are happiest when kept cold! Just cover them and pop them in the fridge—they’ll stay delicious for 3 to 4 days. Heads up: the biscuit layer will soften up as it chills, but honestly, a little extra softness makes each spoonful even more comforting.
Freezer: Got leftovers (or just planning ahead)? You can freeze these for up to a month. The texture of the cream gets a bit icier when you thaw them, but the flavor still totally hits the spot.
Make-Ahead: If you’re prepping for a party or just want dessert ready and waiting: make the cream and crush the biscuits ahead of time, but store them in separate airtight containers. Assemble everything the day you’re serving—this way, those biscuit layers stay perfectly crunchy and fresh!
Biscoff Cream Cups: Serving Ideas
Not sure how to serve these little masterpieces? Here are some of my favorite ways to enjoy (and show off) your Biscoff cream cups:
Pair them with a steaming mug of coffee or tea for the coziest treat.
Arrange them on a dessert tray for parties—trust me, they’ll disappear fast.
Dress them up as a simple but stunning birthday surprise.
Add a scoop of fresh berries on the side to brighten things up and balance the sweetness.
Alongside a hot cup of coffee or tea.
On a dessert tray for parties or holiday buffets.
As an easy but elegant birthday dessert.
With a side of fresh berries to cut through the richness.
Frequently Asked Questions About Biscoff Cream Cups
Q: Why did my cream turn all runny on me? A: Don’t worry, we’ve all been there! Most of the time, it means your heavy cream wasn’t cold enough when you started, or maybe you got a little enthusiastic folding in the Biscoff and overmixed it. Next time, chill your cream (and even your bowl) and stop mixing as soon as things look light and fluffy.
Q: Can I make these without cream cheese? A: Absolutely! The cream cheese is optional and adds a cheesecake flavor. The dessert is just as delicious without it.
Q: Can I use Cool Whip instead of whipped cream? A: You can, but the texture and flavor will be different. For the richest, most authentic mousse, homemade whipped cream is best.
Q: How long should I chill the cups? A: A minimum of one hour is recommended, but two hours is ideal for the perfect set mousse texture.
Q: Why did my Biscoff cream turn grainy? A: This can happen if your cream cheese was too cold when you mixed it with the Biscoff spread, or if the cream was over-whipped. Ensure all ingredients are at the right temperature for a smooth result.
Biscoff Cream Cups: Your New Favorite No-Bake Dessert
See? You don’t need fancy gadgets, chef’s skills, or hours of free time to whip up something that feels extra special. This Biscoff dessert is proof that a handful of simple ingredients can come together in the most indulgent (and ridiculously easy) way. Creamy, caramel-y, and pure comfort—every bite is a little “wow” moment, whether you’re sharing with friends or sneaking a midnight treat for yourself.
Feel free to experiment with the variations and make this recipe your own. Pin this recipe for later, and don’t forget to share your creations in the comments below
Related Post:“Melt-in-Your-Mouth Biscoff Truffles That’ll Make You Skip Store-Bought Desserts Forever”
Printable Recipe Card
Want just the essential recipe details without scrolling through the article? Get our printable recipe card with just the ingredients and instructions.
Disclosure: This post may contain affiliate links.
If you make a purchase through these links, I may earn
a small commission at no extra cost to you.
prab chahal
Hi, I’m Prabjot Chahal – the heart (and taste buds) behind this blog!
Food has always been my love language – from experimenting with family recipes to discovering unique flavors from around the world. I believe that cooking isn’t just about following a recipe, it’s about creating moments, sharing stories, and connecting with others over something delicious. Through this blog, I want to build a vibrant food community where we share more than just recipes – we share inspiration, tips, and the joy of making and enjoying good food together. Whether you’re here for quick weekday dinners, festive treats, or creative seasonal ideas, you’re part of this table. So grab a fork (or a whisk!) and let’s cook, bake, and share our love for food – one recipe at a time.


")
")
")
")