I’ll be honest: gluten free sourdough can sound like a unicorn, but it’s totally doable. You don’t need a wall of gadgets or a PhD in fermentation to pull off a loaf that tastes like real bread. This guide is your friendly nudge toward a crusty, tangy loaf without gluten.
What makes gluten free sourdough different (and worth it)
Gluten gives traditional sourdough its stretch, but gluten free sourdough relies on a mix of starches and proteins that behave differently. The magic comes from a strong starter and a well-timed bake. No gluten? No problem. You still get that tang, the chewy crumb, and a crust that sings. – Your starter is the hero. It’s alive, it’s stubborn, and it loves warm kitchen vibes. – Hydration matters. GF flours absorb differently, so your dough will look looser or tighter than you expect. – Steam is your best friend. A steamy oven helps the crust pop and stay crisp. FYI: gluten free sourdough isn’t a substitute for every loaf. It’s a distinct beast with its own personality. Embrace the quirks, and you’ll taste the magic.
Getting started: the essentials you actually need
You don’t need a million gadgets to begin, just a few reliable tools and ingredients. – Ingredients – Gluten free flour blend (rice, sorghum, tapioca, potato starch blends work well) – Sourdough starter (gluten free, fed with GF flour) – Water, salt – Optional: psyllium husk or xanthan gum for structure, olive oil or eggs for richness – Tools – A sturdy mixing bowl – A loaf pan or a round Dutch oven – A lame or sharp knife for scoring (or a clean craft knife) – A kitchen scale for accuracy – A lid or foil to trap steam during the first part of bake Tip: measure by weight. GF flours don’t behave like wheat flour, and grams beat cups every time.
Building a gluten free starter people will actually love
Your GF starter is a sourdough baby that enjoys a different diet. Feed it regularly with gluten free flour, and it’ll behave. – Start with a simple feed schedule: 1:1:1 by weight (starter: water: GF flour) – Use a forgiving flour blend to start. A blend with rice and tapioca is a good baseline. – Watch for bubbles and a pleasant tang within a few days. If it smells off or shows mold, start over. 3 quick tips to keep it thriving – Keep it in a warm place, around 75–78°F (24–26°C) if possible. – Feed consistently. If you bake weekly, feed every 24 hours before you bake. – If you’re not baking for a while, store in the fridge and feed before bringing it back to life.
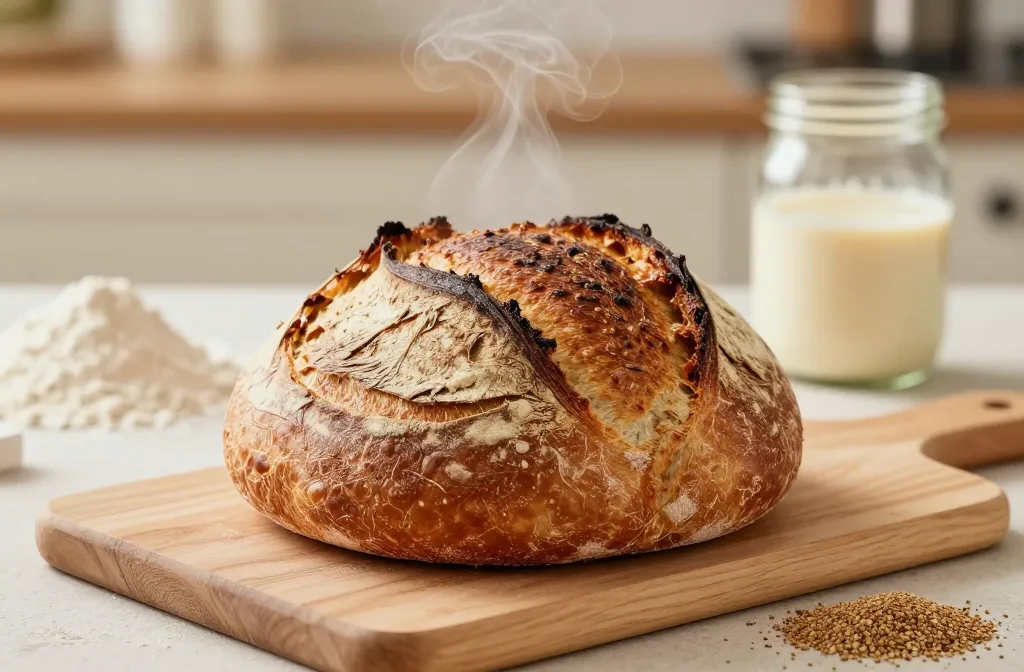
Locking in texture: how to shape and bake the loaf
Texture is the tricky part with GF. The goal is a crusty exterior with a soft, open crumb inside. – Mixing method – Combine starter, water, salt, and your GF flour blend until you reach a shaggy, cohesive dough. It should be tacky but not overly sticky. – Hydration – GF doughs often need a bit more water. If your dough feels too dry, add a splash of water gradually. – Bulk fermentation – Let the dough rise until it looks airy and has some visible bubbles. This can take longer than regular wheat dough. – Shaping – Lightly shape into a round or batard. Don’t overwork it; gluten free doughs resist stretching, and that’s okay. – Scoring – A few shallow cuts help the loaf expand in the oven. – Bake setup – Bake in a covered Dutch oven or with a steam tray for the first 20–30 minutes to trap moisture, then remove the lid to finish for a crust. Pro tip: don’t overproof. GF doughs puff quickly and can collapse if you wait too long.
Pro tips, common mistakes, and variations
Pro tips
– Preheat thoroughly. A hot oven makes for a crisp crust. – Use psyllium husk or xanthan gum if your flour blend lacks gums. It helps hold structure. – Score just before sliding in. A clean cut lets steam escape and prevents bursting.
Common mistakes
– Underestimating hydration: GF flours drink water differently. If your dough feels dry, it’s probably dry. – Not using steam: The crust won’t crack nicely without it. – Skipping the starter refresh: A tired starter = flat bread. Feed regularly.
Variations
– Olive herb GF sourdough: add chopped olives and fresh herbs to the dough for a savory twist. – Garlic and herb crust: mix in roasted garlic and a pinch of Italian herbs before baking. – Sweet starter loaf: add a touch of honey or maple, plus toasted seeds on top for crunch.
Comparison blocks
– Traditional wheat sourdough vs gluten free sourdough – Texture: GF aims for an open crumb but often stays denser; wheat tends to be airier. – Flavor: GF sourdough emphasizes tang with a toasty crust; wheat shares tang but with lighter crumb. – Handling: GF dough is more forgiving with some recipes, but can be tricky without the right gums. – GF blends: rice-based vs sorghum-based – Rice-based blends: mild flavor, good rise, works well with psyllium. – Sorghum-based blends: slightly nutty flavor, sturdy crumb, pairs with olive oil and herbs.
Common questions you might have
FAQ
Q: Can I bake gluten free sourdough without a starter? A: You can, but a good starter makes it shine. If you’re starting from scratch, give it a week or two to mature, feeding daily. FYI, patience pays off.
Q: How long does it take to bake? A: The active bake is usually 40–50 minutes, with steam in the first part. Total time including proofing can range from 4 to 8 hours depending on room temperature and starter strength.
Q: Can I freeze GF sourdough? A: Yes. Slice after cooling, wrap well, and freeze. Thaw and reheat in a toaster or oven to bring back some crust.
Troubleshooting quick fixes
– Loaf looks pale: boost bake time a bit, or increase steam in the first 15 minutes. – Crust collapses after cooling: don’t cut too soon. Let it rest at least 2 hours before slicing. – Dense crumb: might be underproofed or dough too dry. Try a bit more hydration next bake and give it more time to rise.
Flavor boosters and ingredient swaps
– Nutty lift: swap part of the GF flour blend for almond flour or hazelnut meal to add depth. – Seed crunch: sprinkle sesame, poppy, or flax seeds on top before baking. – Dairy-free option: use olive oil or a neutral oil instead of butter if a recipe calls for it.
Ingredient swaps
– Psyllium husk powder: if you don’t have psyllium, you can use xanthan gum (about 1/2 teaspoon per cup of flour). It helps with structure. – Flour blends: experiment with blends that include sorghum and millet for a milder flavor, or go rice-heavy for a lighter crumb. – Liquid add-ins: a splash of apple cider vinegar or a squeeze of yogurt can add tenderness; FYI, dairy-free options work well with plant-based yogurts.
Putting it all together: your easiest gluten free sourdough bake plan
– Day 1: Feed your starter; it should be bubbly and smell pleasantly tangy. – Day 2: Mix the dough with your chosen GF flour blend, water, salt, and optional gums. Let it rest. – Day 3 (or the same day, if your room is warm): Shape into a loaf, place in a lined pan or banneton. Let rise until roughly doubled. – Bake: Preheat a Dutch oven, create steam, bake covered, then uncover to finish. Golden crust, chewy center, done. – Cool: Let the loaf cool fully before slicing. It’s tempting to dive in, but patience pays off.
Conclusion
Gluten free sourdough is not a mythical creature; it’s a confident, doable bake that rewards patience, a little science, and a lot of tasty bread glory. You’ll dial in hydration, starter health, and bake timing with each loaf. So grab your starter, heat up the oven, and get ready to wow friends and family with a crust that crackles and a crumb that satisfies. IMO, you’ll be surprised how good gluten free bread can feel in your hands when you crack that first slice. Happy baking!
Disclosure: This post may contain affiliate links.
If you make a purchase through these links, I may earn
a small commission at no extra cost to you.
prab chahal
Hi, I’m Prabjot Chahal – the heart (and taste buds) behind this blog!
Food has always been my love language – from experimenting with family recipes to discovering unique flavors from around the world. I believe that cooking isn’t just about following a recipe, it’s about creating moments, sharing stories, and connecting with others over something delicious. Through this blog, I want to build a vibrant food community where we share more than just recipes – we share inspiration, tips, and the joy of making and enjoying good food together. Whether you’re here for quick weekday dinners, festive treats, or creative seasonal ideas, you’re part of this table. So grab a fork (or a whisk!) and let’s cook, bake, and share our love for food – one recipe at a time.


")
")