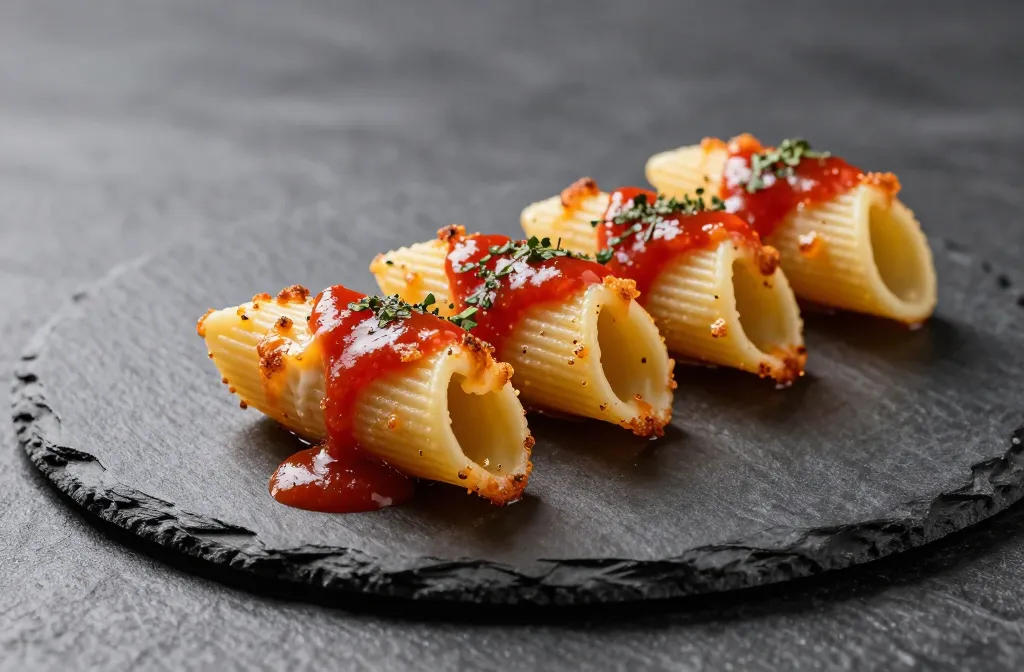
What if you could skip the soggy takeout and still get that cozy pasta fix in under 20 minutes? Enter Air Fryer Pasta Nest Cups: crispy, cheesy, and oddly satisfying bites that feel fancy but are totally doable on a Tuesday night. FYI, this isn’t your average pasta toss—we’re shaping nests, filling them with goodness, and giving the air fryer a little high-five.
Why these little nests work so well
You want texture, right? The air fryer delivers crisp edges without deep-frying drama. These pasta nests hold their shape, so you get a crunchy exterior and a creamy interior without turning the kitchen into a smoke alarm audition. The cups are basically edible jewelry for your plate—sound irresistible or what?
What you’ll need to get started
Before we get into the nest-building, here’s the grocery list in a nutshell:
Cooked pasta (elbow, fusilli, or farfalle work nicely)
Shredded cheese or a cheese blend
Eggs or a binding agent
Seasonings you actually like
Tomato sauce, pesto, or your favorite filling
Nonstick spray or a light brush of oil
That’s it. Simple ingredients, big payoff. Do you have your favorite sauce ready? If not, I’ll throw out some quick ideas in the sections below.
Shaping the nests: technique 101
The key to a sturdy nest is a good mold and confident hands. You’ll coil cooked pasta into muffin-tin cups or nest shapes using the tips below:
Grease the muffin cups well so the nests release cleanly.
Mix pasta with a binding agent (egg or a bit of cheese) to help hold the shape.
Pack gently but firmly so the nests don’t crumble when you lift them out.
Indent each nest for a little sauce well in the center—yay, extra gooey goodness.
If you’ve ever tried to DIY a snow globe, this is a similar vibe: you want shape, but you don’t want to overthink it.
Cooking time and temps: the sweet spot
Set your air fryer to a hot-but-happy temperature, around 350–370°F (175–190°C). Cook time depends on your nest size and how full you packed them, but plan for about 8–12 minutes. You want the outside to be crisp, the inside warm, and the cheese melted to perfection. FYI, you’ll probably flip halfway to ensure even browning.
Flavor profiles you’ll love
Here’s where you get creative without losing the simple charm. You can keep it classic or go bolder:
Classic Margherita vibe: tomato sauce, mozzarella, a sprinkle of oregano
Creamy spin: ricotta and parmesan with a basil kick
Meat lover’s dream: crumbled sausage or pepperoni bits with mozzarella
Herby veggie: pesto with sun-dried tomatoes and spinach
What’s your go-to flavor? IMO, a little warmth from roasted garlic never hurts.
Stretching it further: fillings and toppings
You don’t have to stop at plain cheese. Fill the center with goodies for a surprise in every bite:
Spinach and ricotta mix for a vegetarian-friendly bite
Mini meatballs and a swipe of marinara
Smoked salmon and cream cheese for a brunchy twist
Caprese vibes with cherry tomato halves and basil pesto
Tips for best results:
If your nests crack, don’t panic—just patch with a small piece of pasta and a dab of cheese to seal it.
Pre-cook any raw fillings (like sausage) so you don’t end up with undercooked centers.
Tip: best cheese behavior
Use a blend that melts nicely. A little mozzarella for melt, plus parmesan for bite, plus a creamy ricotta in the center can make magic. If you’re dairy-free, try vegan cheese shreds with a splash of dairy-free cream cheese.
Tip: ingredient swaps
– Gluten-free pasta works fine; just double-check the bite and binding. – For a lighter version, swap some of the cheese for a spoonful of Greek yogurt mixed into the binding. – Want extra crunch? Brush the nest exterior with a light oil and rub with a pinch of garlic powder.
Sauce it up: serving ideas
Cancelling out the “dry” risk is all about the sauce. Drizzle or dunk, you pick:
Tomato basil marinara for a familiar vibe
White garlic sauce with a pinch of parsley
Spicy arrabbiata if you like a little heat
Creamy mushroom sauce for cozy evenings
And yes, you can keep some sauce on the side for dipping. It’s not cheating—it’s strategy.
Common hiccups and how to fix them
We all hit a snag now and then. Here are quick fixes:
Nests crumble when removing? Try a firmer binding and a shorter cook where you can peek at progress.
Cheese not melting evenly? Pause halfway and rotate the pan or shake gently to redistribute heat.
Too dry? Add a tiny splash of sauce in the center before finishing the bake.
Subsection: Make-ahead and meal-prep tips
– Assemble the nests up to 24 hours ahead; keep them in the fridge covered. – Bake straight from the fridge—just add a few extra minutes. – Freeze assembled, unbaked nests with a light dusting of flour to prevent sticking; bake from frozen, adding a few minutes.
Subsection: Quick flavor boosters
– A pinch of lemon zest over a spinach filling wakes up flavors. – A few chopped olives or capers bring briny brightness. – Fresh herbs added after baking keep their aroma strong.
FAQ
Can I make these nests without an air fryer?
Yes. You can bake them in a regular muffin tin in a 375°F (190°C) oven for about 15–18 minutes, until the edges are golden and the centers are set. The air fryer just gives you a crispier exterior with less time.
How many nests does this recipe yield?
Depends on your pan and nest size, but typically 6–8 muffin-cup nests per batch. If you want more, you’ll need to scale up or use a larger muffin tin.
Are there any kid-friendly variations?
Absolutely. Let kids pick their fillings and toppings. Keep the heat mild, skip spicy sauces, and let them help shape the nests. The more hands-on, the more likely they’ll try something new.
What should I do with leftovers?
Store in an airtight container for 2–3 days in the fridge. Reheat in the air fryer for a quick re-crisp, or in a 350°F (175°C) oven for about 5–7 minutes. FYI, they tend to taste best the day after.
Is there a vegetarian option?
Yes. Use a robust vegetable filling like roasted mushrooms, spinach, ricotta, and tomato. Skip meat toppings, and you’re set.
Conclusion
There you have it: Air Fryer Pasta Nest Cups that are crisp, cozy, and surprisingly versatile. They look impressive enough for guests but are forgiving enough for a weeknight win. So next time you crave pasta with a twist, skip the pot boiling chaos and go for nest-building glory. IMO, you’ll wonder why you didn’t try this sooner. Ready to nest your pasta magic? Let’s get snacking.
Disclosure: This post may contain affiliate links.
If you make a purchase through these links, I may earn
a small commission at no extra cost to you.
prab chahal
Hi, I’m Prabjot Chahal – the heart (and taste buds) behind this blog!
Food has always been my love language – from experimenting with family recipes to discovering unique flavors from around the world. I believe that cooking isn’t just about following a recipe, it’s about creating moments, sharing stories, and connecting with others over something delicious. Through this blog, I want to build a vibrant food community where we share more than just recipes – we share inspiration, tips, and the joy of making and enjoying good food together. Whether you’re here for quick weekday dinners, festive treats, or creative seasonal ideas, you’re part of this table. So grab a fork (or a whisk!) and let’s cook, bake, and share our love for food – one recipe at a time.


")
")