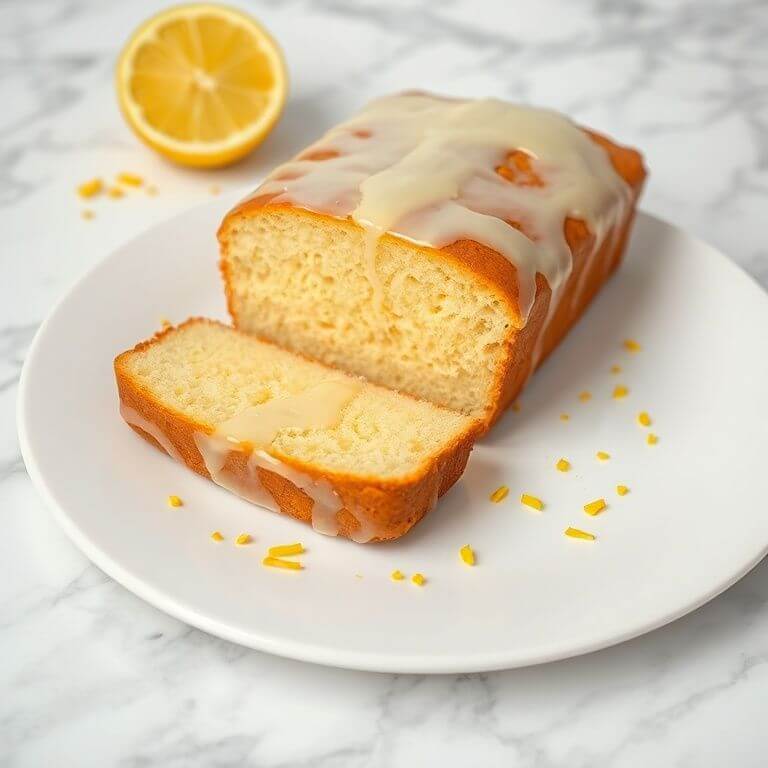
Do you remember walking into your grandmother’s kitchen and being greeted by that bright, sunny smell of baking lemons? There is something incredibly comforting about a classic lemon loaf. It isn’t fancy or complicated. It doesn’t need layers of fondant or complicated piping. It just needs to be moist, buttery, and bursting with zesty flavor.
This old-fashioned lemon loaf is a love letter to those simpler times. It has that timeless bakery-style texture—dense but tender—and a clean, refreshing flavor that pairs perfectly with your morning coffee or afternoon tea.
In this post, I’m sharing my tried-and-true recipe for an ultra-moist lemon loaf. We’ll talk about the simple secrets to getting that perfect crumb, why “old-fashioned” techniques still work best, and how to make sure your loaf never turns out dry.
Like many classic desserts, the origin of lemon loaf is somewhat unclear. Some say it originated in England during the 19th century, while others claim it was created in North America during the early 20th century. What we do know for sure is that lemon loaves have been a staple in bakeries and homes for decades. And with good reason – they’re delicious,
Why Old-Fashioned Lemon Loaf Never Goes Out of Style
In a world of complicated desserts, why do we keep coming back to the humble lemon loaf? Because it works. It comforts us.
However, many of us have been burned by bad recipes before. We’ve all baked a loaf that looked beautiful in the oven but turned out dry, crumbly, or barely tasted like lemon at all. Some are too dense, sitting in your stomach like a brick. Others rely on artificial flavoring that tastes more like a cleaning product than a dessert.
This recipe solves those problems. It focuses on:
Real Lemon Flavor: We use plenty of fresh zest and juice—no extracts required.
Moisture-Rich Ingredients: By balancing fats and liquids, we guarantee a tender crumb that stays soft for days.
The Right Sweetness: It’s sweet, but the tartness shines through, so it isn’t cloying.
You don’t need a pantry full of strange ingredients for this. You likely have everything you need right now. Here is the science behind why these simple staples work together.
You don’t need a pantry full of strange ingredients for this. You likely have everything you need right now. Here is the science behind why these simple staples work together.
Ingredients Needed
1. All-Purpose Flour
This provides the structure. We stick to standard all-purpose flour rather than cake flour because a lemon loaf needs enough structure to hold up the moisture without becoming gummy.
2. Butter and Oil
Most recipes use one or the other, but I like a mix. Butter gives you that rich, nostalgic flavor that you just can’t fake. A splash of oil, however, ensures the crumb stays moist longer than butter alone would allow.
3. Eggs
Eggs are the binders. They create lift and richness. Using room-temperature eggs helps them incorporate smoothly into the batter, preventing that curdled look.
4. Sugar
Sugar does more than sweeten. It helps tenderize the flour so your loaf isn’t tough, and it helps the crust brown beautifully.
5. Fresh Lemons (Zest and Juice)
This is non-negotiable! The zest contains the essential oils where the floral lemon aroma lives. The juice provides the tart acidity. You need both for a “real” lemon taste.
6. Yogurt or Sour Cream
This is the secret weapon for an old-fashioned texture. The acidity in yogurt or sour cream tenderizes gluten, making the loaf incredibly soft.
7. Leavening Agents
We use baking powder and a pinch of baking soda to react with the acidic lemon juice and yogurt, helping the loaf rise tall and evenly.
Before you even touch the mixer, put your sugar in a bowl and grate the lemon zest right on top.
Use your fingers to rub the zest into the sugar until it smells fragrant and looks like wet sand.
This releases the oils from the zest directly into the sugar, amplifying the flavor.
Step 2: Cream the Butter and Sugar
Beat your butter with that lemon-sugar mixture until it is pale and fluffy. This adds air to the batter, which means a lighter loaf.
Step 3: Add Eggs and Vanilla
Add your eggs one at a time, beating well after each addition. This ensures a stable emulsion.
Step 4: Alternate Wet and Dry Ingredients
In a separate bowl, whisk your dry ingredients.
In a measuring cup, mix your lemon juice and yogurt/milk. Add the flour mixture and the milk mixture to the butter bowl in alternating batches, starting and ending with the flour.
Do not overmix. Just stir until the flour disappears.
Step 5: Bake
Pour into a greased loaf pan and bake at 350°F (175°C) for about 45–55 minutes.
You’ll know it’s done when the top is golden brown and usually develops that classic crack down the center.
A toothpick inserted should come out clean or with just a few moist crumbs.
While the loaf bakes, you can decide on your topping. The glaze isn’t just decoration; it adds a second layer of lemon zing.
Classic Lemon Glaze
Simply whisk powdered sugar with fresh lemon juice until smooth. If you like a thin glaze that seeps into the cake, use more juice. If you prefer that thick, white icing you see at coffee shops, use less juice and perhaps a splash of heavy cream.
Pro Tip: Pour the glaze over the loaf after it has cooled completely. If you pour it while hot, the glaze will melt and disappear into the bread.
Lemon Loaf: Flavor Variations to Try
Once you master the base recipe, you can get creative!
Lemon Poppy Seed: Stir in 2 tablespoons of poppy seeds with the dry ingredients. It adds a lovely crunch.
Lemon Blueberry: Toss a cup of fresh blueberries in a tablespoon of flour (to keep them from sinking) and gently fold them into the batter at the very end.
Lemon Almond: Add a half teaspoon of almond extract along with the vanilla. The nuttiness pairs beautifully with citrus.
Lemon Loaf: Dietary-Friendly Versions
Cooking for friends with dietary needs? Here are some simple swaps:
Gluten-Free: Use a high-quality “Measure for Measure” gluten-free flour blend. These blends usually contain xanthan gum, which mimics the structure of gluten.
Lower Sugar: You can swap the sugar for a granulated sweetener like monk fruit or erythritol. Just be aware that the browning might be slightly different.
Lemon Loaf: Expert Tips for Success
Room Temperature is Key: Make sure your butter, eggs, and yogurt are at room temperature. If they are cold, the batter can curdle, leading to a dense loaf.
Don’t Overmix: Once the flour goes in, be gentle. Overworking the batter develops gluten, which makes bread tough. We want tender cake, not chewy bread.
The Toothpick Test: Ovens vary as they age. Start checking your loaf 5 minutes before the recipe says.
Lemon Loaf: Storage and Freezing
This loaf tastes even better the next day as the flavors meld.
Counter: Wrap tightly in plastic wrap or store in an airtight container at room temperature for up to 3-4 days.
Fridge: You can refrigerate it for up to a week, but the cold can dry it out slightly. Let it come to room temperature before eating.
Freezer: This loaf freezes beautifully! Wrap the cooled loaf (without glaze is best, but glazed works too) in plastic wrap, then foil. It keeps for up to 3 months. Thaw on the counter overnight.
Lemon Loaf: Serving Ideas
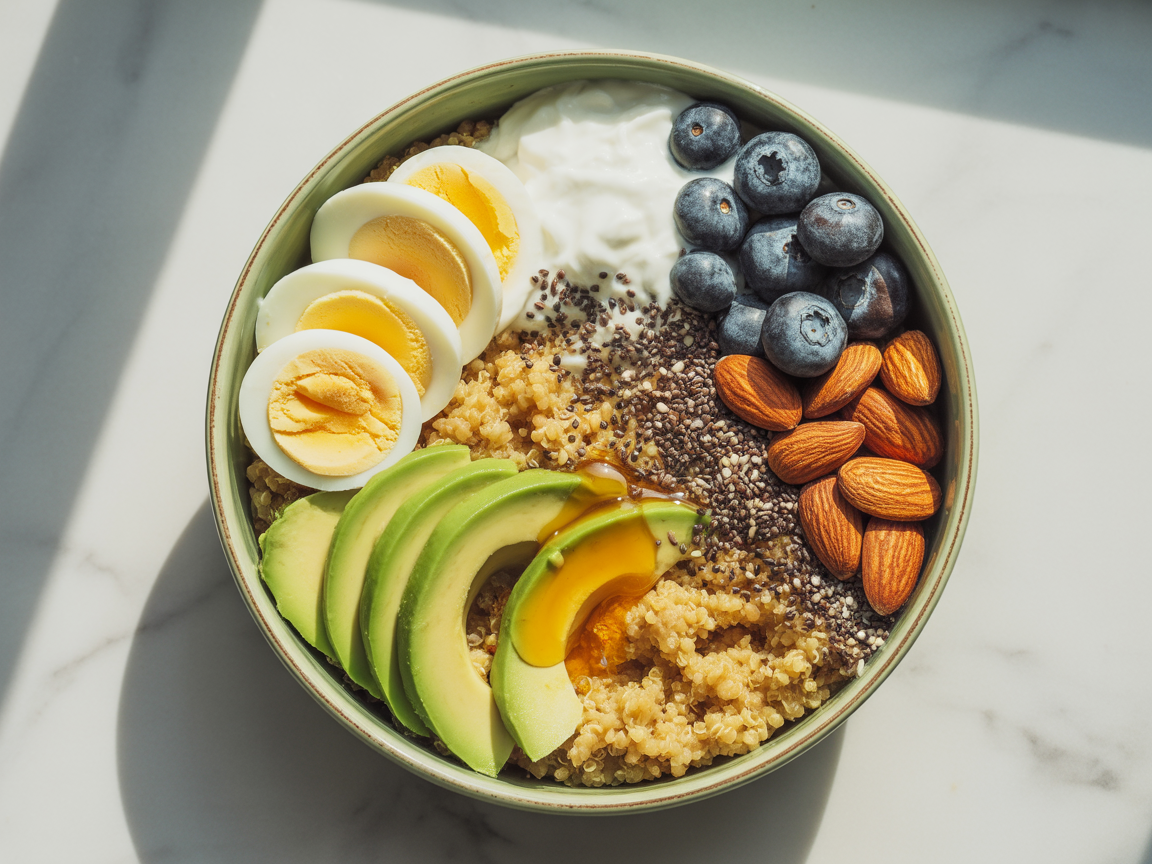
Breakfast: Serve a thick slice with a dollop of yogurt and fresh berries.
Afternoon Snack: It is the perfect companion for a hot cup of Earl Grey tea.
Dessert: Warm a slice slightly in the microwave and top with whipped cream or a scoop of vanilla bean ice cream.
Frequently Asked Questions About Lemon Loaf
Q: Why did my lemon loaf sink in the middle? A: This usually happens if the oven door was opened too early during baking, or if the loaf was underbaked. It can also happen if there was too much leavening (baking powder).
Q: Can I use bottled lemon juice? A: You can, but I highly recommend fresh. Bottled juice lacks the floral notes of fresh lemons and often has preservatives that alter the taste. Since lemon is the star here, fresh is best.
Q: My loaf came out dry. What happened? A: It was likely overbaked. Check it a few minutes early next time. Also, be careful when measuring flour—spoon it into the measuring cup rather than scooping it, so you don’t pack too much in.
Q: Can I double this recipe? A: Yes! You can bake two loaves at once. Just make sure there is enough space between the pans in the oven for air to circulate.
Baking this lemon loaf isn’t just about dessert—it’s about reliving sweet memories and creating new ones to cherish. Each slice is a little piece of comfort, a reminder of warm kitchens and happy gatherings. I truly hope you’ll give this recipe a try and let its bright, zesty flavor and tender crumb bring a spark of nostalgia to your table.
If you do bake it, I’d be delighted to hear how it turned out or see your own special twists—please feel free to share your stories and photos in the comments. Let’s keep these timeless traditions alive, one lemon loaf at a time!
Want just the essential recipe details without scrolling through the article? Get our printable recipe card with just the ingredients and instructions.
Disclosure: This post may contain affiliate links.
If you make a purchase through these links, I may earn
a small commission at no extra cost to you.
prab chahal
Hi, I’m Prabjot Chahal – the heart (and taste buds) behind this blog!
Food has always been my love language – from experimenting with family recipes to discovering unique flavors from around the world. I believe that cooking isn’t just about following a recipe, it’s about creating moments, sharing stories, and connecting with others over something delicious. Through this blog, I want to build a vibrant food community where we share more than just recipes – we share inspiration, tips, and the joy of making and enjoying good food together. Whether you’re here for quick weekday dinners, festive treats, or creative seasonal ideas, you’re part of this table. So grab a fork (or a whisk!) and let’s cook, bake, and share our love for food – one recipe at a time.


")
")