Last February, I was standing in my kitchen at 9 PM, realizing I had completely forgotten about Valentine’s Day the next morning. My daughter’s class party needed treats, my husband deserved something sweet, and honestly? I wanted a little pick-me-up for myself, too.
I looked at the strawberries sitting on my counter and thought… what if I made them just a little more special?
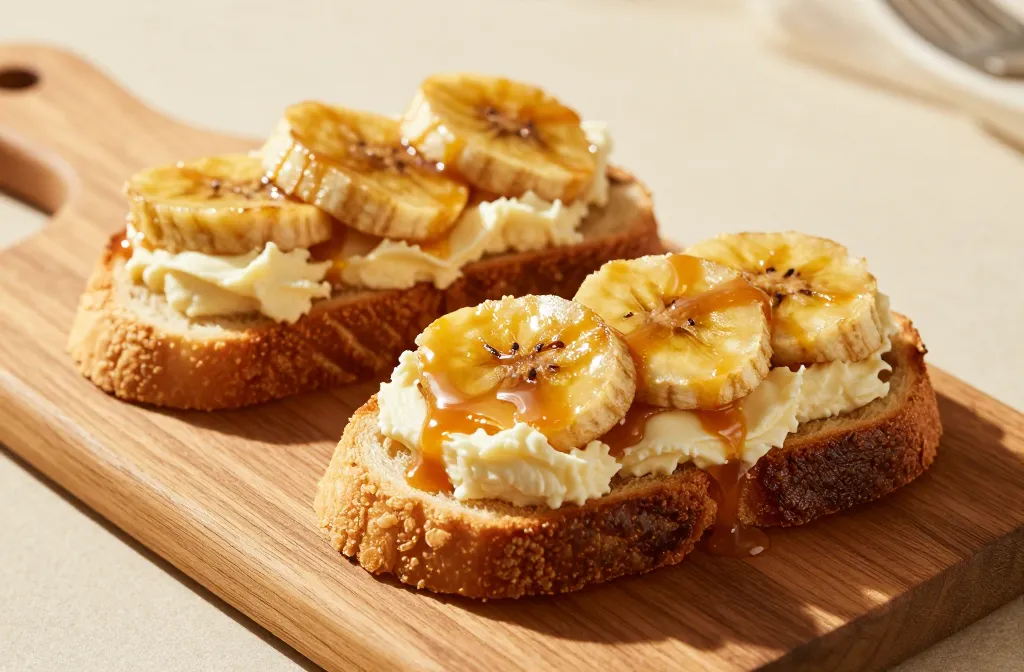
Twenty minutes later, I had a tray of glossy, heart-shaped chocolate strawberries that looked like they came from a fancy bakery. My kitchen smelled like melted chocolate, and I felt like a dessert genius.
Here’s the best part: No baking. No fancy equipment. Just fresh strawberries, chocolate, and a simple little trick that makes them absolutely adorable.
These go viral every February for a reason – and once you try them, you’ll understand why.
Why Everyone Falls Head Over Heels for Chocolate Covered Strawberry Hearts
Listen, I’ve made a lot of Valentine’s desserts over the years. Cupcakes, cookies, those little molten lava cakes that always stress me out… but nothing gets the reaction these strawberry hearts do.
There’s something magical about biting into a juicy, cold strawberry wrapped in that rich, crackly chocolate shell. It’s the perfect balance – not too heavy, not too light. Sweet but still fresh.
And they’re just so darn versatile:
Making a romantic dinner at home? These are your desserts.
Need something cute for a girls’ night? Everyone will be taking photos.
Want a healthier sweet treat that doesn’t feel like rabbit food? Done.
Last-minute gift for a teacher, neighbor, or friend? Box these babies up.
Plus, they’re budget-friendly – we’re talking maybe $8 for ingredients that make enough to share with everyone you love. And beginners? You’ve got this. If I can make them while my toddler pulls on my apron strings, you absolutely can too.
What Makes These Chocolate Covered Strawberry Hearts Different (My Secret Touches)
Now, you might be thinking, “Okay, chocolate strawberries… I’ve seen those before.”
The heart shape. It’s not just dipping strawberries whole – we’re actually cutting them to look like little hearts. It takes 30 extra seconds per strawberry and makes them look like you spent all day in the kitchen.
That shiny, professional coating. We’re adding a tiny bit of coconut oil to the chocolate. Game changer. It makes the chocolate smooth, glossy and gives you that satisfying snap when you bite into it.
The drizzle. This is totally optional, but oh my goodness, a little white chocolate drizzle makes these look bakery-level gorgeous. My mom actually asked me which chocolate shop I bought them from. (Best compliment ever.)
And if you want to go healthier? Dark chocolate works beautifully here – still tastes indulgent but with way less sugar than most Valentine’s treats.
Kids devour these. Adults feel fancy eating them. It’s a win all around.
Just 3–5 Simple Ingredients To Make Chocolate Covered Strawberry Hearts
I keep my pantry pretty simple out here, and I love that this recipe doesn’t need anything weird or hard to find.
What you absolutely need:
Fresh strawberries – Get the biggest, prettiest ones you can find. Smaller strawberries are harder to shape into hearts.
Chocolate – Dark, milk, or semi-sweet all work. I usually grab a couple of those chocolate baking bars from the baking aisle.
Coconut oil or butter – Just a tablespoon. This is what makes your chocolate coating smooth and shiny instead of dull and streaky.
Optional toppings (but so fun):
Sprinkles – the Valentine’s Day ones with little hearts are adorable
Crushed almonds or pistachios
White chocolate for drizzling
A tiny pinch of sea salt if you’re feeling fancy
Budget hack: Store-brand chocolate works just as well as the expensive stuff for this. Save your money!
Vegan friends: Use dairy-free chocolate chips and coconut oil instead of butter. They turn out just as beautiful.
Step-by-Step Instructions On Chocolate Covered Strawberry Hearts
Alright, this is the part everyone asks me about. How do you actually turn a strawberry into a heart?
It’s easier than you think, I promise.
Step 1: Pick your strawberries carefully
Look for berries that are larger and have that classic strawberry shape – wider at the top, pointier at the bottom. Those work best.
Step 2: Wash and dry them REALLY well.
This is important! Any water left on the strawberries will make the chocolate seize up and get grainy. I wash them, then pat them completely dry with paper towels. Sometimes I even let them air dry for a few minutes.
Step 3: The cutting
Keep the green top on – that’s your handle. Now, take a sharp knife and make a V-shaped cut right at the top of the strawberry, just below the leaves.
You’re removing a small triangle from the top. When you do this, the top of the strawberry suddenly looks like the top of a heart with that little dip in the middle.
Step 4: Secure the tip
If the bottom of your strawberry is really pointy and you want more of a heart shape, you can carefully slice just a tiny bit off the very tip to make it more rounded. But honestly? This is optional.
Step 5: Quick freeze.
Pop your shaped strawberries in the freezer for 10–15 minutes before dipping. This does two things: it keeps them nice and cold (which feels amazing when you eat them), and it helps the chocolate set up faster and stick better.
Pro tip: Don’t freeze them too long or they’ll get mushy when they thaw. We’re talking 10–15 minutes, max.
Getting That Perfect Chocolate Coating (So Smooth & Glossy)
The chocolate is where people sometimes get nervous, but I’m going to walk you through this like we’re doing it together in my kitchen.
Method 1: Microwave (my go-to)
Put your chocolate and about 1 tablespoon of coconut oil in a microwave-safe bowl. Microwave for 30 seconds, stir, then do another 30 seconds, stir again.
Keep going in short bursts until it’s almost completely melted, then just stir until it’s smooth. The residual heat will melt any remaining chunks.
Why short bursts? Because chocolate can go from perfect to burnt and seized in like 10 seconds. Don’t ask me how I know this.
Method 2: Double boiler (if you’re feeling fancy)
Put an inch of water in a pot and bring it to a simmer. Place a heat-safe bowl on top (it shouldn’t touch the water). Add your chocolate and coconut oil, stirring constantly until smooth.
The perfect temperature: The chocolate should be warm but not hot. If it’s too hot, it’ll slide right off your strawberries. If it’s too cool, it’ll be thick and clumpy. I usually let it cool for about 2 minutes after melting.
Dipping technique: Hold the strawberry by its green top and dip it at an angle, swirling slightly to coat it evenly. Let the excess chocolate drip back into the bowl. Don’t worry about getting it perfect – rustic and homemade is part of the charm!
The placement: Line a baking sheet with parchment paper (not wax paper – the chocolate can stick to that). Gently place each dipped strawberry on the parchment. If your chocolate is the right temperature, it should hold its shape nicely.
Bakery-Style Chocolate Covered Strawberry Hearts You Can Make at Home
Baking sheet – Any size works, just needs to fit in your fridge
Parchment paper– Don’t use wax paper! The chocolate can stick to it. Parchment is the way to go.
Paper towels– For drying those strawberries really well
Optional but helpful:
Small ziplock bags – For drizzling white chocolate or piping messages. The sandwich-size bags work perfectly.
Toothpicks – If you want to make marble designs by swirling chocolate
Cupcake liners – For pretty presentation or gifting
Fork or dipping tool – Some people like these for dipping, but honestly? I just use my fingers to hold the strawberry tops.
That’s it! No fancy equipment, no special gadgets. Just simple kitchen basics.
Making These Chocolate Covered Strawberry Hearts Pinterest-Pretty (Decorating Ideas)
This is where you can really have fun and make these your own!
White chocolate drizzle – Melt a handful of white chocolate chips the same way, put it in a ziplock bag, snip off a tiny corner, and drizzle it back and forth over your strawberries. Instant elegance.
Sprinkle situation – Add sprinkles while the chocolate is still wet. Those Valentine’s sprinkles with the little hearts and pink/red colors? Chef’s kiss.
Gold dust – If you’re making these for something fancy (anniversary, maybe?), a tiny brush of edible gold dust makes them look like jewelry.
Message piping – Use melted chocolate in that ziplock bag trick to write little messages. “XO,” a heart, someone’s initial… so cute for gifting.
Nut-crusted edges – Dip your chocolate-covered strawberry into finely chopped almonds or pistachios on one side. Adds amazing crunch.
Marble effect – Drizzle a different color chocolate (like white on dark, or dark on milk) and swirl with a toothpick before it sets. Looks so professional!
Honestly, even if you just leave them plain, they’re beautiful. But decorating them is half the fun, especially if you’ve got kids helping.
Gifting These Like a Total Sweetheart
I’ve given these as gifts more times than I can count, and people are always so touched.
Simple presentation ideas:
Put them on a pretty dessert platter with some fresh berries and flowers scattered around. Instant centerpiece for a Valentine’s dinner.
The cupcake liner trick – Place each strawberry in a mini cupcake liner, then arrange them in a box. Looks like something from a chocolate shop.
Clear boxes – You can grab small clear boxes from craft stores. Line them with tissue paper, nestle your strawberries inside, and tie with a ribbon. I’ve made these for teachers, mail carriers, neighbors… everyone loves them.
With a handwritten note – “Made with love” or “You’re berry special” (yes, I went there) written on a little card makes it extra meaningful.
Valentine’s dessert board – Arrange these alongside some cookies, brownie bites, and maybe some cheese and crackers. It’s become my go-to for Valentine’s parties.
One time, I made a batch for my husband’s coworkers, and he said three different people asked for the recipe. That’s when I knew I had to share this with more people!
The Healthier Version (Because Balance, Right?)
Look, I’m all about treats, but sometimes you want something that feels a little lighter.
My under-100-calorie version: Use dark chocolate (70% cacao or higher) and skip the drizzle and toppings. Each strawberry comes out to about 60–80 calories, but still feels like a total indulgence.
Keto-friendly: Use sugar-free dark chocolate. Lily’s brand makes a great one that melts beautifully. Add a little extra coconut oil to help it stay smooth.
Vegan: Dairy-free chocolate chips and coconut oil. That’s it! They turn out exactly the same.
Watching sugar: Dark chocolate naturally has less sugar, and strawberries are already naturally sweet, so you’re not getting that sugar overload you’d get from, say, a cupcake or candy.
I actually feel pretty good eating a few of these after dinner instead of reaching for ice cream. They satisfy that chocolate craving without leaving you feeling heavy.
Keeping Them Fresh & Beautiful (Storage Tips)
How long do they last? In the fridge, these stay perfect for about 2–3 days. The strawberries stay juicy, the chocolate stays crisp. After that, the strawberries start releasing moisture, and things can get a little weepy.
Can you freeze them? Technically, yes, but I don’t recommend it. Frozen strawberries get mushy when they thaw, and the chocolate can develop condensation. These are really best enjoyed fresh or within a couple of days of making.
Keeping that chocolate shiny: Store them in a single layer if possible, and don’t stack them. Keep them in an airtight container in the fridge. The cold keeps the chocolate nice and snappy.
Preventing sweating: When you take them out of the fridge, let them sit for just 5 minutes before serving. This prevents that condensation that can form when cold chocolate meets warm air.
Make-ahead tip: You can definitely make these the night before you need them. Sometimes I think they taste even better after sitting in the fridge overnight – the flavors meld together beautifully.
The Mistakes I Made (So You Don’t Have To!)
Let me save you from the little disasters I’ve had along the way:
Chocolate seizing – This happens when even a tiny bit of water gets in your chocolate. It turns grainy and clumpy and basically unusable. Make sure your strawberries are bone dry, and don’t let any steam from your double boiler get in there.
Watery strawberries – If your strawberries aren’t completely dry, the chocolate won’t stick properly. Pat them dry, people! I know I sound like a broken record, but this is the most common mistake.
Chocolate sliding off – This means your chocolate was too warm when you dipped. Let it cool a bit more before dipping.
Hearts losing shape – If you freeze them too long, they can get soft and mushy. Stick to that 10–15 minute freezer time.
Dull, streaky chocolate – You forgot the coconut oil! Or your chocolate got too hot. That little bit of fat makes all the difference in getting that glossy, professional finish.
I’ve done every single one of these. Learn from my mistakes, and your first batch will be gorgeous!
When to Make These (All the Best Occasions)
Obviously, these are perfect for Valentine’s Day – that’s when I make them most often. But honestly? They’re appropriate for so many moments:
Anniversary – Way more thoughtful than grabbing a box of store-bought chocolates, and you can make them together!
Bridal showers – I made pink-and-white decorated ones for my cousin’s shower last year. They disappeared in minutes.
Kids’ parties – They’re healthier than most party treats, and kids think they’re so fancy. Plus, no mess of cutting cake!
Galentine’s Day – My girlfriends and I have a February tradition of getting together, and I always bring these. They photograph beautifully for everyone’s Instagram stories, which makes everyone happy.
Self-care nights – Sometimes you just need to make something pretty for yourself. Pour a glass of wine, make a batch of these, and watch your favorite show. Perfect evening.
Any random Tuesday – Who says you need an occasion? Make them just because. Life’s short. Eat the chocolate strawberries.
More Sweet Treats You’ll Love
If you’re on a Valentine’s dessert kick (and honestly, who isn’t in February?), here are some other recipes that pair beautifully with these:
No-Bake Strawberry Cheesecake Cups – Individual portions, super creamy, and you can make them ahead
Frozen Yogurt Bark – Topped with berries and dark chocolate, perfect for a lighter treat
Raspberry Cheesecake Bites – Bite-sized, no-bake, and totally adorable
Healthy Valentine Truffles – Made with dates and nuts, but taste like fancy chocolate
Sometimes I make a whole Valentine’s dessert spread with a couple of these recipes. It’s fun to have variety, and people love having options!
Frequently Asked Questions About Chocolate Covered Strawberry Hearts
Can I make these the night before?
Absolutely! In fact, I usually do. They set up perfectly in the fridge overnight and are ready to go when you need them.
Which chocolate works best?
Honestly, use what you like to eat! Dark chocolate gives you that sophisticated, less-sweet taste. Milk chocolate is classic and crowd-pleasing. Semi-sweet is right in the middle. I’ve had success with all of them.
How do I stop chocolate from cracking?
Make sure you’re not putting frozen strawberries directly into warm chocolate (that temperature shock can cause cracking). Also, add that coconut oil – it keeps the chocolate more flexible.
Can I use frozen strawberries?
Not really, unfortunately. Frozen strawberries are too soft and watery when thawed. You need fresh berries for this to work properly.
How long do they stay fresh?
They’re best within 2–3 days in the fridge. After that, the strawberries start breaking down and releasing moisture.
My Sweet Note to You 💖
I hope you try these chocolate-covered strawberry hearts. Whether you’re making them for someone special, with someone special, or just for yourself (which is equally important!), there’s something really joyful about creating something beautiful with your hands.
Last Valentine’s Day, my daughter and I made a batch together. She’s seven, and she took the job of adding sprinkles very seriously. We laughed, we got chocolate on our aprons, and at the end, we had this tray of slightly imperfect but absolutely lovely strawberries.
She asked if we could make them “not just for Valentine’s, Mom, but for regular days too.”
And you know what? She’s right. These little moments of sweetness – both literally and figuratively – don’t need a special occasion.
Do check out my 10 Irresistible 3-Ingredient Chocolate Treats Anyone Can Make, Simple & Quick!!
Printable Recipe Card
Want just the essential recipe details without scrolling through the article? Get our printable recipe card with just the ingredients and instructions.
Disclosure: This post may contain affiliate links.
If you make a purchase through these links, I may earn
a small commission at no extra cost to you.
prab chahal
Hi, I’m Prabjot Chahal – the heart (and taste buds) behind this blog!
Food has always been my love language – from experimenting with family recipes to discovering unique flavors from around the world. I believe that cooking isn’t just about following a recipe, it’s about creating moments, sharing stories, and connecting with others over something delicious. Through this blog, I want to build a vibrant food community where we share more than just recipes – we share inspiration, tips, and the joy of making and enjoying good food together. Whether you’re here for quick weekday dinners, festive treats, or creative seasonal ideas, you’re part of this table. So grab a fork (or a whisk!) and let’s cook, bake, and share our love for food – one recipe at a time.


")
")