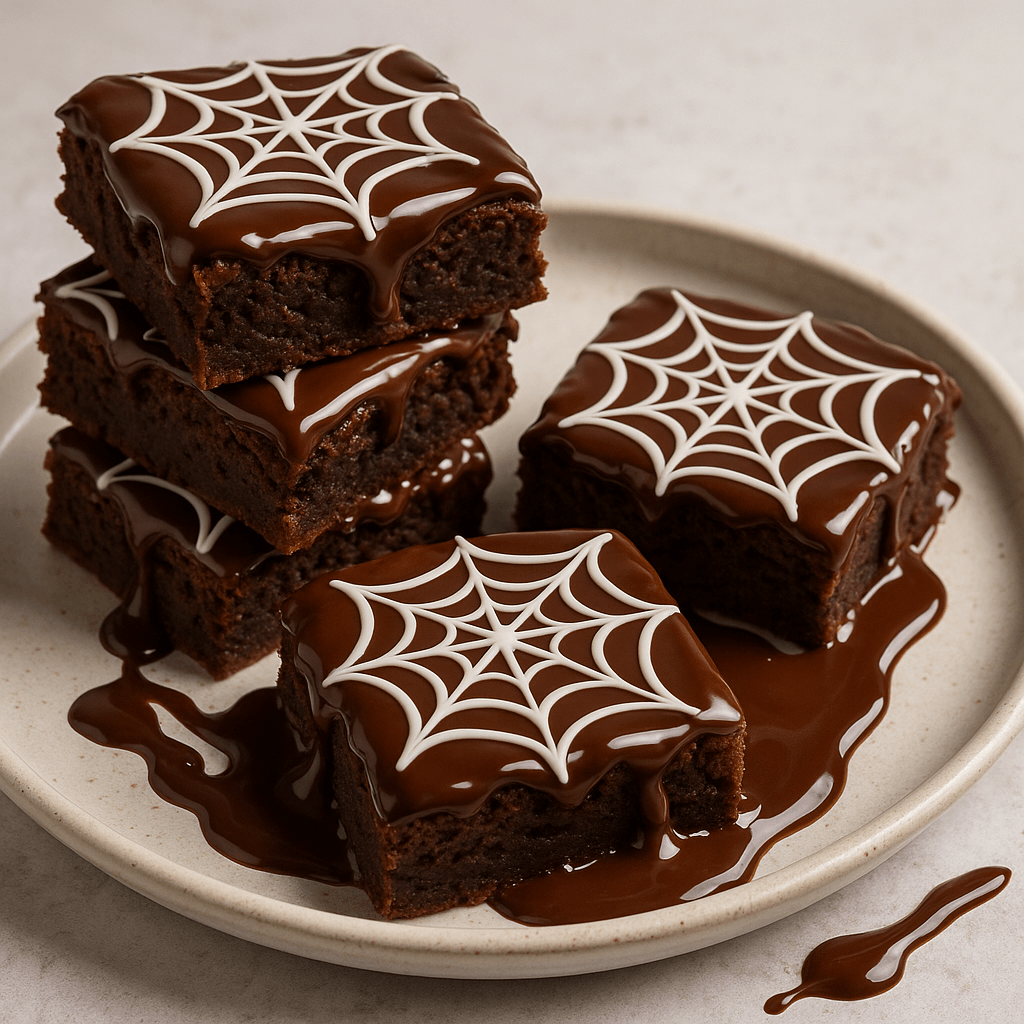
Halloween isn’t just about scary houses, pumpkins, and costumes. It’s also about tasty food that makes everyone happy. Spiderweb Brownies are the perfect dessert if you want something scary and tasty. Think of fudgy chocolate brownies with a simple but beautiful spiderweb design made from melted white chocolate on top. Not only do they taste great, but they also add a fun touch to your Halloween party table.
But what’s the best part about this? You don’t have to be a pro at baking or decorating cakes to do this. You can make brownies that look like they came from a Pinterest board with just a few common ingredients and some imagination. These brownies are sure to make everyone smile, want seconds, and say “oooohs and ahhhhs” whether you’re making them for a kids’ Halloween party, a work potluck, or just for family movie night with scary movies.
Let’s get started. I’ll show you the ingredients, simple steps, expert tips, and serving ideas you need to make perfect Spiderweb Brownies this Halloween.
What Are Spiderweb Brownies?
Spiderweb brownies are simply classic brownies decorated with a spiderweb design for a festive Halloween twist. The base can be as simple as a boxed brownie mix (perfect if you’re short on time) or a homemade fudgy brownie recipe. Once baked, melted white chocolate is piped or drizzled in a spiral, and then a toothpick is gently dragged through the chocolate to create an eye‑catching spiderweb design.
It’s a simple technique, but it makes your dessert instantly themed and party‑ready. Think of them as the glamorous cousins of regular brownies — same rich, gooey chocolate inside, but with a spooky, Instagram‑worthy makeover.
Preheat your oven to 350°F (175°C). Line a 9×13-inch baking pan with parchment paper (leave an overhang on two sides so you can lift the brownies out easily). Lightly grease the parchment/sides.
Combine wet ingredients
In a medium saucepan or microwave-safe bowl, melt 1 cup (2 sticks) butter until liquid.
Stir in 2 cups sugar until mostly combined.
Let it cool for a minute, then whisk in 4 large eggs one at a time, then 2 tsp vanilla extract until smooth.
Mix cocoa & flour
In a separate bowl, sift (or whisk) together 1 cup all-purpose flour, 1 cup unsweetened cocoa powder, ½ tsp baking powder, and ½ tsp salt.
Sifting helps remove lumps in the cocoa.
Combine wet + dry
Fold the dry mix into the wet mixture gently until just combined.
Don’t overmix — you want fudgy brownies. The batter will be thick and glossy.
Baking
Pour batter into your prepared pan and smooth the top. Bake 25–30 minutes at 350°F.
Start checking at 22 minutes — a toothpick inserted near the center should come out with a few moist crumbs (not raw batter).
For fudgier brownies, err on the shorter side.
Cool fully
Remove from oven and let the pan cool on a wire rack until completely cool. Cooling fully is important — the white chocolate web will melt if the brownies are warm.
Prepare white chocolate for the web
Put ½ cup white chocolate chips (or candy melts) + 1 tsp vegetable oil in a microwave-safe bowl.
Microwave in 20–30 second bursts, stirring between each, until smooth. (Or melt in a double boiler.)
Transfer the melted white chocolate to a small piping bag, squeeze bottle, or a zip-top bag and snip a tiny corner.
Pipe concentric circles
Lift the cooled brownie slab from the pan using the parchment. Pipe concentric circles of white chocolate across the surface — start with a small dollop in the center, then circle around it in rings (spacing about 1–1.5 cm).
Make the web
Use a toothpick or skewer: starting at the center, drag the tip straight outward to the edge to create spokes — repeat every 1–1.5 cm all the way around (about 8–12 spokes). Clean the toothpick if it gets messy.
The concentric rings + outward drags automatically form the spiderweb pattern.
Set the topping
Let the white chocolate set at room temperature or pop the brownies in the fridge for 10–15 minutes to firm the web.
Optional — make chocolate spiders
Melt a little dark chocolate, pipe a small teardrop for the body and a smaller dot for the head, then add 6 thin legs with a toothpick.
Place a few spiders on the web for extra creep factor.
Cut & serve
Use the parchment overhang to lift the slab out and slice into squares with a sharp knife (wipe the knife between cuts for clean edges).
Storage
Store in an airtight container at room temp for up to 3 days, or refrigerate for up to 5 days.
You can freeze cut brownies for up to 2 months — thaw to room temp before serving.
Video
Tips for Making the Perfect Spiderweb Brownies
1. Use good-quality ingredients
The chocolate you use makes your brownies taste better. Choose a good cocoa powder mix and use real vanilla extract instead of imitation vanilla for a stronger flavor.
2. Don’t mix the batter too much
Brownies can get tough and cake-like if you mix them too much. Stop stirring when the ingredients are just mixed together. This guarantees fudgy results.
3. Use a Toothpick to Test Doneness
When the crumbs stick to the toothpick, take them out. Brownies will be dry if you bake them too long, so it’s better to bake them a little less.
4. Let the Brownies Cool Before Adding the Spiderweb Design
The white chocolate will melt into the brownie surface if you decorate them while they are still hot. Cooling keeps your design sharp and pretty.
How to Serve and Store Spiderweb Brownies
1. Microwave
Warm, fudgy brownies with vanilla ice cream on top are the best. Add orange sprinkles or gummy spiders on top to make it more Halloween-like.
Store brownies in a sealed container at room temperature for 2–3 days to keep them fresh.
3. Freeze for Long-term Storage
Want to get ready ahead of time? You can freeze the brownies (without icing) for up to two months after baking, cooling, and cutting them. Once it’s thawed, decorate.
Why You’ll Love Spiderweb Brownies
They’re simple enough for beginners to do, but they look like pros.
Great for Halloween parties, bake sales, or scary movie nights.
Kids love to help make the spiderweb (messy fingers are fine!).
You can change the look of the web by using peanut butter chips, dark chocolate drizzle, or even colorful candy melts.
Frequently Asked Questions (FAQs)
1. Is it okay to use whole wheat or almond flour instead of some of the all-purpose flour?
Yes, you can use whole wheat flour (for a nuttier texture) or almond flour (to cut down on gluten) to replace up to 25–30% of the flour. Be careful: if you change too many things, the brownies might become dense or fall apart.
2. How can I tell when the brownies are done? They shouldn’t be too dry or too soft.
Put a toothpick or cake tester in the middle. It should come out with a few moist crumbs, not wet batter. The edges should also be just set, and the center should be a little jiggly (it will keep cooking from the heat that is left over).
3. Is it possible to make this recipe without dairy or meat? What should I switch?
Yes, of course. Instead of butter, use plant-based butter or coconut oil. Instead of eggs, use flax or chia “eggs” (for example, 1 tbsp ground flaxseed + 3 tbsp water = 1 egg). You can also use cocoa powder or vegan chocolate.
4. How do I keep brownies fresh and moist after I’ve eaten them?
You can keep them at room temperature for 2–3 days by wrapping them tightly in plastic wrap or putting them in an airtight container. Put it in the fridge for 3 to 4 days or in the freezer for up to 2 months to keep it longer. Before serving, thaw.
5. Can I make these brownies in advance for a party or get-together?
Yes, you can bake them a day ahead of time. To get the best look and feel, let them cool to room temperature before serving, or gently reheat them in a low-heat oven (120–140 °C) for 5–10 minutes.
6. What are some things I can add to the mix or change the flavor?
Here are some thoughts:
Before baking, mix in peanut butter, Nutella, or salted caramel.
Add some chopped nuts, like walnuts, pecans, or hazelnuts.
Add chocolate chips, white chocolate chunks, or dried fruit and mix.
To make the chocolate flavor stronger, add a little bit of espresso powder or instant coffee.
Right before baking, add some sea salt on top.
7. Is it possible to turn this into brownie bars or cookies instead?
Yes, if you want cookie-style, scoop out smaller amounts and bake them at a higher temperature (about 10 °C) for a shorter time. For bar-style, spread the batter into a bigger, shallower pan and change the baking time as needed (by about 10 to 15 minutes).
8. Why did my brownies turn out too crumbly or too cake-like, and how can I fix this?
Some common reasons are:
Overmixing the batter makes gluten.
Using too much flour or not enough fat
Baking for too long or at too high a temperature To fix this, measure carefully, mix just until everything is combined, and either lower the temperature or bake for a shorter amount of time next time.
Final Thoughts
Spiderweb Brownies are more than just a recipe; they’re a Halloween tradition just waiting to happen. They have fudgy centers, chocolate on chocolate goodness, and a web design that is both creepy and cute. They are sure to be the best part of your spooky spread.
Baking with family, laughing as you drag toothpicks through melted chocolate, or serving them at a costume party where everyone is secretly hoping there will be dessert are all simple things that can make memories.
Don’t worry about hard-to-make cakes or expensive baked goods this Halloween.
“I’ve also come across a 3-ingredient brownie recipe — the perfect choice if you’re looking for an easy, fuss-free version that still tastes amazing!”
Printable Recipe Card
Want just the essential recipe details without scrolling through the article? Get our printable recipe card with just the ingredients and instructions.
Disclosure: This post may contain affiliate links.
If you make a purchase through these links, I may earn
a small commission at no extra cost to you.
prab chahal
Hi, I’m Prabjot Chahal – the heart (and taste buds) behind this blog!
Food has always been my love language – from experimenting with family recipes to discovering unique flavors from around the world. I believe that cooking isn’t just about following a recipe, it’s about creating moments, sharing stories, and connecting with others over something delicious. Through this blog, I want to build a vibrant food community where we share more than just recipes – we share inspiration, tips, and the joy of making and enjoying good food together. Whether you’re here for quick weekday dinners, festive treats, or creative seasonal ideas, you’re part of this table. So grab a fork (or a whisk!) and let’s cook, bake, and share our love for food – one recipe at a time.


")